Container shipping is a common mode of transportation. In fact, 80% of international merchandise trade is carried out by sea. Containers are large and reliable, offering a standard size that makes them portable between ships, trains and trucks.
However, the loss of items transported in containers is not an uncommon problem in the shipping industry. The good news is that you can track shipped items using a simple electronic solution.
In this project, we will design an Arduino based electronic tracking system for container shipments. This embedded circuit uses Arduino, LDR and IR sensors and a real-time clock. The system works by tracking each time a container is opened and items are removed from it. By tracking these factors, it is easy to detect when items in the container have been moved and potentially misplaced or stolen.
Required components
1. Arduino UNO x1
2. LDR sensor x1
3. DS1307 RTC x1
4. IR Sensors x2
5. Test board x1
6. Connecting wires or jumper
Circuit Connections
To track the exact moment a container is opened and items shipped from it are removed, we will need a few devices.
- To control time, a real-time clock – the DS1307 is interfaced with Arduino.
- To detect whether a container is open, an LDR sensor is also interfaced with the Arduino.
- To detect the movement of shipped items, a pair of IR sensors is required.
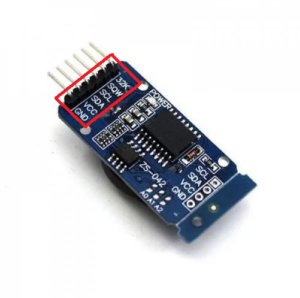
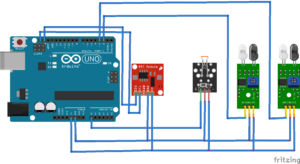
See how it works. The RTC DS1307 has six terminals: 32K, SQW, SCL, SDA, VCC and GND. It interfaces with Arduino using the I2C interface . The VCC and GND pins of the DS1307 are connected to the 5V power and ground pins of the Arduino respectively.

The SCL and SDA pins of the RTC module are connected to one of the I2C ports of the Arduino UNO.

The LDR sensor has three terminals: VCC, GND and OUTPUT. VCC and ground are connected to the 5V DC and ground of the Arduino. The OUTPUT pin of the LDR is connected to the Arduino UNO analog input pin A0.
IR sensors have three terminals: VCC, GND and OUT. The VCC and GND pins are connected to the Arduino's 5V DC and ground. The OUT terminals of the IR sensors are connected to Arduino digital I/O pins 2 and 3 respectively.
Circuit Diagram
Arduino 1 Sketch
Arduino Sketch 2
How it works
To begin, set the current time using the DS1307 real-time clock and start the clock using Arduino sketch 1. Once the RTC starts, it keeps the time – as long as it remains powered by a coin cell battery.
Then the RTC is ready to interact with the shipment tracking system and can be installed inside the container. The LDR sensor uses light to observe whenever the container is opened (otherwise it is dark inside).
The sensor's analog output increases in response to incident light and can be calibrated to output a certain voltage into the light. Its analog output voltage remains low in the dark due to increased resistance.
To do this, the LDR sensor is adjusted in the circuit using the built-in potentiometer to provide a zero analog reading in the dark and a reading above 700 in the light. When the container is opened, the sensor's analog output increases. If it exceeds 100, the current time is read from the RTC module and a message stating this time is sent serially. This message may also be stored on an SD card or in a logging system.
There are two IR sensors connected in the circuit. The pair is installed at the entrance of the container. When a shipment is removed from the container, the IR 1 sensor detects the obstacle in its path. Then, the IR 2 sensor also detects the obstacle in your path.
The Arduino is only programmed to react if the IR 2 sensor detects an obstacle after the IR 1 sensor. If this occurs, a message with the time of this movement is sent serially. This message may also be stored on an SD card or in a logging system.
The code
Arduino sketch 1 is used to save time in RTC module. It starts by importing the Wire and DS1307 library. Here is the library used in this project:
Link to DS1307 Zip library: DS1307
Here are the functions from sketch 1:
- A DS1307 object is initialized, called rtc.
- In the setup function, the baud rate for serial communication is set to 9600.
- The RTC module is initialized using the rtc.begin method.
- The current time is set in the RTC using the rtc.set method.
- RTC starts the clock using the rtc.start method.
- The current time is set in the RTC module, which continues to track it.
It is now ready to be used in the container's shipment tracking system. Arduino sketch 2 is then loaded into the Arduino UNO to run the system. The sketch starts by importing the Wire and DS1307 library.
Here are the functions from sketch 2:
- An object of type DS1307 is started and named rtc.
- Five variables of an 8-bit integer type are declared to store second, minute, hour, day and month.
- A 16-bit integer variable is declared to store the year.
- The pins that interface with the LDR and IR sensors are defined as constant.
- The getTimeStamp function is defined to receive the current time from the RTC module. This function starts by calling the rtc.get method to get the current time (in the second, minute, hour, day, month and year variables).
- The current time is sent to the serial port in the appropriate format with the appropriate strings filled in.
- The setup function calls two methods: Serial.begin to set the baud rate for serial communication to 9600 and rtc.begin to initialize the RTC module.
- The loop function tests the status of the LDR sensor. If the analog output of the LDR sensor is greater than 100, a message that the container is being opened is transmitted serially. It also confirms that IR sensor 2 is activated after IR sensor 1.
If IR sensor 2 is activated, a message stating that a shipped item is being removed from the container will be transmitted serially. (Since IR sensors have an active LOW signal, the sketch also checks their output for a logic LOW.)
Results


(tagsToTranslate)Arduino