The mechanical engineering industry is the production of parts and products with a specific shape, position and size and their equipment with the mechanical engineering industry. Mechanical engineering products can be used directly by people, but also by other industries to provide equipment for products. The company has a variety of mechanical engineering machines or products. Our life cannot be separated from the manufacturing industry, therefore the manufacturing industry is an important industry for the development of the national economy, an important basis for the development of a country or region and a strong pillar.
Threads are an indispensable basic component of mechanical design. Generally, wires are divided by type into triangular, trapezoidal, serrated, circular, rectangular arc, etc. According to the function, they can be divided into two categories: one is the connection thread and the other is the transmission thread. Screw nut transfer has a wide range of applications in many equipment, but the process and economics of screw nut processing are the main factor affecting the application of screw nuts. The finishing quality of its components has a direct impact on the transmission and stability of its parts, which directly affects the overall performance of the product. Therefore, ensuring the quality of your processing is the key to technology in parts processing.
This article mainly deals with tool design and machining process improvement of trapezoidal toothed nuts (called T-nuts). The content of this article is to solve the problems in nut production encountered in positioning, fixing and process control, as well as designing a special device to ensure the quality of parts processing.
1. Parts overview
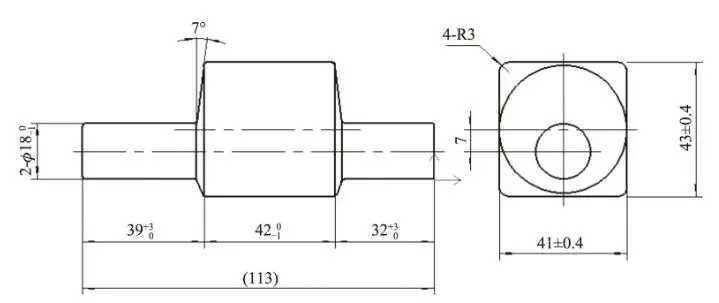
A company supports the production of various types of high voltage switch parts supporting the unit that has a class of transmission parts with T nuts. The T nut is machined into the part and the screw is compatible with the T threads transmitting torque by rotating the screw, as shown in Figure 1. To achieve precision of part movement, the transmission of large torque inevitably requires a high degree of precision and roughness of the screw and nut threads, as large quantities need to be used, so that the nut machining process and improving efficiency towards technical research.

Figure.1 Three-dimensional image of part drawings and finished parts
For T-bolts with nuts, the material is generally made of carbon steel or alloy steel to ensure the strength of the structure. Screws are made from softer, more wear-resistant materials such as nodular cast iron or tin bronze. Due to the requirements of the parts structure and transmission requirements, QAL10-3-1.5 solution annealed aluminum bronze is chosen.
2. T-nut machining process
Due to the technical requirements of the cross-sectional shape of the nut to the square and the ends of the two external coaxial connectors of Φ13mm, which is less than 0.05mm, the parts of the process steps are: ① under the material (rod); ② Heat treatment; ③ Milling (shape); ④ Turning (external and thread machining), in the warehouse.
2.1 Thread processing check
Thread machining processes mainly include turning, milling, thread cutting, hexagonal socket and turning, etc., while nut machining in M16 below uses thread cutting. This method is more efficient, and one company's T-nut specifications for Tr25×6 did not produce a tap shape for the general cutter type through preliminary understanding of this tap type due to large diameter machining and high tool load. beating cut. After repeated market research, there is generally no such general-purpose standard tap for this trapezoidal thread due to the large processing load during machining.
According to the structure of the broaching tool, as shown in Figure 2, the broaching tool has multiple rows of teeth, with the size and shape of the rows of teeth increasing and changing from cutting edge to cutting edge. When the broaching tool makes a broaching movement, each tooth cuts a certain thickness of metal from the workpiece and finally obtains the required size and shape. Therefore, after contacting and confirming several times with the tool manufacturer, we developed a tap with a longer cutting edge.

Fig.2 Schematic representation of a standard brooch
The main difficulty in designing and manufacturing satisfactory taps for trapezoidal threads is that the tap must remove a large amount of metal from the hole to form the thread. When cutting, the torsional tension of the tap is very large. If the design, manufacturing and application methods are not completely correct, the faucet can easily break.
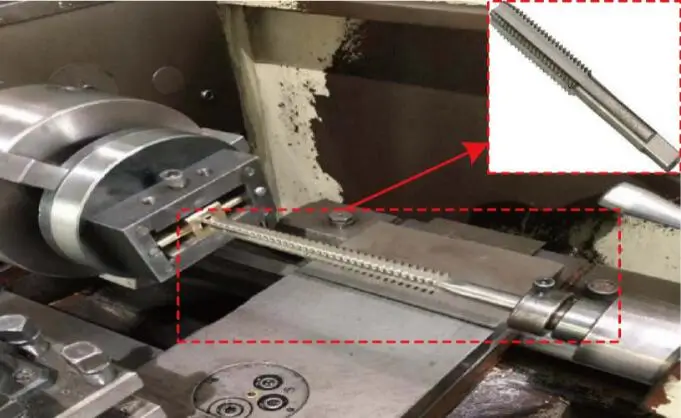
Therefore, the first design step is to determine the allowable cutting depth per tooth of 0.3 mm based on the part thickness of 38 mm. The second step is to ensure the thread quality according to the workpiece material and processing characteristics on the common lathe. To do this, the guide part of the cone tap is lengthened and the diameter of the tapered channel is increased. Practice has shown that taper lengthening can solve thread cutting corrections and solve quality problems in Tr25×6 thread processing. In addition, the number of taps caused by taper processing is reduced and the number of taps caused by cone processing is reduced. Reduce and minimize disadvantages caused by machining tap wear and cutting edge fragmentation. An improved extension tap can process more than 2,000 parts at a time, improving tap life (see Figure 3). This special long cutting tap allows the part to be roughed, finished and finished in a single pass, maintaining stable quality, which to a certain extent saves the company a series of costs.

Fig.3 Photo of the male and original photo of the machining
2.2 Checking the nut turning process
In the turning process, the workpiece is first processed on an ordinary lathe, and a special device is designed according to the shape of the workpiece. The process is divided into four steps:
Work step ①, work step 2: Each time the 38 x 40 part shape (see Figure 4) is used as approximate reference positioning, the tools for the eccentric structure are prepared, the two ends of the faces are rotated to ensure that the length of the partially true to size, A2.5mm holes are drilled in the middle of both ends and an outer circle is machined to Φ13mm. There is a margin of 0.5 mm left. The center of the 38mm dimensions is machined to 380-0.1-0.10.

Figure 4 Working step ①, working step ② Clamping device positioning cross section
Step ③: When machining Tr25×6 threads, use size 380-0.1-0.10 for machining to ensure better consistency. The lower end surface of 40 was not changed in the first two steps. Therefore, use 380-0.1-0.10×40 to locate the machining, drill and boring the threaded holes, and tap to ensure that the position degree of the threaded holes of Tr25×6 is in the correct position (see Figure 5 ).

Fig.5 Working step ③ Cross section of workpiece clamping and positioning
Working step ④: Due to working step ① and working step 2, when positioning the reference points A and B of the tools are fixed (see Figure 6), and due to the coaxiality requirements of part 2 – outer circle with Φ13 mm – the two upper parts of the path to machine the outer Circle machined with Φ13 mm to ensure coaxiality requirements.

Fig.6 Working step ① Working step and ② with tool
Through process testing, small batch machining, etc., machining of parts is carried out on common equipment using the above methods to ensure that the machined part meets technical design requirements and achieves high cutting performance.
3. Improve T nut machining
With the increasing use of parts year after year and the continuous introduction of CNC equipment, the original problems with the technology and efficiency of ordinary lathe machining are overcome, the machining efficiency of nuts is improved, and the machining of CNC machine tools becomes a secondary problem – resolution technology.
During the entire optimization process for process demonstration, in order to save material costs with the raw material unchanged, the bottom feed processing technology is optimized again and the bar is changed to the billet forging process (see Figure 7). After checking whether the strength of the forging process is higher than that of the original bar, it not only reduces the cost of raw materials (saving more than 70 yuan per piece), but also reduces processing time.

Figure.7 Blank forging
The parts of the new process steps are optimized as follows: ① Material; ② forging; ③ Heat treatment; ④ Milling (modeling); ⑤ Turning (CNC turning and thread machining), storage. The improvements in CNC turning are explained below:
3.1 Machining of a 2-Φ13mm outer circle
As mentioned previously in general lathe machining, due to the positioning of the workpiece clamping reference points A and B in step ④ (see Figure 6) and the coaxiality requirements of the workpiece outer circle 2 (Φ13mm), the clamping clearance of the common lathe cannot be eliminated. Therefore, it is necessary to increase the finishing step ④ and use the two-point method to machine the outer circle of Φ13mm to ensure the coaxiality requirements.
After analysis and demonstration, process improvements and optimizations are carried out on the CNC lathe:
- 1) The clamping accuracy of an ordinary lathe chuck is low. In contrast, the hydraulic chuck has no backlash, allowing the soft jaw characteristics of CNC machine tools to be utilized with consistent, repeatable positioning accuracy.
- 2) The workpiece (see Figure 7) has been optimized. Requirements for the positioning of the clamping tool hole and the outer circle, the two end faces ensure that the shape and position tolerance (position, parallelism, perpendicularity) is less than 0.02 mm.
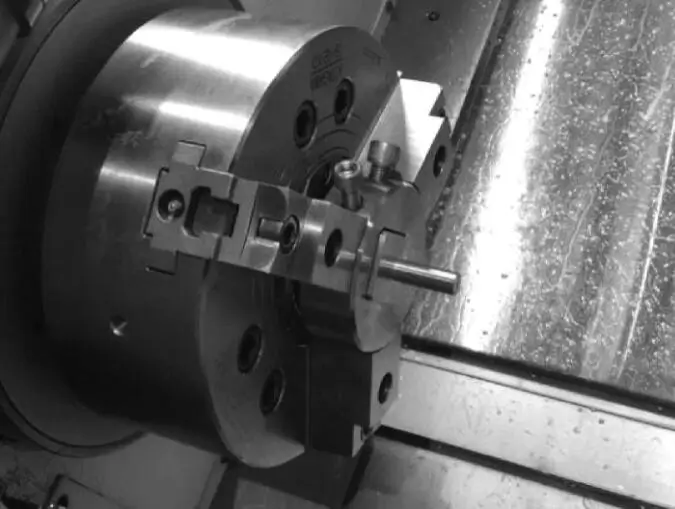
- 3) The parts are manually fixed to the workpiece by compressing the workpiece using two screws. The soft jaw of the hydraulic chuck allows the table jaw to be positioned quickly, clamping parts at the same time after turning, regardless of the part. Regardless of positive and negative clamping, the special jaw of the hydraulic chuck of the CNC lathe spindle (see Figure 8) is used to allow machining of parts with a center line of 2 – Φ13 mm. The spindle centerline completely overlaps. The soft claw on the step surface can also ensure the consistency of the length of the part. The stepped surface on the soft jaws also ensures consistent part length.
- 4) In the machining process, the process reference is the outer circle of the clamped workpiece, and the fine reference is consistent with it, which ensures accurate positioning, reliable clamping, easy clamping and convenient operation of the machining process.
This CNC lathe improves the outer circle process. The soft claw can maximize the fit to the workpiece surface to ensure the precision of the clamping guide. This transmits greater torque and guarantees better machining speed and surface quality. This greatly improves productivity and meets the target of mass production.

Fig. 8 Drawing of the hydraulic chuck, tool and parts
3.2 Thread machining
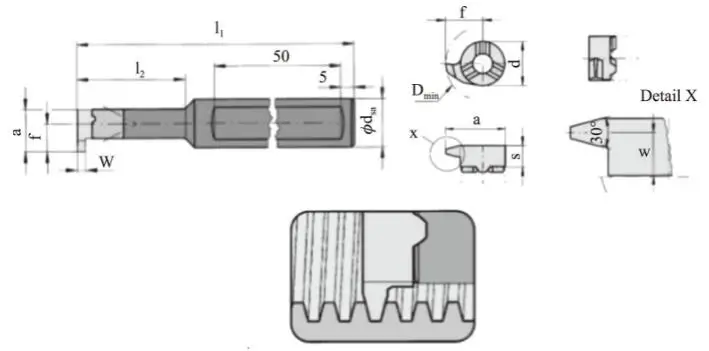
In CNC lathes, due to the use of ball screws and high-precision equipment and machining of taps with large threads (Tr25 × 6), the precision of the machine tool is reduced and damage occurs. To improve labor productivity, it is necessary to select T-shaped threads for CNC lathe turning tools (see Figure 9). Therefore, the selection of the tool is an improvement over the other highlights.
Generally, T-slot internal thread tools are ground manually. For threads with a smaller diameter, grinding the tool during the production process is more difficult. After a continuous search, a replaceable carbide insert for parts from a company was found. This insert has stable geometric parameters (no grinding) and accurate positioning after replacement, which reduces tool sharpening costs and improves cutting performance. It has been confirmed that this tool can be used to machine T-slot threads.

Fig. 9 T-tapping tool


