For Large Flange and Large Cross Section Difference in Forging Parts on the Motor Side of the Shaft Analyzed the Disadvantages of the Whole Open Forging Process, Studying the Forging Mold Mechanism and the Forging Process, Using a Combination of Die Forging tire + open forging to obtain better forging flow, improving the utilization of raw materials and avoiding the forging defects caused by open forging; reasonable choice of Metal Material The process control parameters of thermal processing and forging production inspection are excellent.
1. Development of main technical indicators
Metallurgical rolling equipment with drive motor rotor for three-piece shaft structure, two side shafts and a hollow shaft through a large pin connection to transmit torque, motor speed 45-100 rpm, power 6500 kW, Rated speed working conditions, side shaft requirements can be 2. Can withstand 5x overload. Forging materials for side shafts are generally European standard C55E or Japanese standard SF590; the composition meets the national standard steel 55# and the main chemical compositions: C is 0.52% – 0.60%; Si ≤ 0.40%; Mn is 0.50% – 0.80%; the requirements for standardized performance: yield strength ≥ 300 MPa, tensile strength ≥ 620 MPa.
Side shaft forgings are shown in Figure 1; the maximum cross-section size is Φ2200mm × 315mm, the small shaft diameter is Φ750mm, the total length is 2160mm, and the forgings belong to the large transverse flanges with different T-shaped short shanks. Its main technical indexes:
- (1) Normalizing and tempering process after forging to ensure the mechanical properties required to realize the tangential and longitudinal mechanical properties at both ends;
- (2) The requirements for ultrasonic flaw detection must meet an initial sensitivity of Φ1.6 mm. The presence of defects with an equivalent diameter ≥ 3.0 mm is not permitted, nor is the attenuation of the lower wave ≥ 3 dB permitted.
- (3) The angle R of the joint between the flange and the shaft diameter is an area of high stress concentration. Figure 2 shows the distribution of equivalent stresses under the numerical simulation of the maximum load. Reduce the machining margin as much as possible for large R-angle positions to maintain the continuity of the forging's fiber flow line and extend the life of the forging.
2. Analysis of the forging process
2.1 Analysis of the free forging process
Adopting traditional open forging process: disturbance → drawing length, manufacturing difficulties and quality risk. 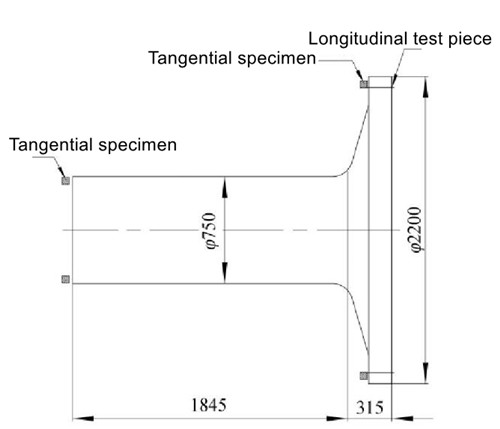
Figure.1 Side shaft forgings 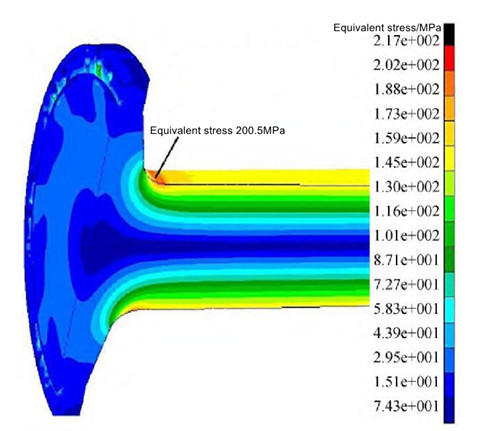
Figure 2 Equivalent force distribution under maximum load
(1) When choosing small ingot production, the length of the Metal material size is small, the quality risk of drawing a long and small round, as shown in Figure 3; When choosing large ingots, increase the length size of the Metal material the actual usage of raw materials is low. Forging mass of about 2.1 × 10⁴ kg, free forging process when 3.2 × 10⁴ kg billet, upsetting to diameter Φ2200 mm, billet length 780 mm, according to Figure 3, the distribution of small round extraction, the distribution length of the card table L is only 400 mm, the design is long for local settlement, that is, the height-width ratio of the design length (2200/400) reaches 5.5, according to the Drawing length conditions of L ≥ 0.3D, the minimum distribution length should be ≥ 700 mm. Minimum length of metallic material must be ≥ 700 mm. At this point, the inside of the ingot cannot swell, resulting in shrinkage and bending defects (see Figure 3); at the same time, the ingot cannot be effectively pressed out of the water mouth, resulting in high-density forging defects that meet the scrapping standard. Therefore, it is necessary to produce a larger ingot through the free forging process, reducing the raw material utilization rate to 40-50%, which is the true economic benefit for people in poverty.
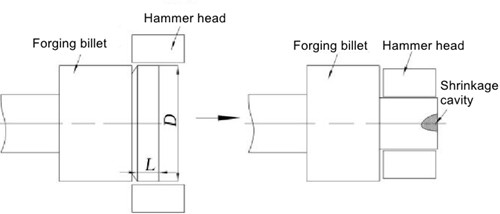
Figure 3: Deformation error during free forging
(2) In the transition corner of a large number of discharges, the actual size of the forgings is larger than the deviation process requirements. Due to the difference between the diameter pitch of the flange and the shaft, the card table of the free forging process is after the distribution of metal material. When pulling long and small round forgings, the transition is gradually realized through tension. A large number of billets are stacked up to the large flange transition angle. Due to uneven deformation, the flange end has an uneven surface inside, which affects the size of subsequent processing and requires an increase in the processing margin. This causes the actual forging quality to exceed requirements by more than 20%, affecting economic efficiency.
(3) The shape of forgings is difficult to control. Open die forging creates long and small circles. If the process is not carried out correctly, small circles and flanges can easily create significant eccentricities. This means that the diameter must be reworked several times during subsequent processing to find the correct diameter. Due to non-compliance with size requirements, the item may even be discarded.
(4) If the small circle cannot be completely forged when heated, it will need to be reheated in the oven. The flange diameter does not have a cutting edge. Repeated heating in the furnace increases the grain size of the flange part. During ultrasonic detection of grain boundary flaws, many echo reflections are generated. The sensitivity of ultrasonic flaw detection cannot reach the beginning and bottom of the wave. Due to the gross echo interference caused by the organization and grain, the number of reductions required due to defective waves cannot be reduced.
2.2 Analysis of tire mold forging process
The free forging process for shaft parts is a forging process in which the outer circle is gradually forged from large to small. The flange part is machined axially, the machining inside the flange is greater and the forging flow is interrupted, destroying the continuity of the forging fibers. In drop forging, the flange part is formed not only by the axial flow line in the billet drawing process, but also by the circular flow line in the subsequent drop forging process. Therefore, the performance and isotropy organization of the flange part are much better than free forging. Additionally, fewer cuts are made inside the flange than in free forging, so the continuity of the forged fibers in the flange part is maintained, compared to the flow line of the fibers in free forging.
3. Optimization of process solutions
Through the above analysis, the forgings produced by the “open forging + falling forging” composite forging technology can effectively improve the surface quality of forgings and maintain the complete flow of forging fiber to avoid the defects encountered in open forging. The entire heat treatment technology program is: riser clamping loops → ingot upsetting → wide anvil, main stretching length deformation → rounding. Long drawing, billet making, riser removal → upsetting and head rounding → cutting small curves, From the finished product → heat treatment after forging (performance), as shown in Table 1. The main control points of the heat treatment process are as follows.
- (1) Melting of ingots. 0.03% Nb trace elements are added to the chemical composition of 55# steel to reduce the overheating sensitivity of the steel, increase the forging temperature, prevent the formation of highly dispersed carbide NbC, prevent grain growth and increase the temperature of forging after forging in the heat treatment furnace improves. Ingot melting process: EBT steel with eccentric bottom, electric arc furnace, primary steel refining → LF furnace refining → VD vacuum treatment, degassing, steel purity improvement → VC vacuum casting.
- (2) Turn the ingot by pulling the length of the wide anvil. The forging process of large forged parts includes two-part upsetting and deformation, of which fire upsetting and longitudinal stretching belong to the main deformation process. This is the main control process of forging. The forging rate perturbation should be ≥ 2, the aim is to break the ingot into the molten state of the organization. After pressing, a long anvil is pulled out using a strong compression process. The forging rate must be > 2.0. The process control ratio of long anvil for wire drawing is 0.5 to 0.8. The pressure drop is 20% of the previous pressure to ensure that the ingot heart is always in the center of the ingot. The wide anvil pulls for a long time. Make sure that the ingot heart is always in a three-sided compressive stress state. To achieve the objective of compaction forging, the drawing process requires two consecutive hammer pressures between the anvil width of 10% overlap to avoid dead center deformation and pressure loss.
- (3) Rounding and blank production drawing. The billet manufacturing process aims to ensure that the forgings obtain the ideal key link shape. The billet flange part must ensure that the flange size is suitable after forging. The small shaft should be avoided when making the billet, making the drawing length to the required size. As the pressing is carried out at high temperatures, the minor axis must have some deformation. The principle of residual forging rates and dynamic forging recrystallization is to adjust the size of the small shaft in the latter according to the process requirements, so that a fine grain arrangement is achieved after forging.
- (4) Compress and round the head. The disturbance must be carried out at high temperature. Care must be taken to control the compression ratio, reduce the cracks caused by the tensile stress of the outer circle, and compress half the height. A local compression and rotation method should be used, first rotating a circle and then compressing the central position. During the final compression, due to the restriction of the outer circle, high hydrostatic pressure is applied to the middle of the billet, so the compression effect on the heart is good. During stamping, make sure the forging is always in the middle position of the mold to avoid stamping.
- (5) A small circle is cut out of the finished product. After the forging is released from the mold, the flange is fixed and the small circle is cut to the required size of the forging under high temperature conditions, because the small circle rolled into the mold still maintains a high forging temperature.
- (6) Final forging temperature control. 55# steel phase transition temperature point A c1 approx. 720°C, A c3 about 760°C, the selection of the final forging temperature of 750°C, reducing the final forging temperature is conducive to obtaining finer ferrite grains and organization, forging and other accelerated cooling measures , so that forging leads to a faster cooling rate through the A 1 -A 3 Zone, the outer circle is cooled to 400-450°C to obtain a uniform pearlitic + ferritic structure inside. Forging size, heart diameter Φ300mm, cooling speed in the slow range, when staying at high temperatures for a long time, many ferrite blocks are deposited at the grain boundaries, a coarse mesh ferrite structure is formed, which leads to attenuation of the lowest waves in ultrasonic flaw detection and cannot meet the initial sensitivity requirements.
- (7) Heat treatment process in forging. The austenitizing temperature must guarantee the mechanical properties and refinement of the grains. The selected heating temperature is between 790 and 830 °C. After normalization, the material is cooled to room temperature. The cooling rate is accelerated to reduce ferrite precipitation, promote growth, and increase pearlite content to improve strength index mechanical properties. The tempering heating temperature is between 540 and 570 °C to obtain the appropriate strength and toughness index.
4. Tire Shape Design
The tire forming die shown in Fig. 4 (a) was designed according to the forging mold, and the flange forging was simulated and analyzed using Forge software. Fig. 5 shows the pressure curve of drop forging. After forging is completed, the block is not filled with cavities, and there is a cavity in the ellipse area shown in Fig. Analysis may be due to the fact that the temperature of the block and the contact surface between the molds decreases rapidly, the local temperature is below 750°C and the lowest temperature reaches 475°C, which reduces plasticity in these areas and makes metal flow difficult. . At the same time, the excess block is clamped between the molded parts and the compression cap. Peripheral constraints on molded parts also result in a linear increase in forging force. Figure 4(a) shows that the size limitation of the die on the flange is very strict because hand tracing, cutting with a cleaver or cutting with acetylene gas are used when forging the ingot under the material. If the material accuracy is low and the material size is small, the mold cannot be filled. When the material size is large, the excess material is extruded to the outer edge of the tire mold. 2 steps occur. In addition, there is a large expansion force when forming the flange shape, which is easy to cause cracking and wear. Due to the connection of the outer round stage, the forged parts do not easily come out of the mold. Due to the connection of the outer round step, the forging cannot be easily demolded. The optimized die structure shown in Fig. 4(b) has a simple design and provides good flange forming effect, low expansion force and large taper angle for easy demolding during forming and long service life. Figure 7 shows the forging flow line calculated using simulated forging.
5. Production practice
According to the above forging production technology program, the end faces of forged flanges are regular, the flanges and small circles are not eccentric, and the transition between flanges and large chamfered transitions has a large profile angle. The mechanical properties of the samples in the flange area in the transverse and longitudinal directions are shown in Table 2. The transverse and longitudinal properties do not show significant fluctuations. The ultrasonic forging flaw detection meets the initial sensitivity of Φ1.6 mm, and no coarse crystalline waves were found.
Table 1: Forging process design for side shaft forging

Fig. 4 Tire shape design optimization scheme 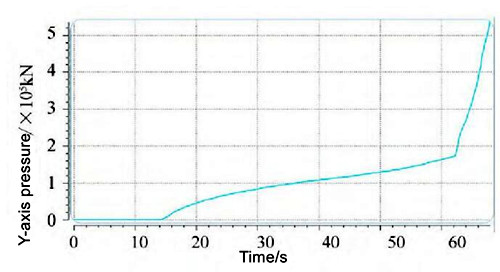
Fig.5 Pressure curve during drop forging 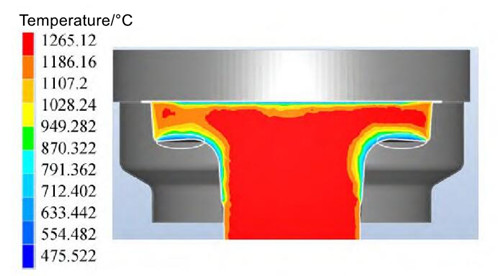
Fig. 6 Forging simulation 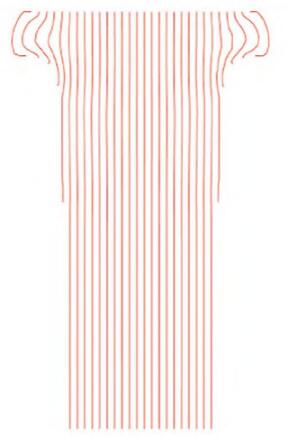
Fig. 7 Forging flow line calculated by simulation 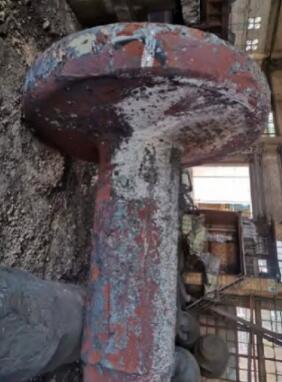
Figure.8 Forging blanks in person
Table 2: Measured mechanical properties of forgings
| Performance | R p0.2 /MPa | R M /MPa | A/% | Z/% | K Version 2 /J | |
| table | Horizontal | 360 | 650 | 28 | 51 | 23.8\23.2\23.2 |
| 357 | 647 | 25.5 | 47 | |||
| Vertical | 368 | 648 | 26 | 50 | – | |
| 366 | 658 | 22 | 49 | – | ||
| 354 | 654 | 25.5 | 46 | – | ||
| 353 | 654 | 26.5 | 48 | – | ||


