The basic content of the general process regulations includes the open forging process and operating methods. A process map can represent the process plan for the design and calculation of open forging. Forging process Free forging process specification consists of forging drawings, forging process cards, heat treatment process and process rules. It is one of the basic documents for forging production and one of the basic foundations for organizing production, assigning tasks and preparing production. At the same time, the process specification is also a rule to be followed during production and a quality acceptance standard for forgings.
When setting up the free forging process, the following principles must be observed :
- (1) In close coordination with the actual production conditions, equipment capacity and technical level of the actual situation, the process technology is prepared to meet all technical requirements of the product.
- (2) Based on ensuring high quality and improving production efficiency, saving metal material, it is economical and reasonable.
The main contents of free forging process development include:
- (1) According to the forging diagram on the part drawing, determine the machining tolerance and tolerance standards for forging.
- (2) Determine the quality and size of the billet.
- (3) Development of the forming process and tool selection.
- (4) Selection of forging equipment.
- (5) Determine the forging temperature range to develop billet heating and cooling specifications.
- (6) Development of heat treatment specifications for forged parts.
- (7) Provide the technical conditions for forgings and testing requirements.
- (8) Complete the process program card.
This article mainly presents the design of structural elements in the development of deformation processes for free forgings.

1. Design the forging diagram and determine the tolerance and tolerance standards
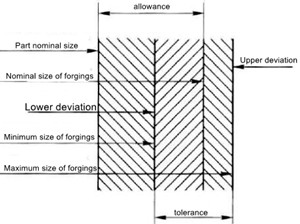
The forging diagram is designed according to the parts diagram. Generally, when designing forging diagrams for simple parts, it is only necessary to add machining tolerances and forging tolerances based on the part drawings. However, if the pieces have a concave file, steps, projections, flanges or holes, these must be fixed to the “rest of the block”. When forging after forging, no machining of the forged parts is required, only the part drawing plus the forging tolerance. Different dimensions of forging ratios and tolerance as shown in Figure 1 below:

Figure.1 Various dimensions and tolerances for forgings
1.1 The shape design of free forgings must follow the basic principles
- (1) The forging flow is as close as possible to the direction of the main stress distribution of the part, is not interrupted, and serious eddy currents do not occur.
- (2) Sudden transverse changes should be kept as small as possible and the transition should be smooth.
- (3) The forging rate of forgings is similar.
1.2 The design basis of free forging drawing
The design of the free forging diagram is essentially based on the part diagram and its technical requirements, on-site production conditions and the production batch.
1.2.1 Part drawings and their technical requirements
The drawings of the parts and their technical conditions constitute the fundamental basis for the design of forged parts. Mainly includes:
- (1) Whether the use of free forgings is permitted for the parts.
- (2) In order to ensure greater quality control for forgings, the main stress direction, flow direction, test point mechanical properties, direction and various other special tests, as well as other special test items, test levels , test points and other provisions must be established.
- (3) Whether the forgings require special treatment, such as: B. an aging treatment or stress relief before compression.
1.2.2 Production conditions
On-site production conditions essentially include:
- (1) Forging plants, heating systems and other technical installations
- (2) Raw material supply conditions, such as classes and specifications, quality level, etc.; (3) Conditions of service for employees.
- (3) Qualification level of workers.
- (4) Tool preparation capacity.
1.2.3 Production batch size
Production batch size is an important factor that directly affects the design of forgings. From an economic point of view, the batch is large and the shape and size of the forgings must be accurate; on the contrary, it can be relatively easy.
1.3 Machining allowances and tolerances for loose forgings
1.3.1 Machining tolerance
The overall dimensional accuracy and surface roughness of forgings cannot meet the requirements of the parts card. Forgings must leave a layer of metal on the surface for machining. This metallic layer is called machining tolerance (addition). The tolerance size is determined by the shape and size of parts, machining accuracy, surface quality requirements, forging heating, equipment and tooling accuracy, and operation technology level. No additions are required to the unfinished surface. The nominal part size plus tolerance equals the nominal forging size.
1.3.2 Forging tolerance
Due to various factors such as: Such as the final forging temperature, forging equipment, tool precision and technical level of workers, the actual forging size may not reach the nominal size, therefore a certain degree of deviation is allowed . This deviation is called forging tolerance. If the forging size is larger than the nominal size of the part, it is called upper runout (positive runout), and if it is smaller than the nominal size of the part, it is called underrunout (negative runout). Regardless of whether all forging parts are machined, the forging tolerance must be specified. Normally the forging tolerance is about 1/4 – 1/3 of the tolerance. The exact tolerance and tolerance values of forgings can be found in the relevant manuals or factory standards. Special circumstances can also be agreed with the processing technicians.
1.3.3 Forging permission
In order to simplify the shape of forgings and meet the requirements of the forging process, parts with smaller holes, narrow grooves and small diameter differences are made small. The step length is not large, and other places are difficult to fake. Typically, this portion of additional metal is called forge scrap.
For production, some forged parts can be brought to the exact final size by machine, and technical conditions in terms of dimensions, tolerance and flatness as well as concentricity must be met in the forging phase.
The expected machining tolerance increases the mass of the forging. The additional quality and machining process required to remove this addition increases the cost of the finished part. Therefore, the tolerance provided for each machining step must be as low as possible, while ensuring that sufficient metal of all dimensions of the finished part can be easily obtained using normal production techniques.
Tolerance describes the allowable range of deviations for a specific size. Tolerance is given approximately one quarter (positive or negative) of the tolerance.
To understand the shape of the part and check the actual forging tolerance, the shape of the part is drawn on the forging drawing with a double dotted line. Forging nominal dimensions and tolerances are given above the dimension line, and part dimensions are given below the dimension line and in parentheses.
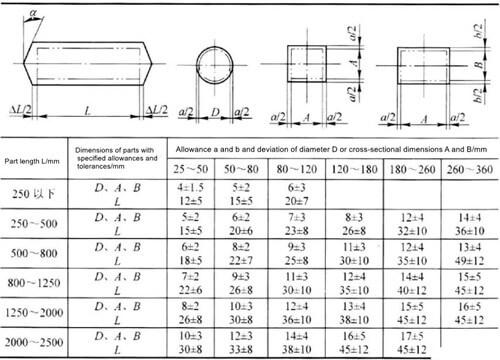
The flatness and concentricity of forgings are generally negotiated between the forge and the demand side. Free forgings with machining tolerances and tolerances can be discussed from the supply and demand side to make a decision. Table 1 Free forgings with machining tolerances and dimensional tolerances for reference. When the forging process is stopped in the final process, the forging end face of the chamfer angle should not exceed 10°; if the forging has a rectangular cross-section, the tolerance and tolerance must correspond to the selection of the maximum cross-section size.
China's hydraulic press aluminum alloy forging with tolerances and tolerances still needs to be a unified standard according to company regulations. The data provided in Table 1 can be used without information and data. If the forging process is stopped in the final process, the chamfer angle of the forging end face should not exceed 10°. If the forging has a rectangular section, the allowances and tolerances must correspond to the section of the largest size range.
table 1 Machining tolerance and dimensional tolerance for loose forgings

2. Determination of the quality and dimensions of original blanks
2.1 The quality of the original G blank
G stick =G Forge +G Loss
In the formula:
- G Forging – forging mass, kg (to determine the forging mass, forging is used according to the forging diagram. For complex-shaped forgings, it is generally first divided into several simple-shaped units, and then the volume of each unit is calculated according to the nominal size);
- G Loss – Loss of quality due to the forging process for various waste materials from the process, kg.
In hydraulic press forging, the loss of a variety of process waste materials refers to the core material of stamped forgings and the final cutting head. Unless they are stamped forgings, there is no such process waste material. Unlike steel forging, the combustion loss of aluminum alloys during heating is not taken into account.
When forging from ingots, attention should also be paid to the quality of the sprue and the quality of the ingot bottom.
The loss of material from the punched core depends on the punching method, the punch diameter and the height of the return material.
2.2 Billet size determination
Determining billet size depends on the forging process used, and the method for calculating billet size differs depending on the forging process used.
3. Formulation of the forging deformation process
The selection of different types of forging deformation processes can be made based on the shape, size and technical requirements of the forgings, combined with the deformation characteristics of the basic processes, referring to the typical process to determine it. The selection of the deformation process includes determining the production of forgings required for the basic processes and auxiliary processes, arranging the process sequence, and designing the process dimensions.
3.1 Principles for selecting the deformation process
The selection of the deformation process is the most important and difficult part of the preparation process. Due to the influence of many factors such as workers' experience, technical level, workshop equipment condition, billet, production batch, forging, auxiliary tools and forging technical requirements, there are no uniform regulations for specific treatment. In general, the following principles must be observed.
- (1) The fewer forging processes required, the better.
- (2) The frequency with which heating is minimized.
- (3) The use of tools: the simpler and fewer in number, the better.
- (4) The simpler the technology, the better.
- (5) The final product must meet the technical conditions for forged parts.
In short, by combining the specific production conditions of the workshop, referring to similar typical technologies and trying to use advanced technologies, it guarantees good quality of forgings, high production efficiency and the lowest possible material consumption.
3.2 Free forging process program
The quality of forgings largely depends on the metallic structure achieved in the deformation process, mainly on the uniformity of deformation of the forgings. Because the deformation is not uniform, not only is the plasticity of the metal reduced, but also an irregular structure occurs due to uneven recrystallization, which deteriorates the performance of forgings. Appropriate forging scheme should be adopted to obtain uniform deformation structure and best mechanical properties. When choosing the free forging program, the requirements for shape, size and mechanical properties of the forgings, as well as the shape of the billet (block or extruded bar) must be taken into account.
3.3 Selection of the transformation process
In general, the selection of different types of forging processes is based on the shape, size and technical requirements of the forging, combined with the forming characteristics of the forging process, to determine the specifics of the typical process.
- (1) Cake-shaped forging, which generally involves rough shaping. When forging with convex shoulder, choose the thickness of the pad ring lock or the thickness of the local lock according to the size of the convex shoulder. If the forging hole can be drilled, a punching process is also necessary.
- (2) The drawing length deformation process is necessary for forging long shafts.
3.4 Process size design
Process sizing and selection occur simultaneously. Therefore, the following points should be taken into consideration when determining the process size.
- (1) According to the law of volume invariance, the process variable must correspond to the process points of the respective process.
- (2) The size changes of the blank caused by the deformation process must be estimated so that sufficient tensile shrinkage and a safe amount remain.
- (3) It must be ensured that the individual parts have sufficient volume.
- (4) When forging with multiple fires, the possibility of heating by intermediate fires must be taken into account, taking into account the size of the process, the intermediate fires, the furnace loading and the exposed part of the forging.
- (5) It is necessary to make sufficient final forging corrections to make the forging surface smooth and adjust the length to the correct size.
- (6) For long-axis parts, very precise length measurements are required; You should expect the length dimensions to increase slightly when cutting to length.
- (7) For long-axis parts, very precise length measurements are required; You should expect the length dimensions to increase slightly when cutting to length.
- (8) The number of head cuts on forged shafts must be in accordance with regulations.
4. Preparation of forging process map
The forging process map is the basis for the workers' operation. The production and inspection of forgings are the most important technical documents in production. When preparing process sheets, the various procedures and steps of the forging process should be written according to the production order, and the name of the process or step, the use of tools and equipment, the outline and dimensions of the step, and the working hours quota, etc. must be specified. Process record cards generally contain: forging name, forging sketch, blank specifications, quality and size, alloy quality, process or step name and sketch, tools and equipment, heating and cooling specifications, temperature range of forging, quota of working hours, etc.


