The causes of cracking of Q345D steel plate during cold bending were analyzed through macroscopic observation, chemical composition analysis, mechanical properties test, fracture analysis, metallographic examination and hardness test. The results show that the chemical composition, matrix structure and mechanical properties of the steel plate meet the technical requirements. When cutting, a groove is formed on the side of the steel plate. The groove is made of martensite, which has low plasticity. During bending, stress concentration occurs, which is the main reason for the cracking of Q345D steel plate during cold bending.
A batch of heavy plates cracked during the cold bending and pressed plate forming process, resulting in wasted material. The type of steel plate is Q345D-Z25, in standard state, with a thickness of 60mm and a width of 400mm. In order to determine the causes of Q345D steel plate cracking and eliminate safety risks, the author analyzed the causes of Q345D steel plate cracking through physical and chemical investigations to prevent the recurrence of such accidents.
1. Physical and chemical inspection
1.1 Macroscopic observation
The length of the Q345D split steel plate is about 840 mm, and the angle between the steel plate and the horizontal direction after bending and breaking is about 30°, as shown in Figure 1. It can be seen in Figure 1 that there are obvious depressions on the surface of the steel sheet caused by the contact and extrusion between the surface of the steel sheet and the bent core. A crack can be seen directly below the depression, perpendicular to the rolling direction and penetrating the width of the plate. In Figure 2 it can be seen that there are grooves on both sides of the crack, located at the deepest point of the groove. Another observation shows that the groove extends along the plate thickness direction and has a length of about 40 mm (essentially the same as the length of the crack). Compared with the A side of the steel plate, the groove on the B side is narrower, and the crack length in the thickness direction is about 45 mm. 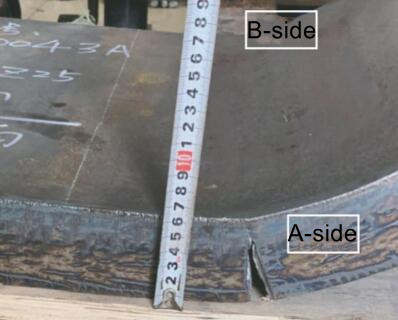
Figure 1 Macromorphology of a cracked Q345D steel sheet 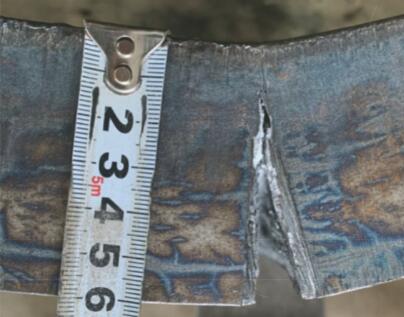
Figure 2 Macromorphology of the A-side groove in a cracked Q345D steel plate 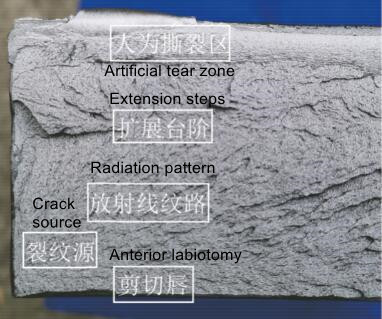
Figure 3 Macromorphology of the fracture surface of a Q345D steel plate with cracking
Figure 3 shows the cross-sectional morphology of the Q345D steel plate after fracture along the crack. In Figure 3 it can be seen that the overall cross section is relatively flat and clear radial bands are visible. The cross section can be divided into three parts based on different morphologies and properties.
(1) Crack Source:
From the characteristics of the radiation zone, it can be seen that the radiation converges to the surface of side A of the Q345D steel plate, indicating that the source of the crack is close to the surface of side A, and the cracks originate at the bottom of the groove. The surface of the groove is rough and striped, and block-shaped peeling is observed near the fracture surface, forming a notch, indicating that the area near the surface is relatively brittle.
(2) Example (cutting edge, radiation lines, extended steps):
The Eixample is large and occupies 80% of the fracture area. The overall surface is relatively rough, with clear radial streaks visible. Shear lip features can be seen near the surface of the Eixample and clear expansion steps can be seen near the center of the steel plate.
(3) Artificial tear zone:
This area represents 20% of the fracture surface and is artificially fractured, with slight visible plastic deformation.
Based on the above analysis, it can be seen that during cold bending and extrusion, penetrating cracks (in the width direction) appear on the outer surface of the Q345D steel plate, and the fracture surface has brittle fracture characteristics. The cracks originate from the side of the steel plate, and there are grooves at the crack initiation point, which may be related to the grooves.
1.2 Analysis of chemical composition
Samples were taken from a cracked Q345D steel plate and the chemical composition was analyzed in accordance with GB/T 4336-2016 Determination of multi-elemental content of carbon steel and medium alloy steel using spark discharge atomic emission spectroscopy. The test results can be found in Table 1. From Table 1, it can be seen that the chemical composition of the broken steel plate meets the technical requirements for Q345D-Z25 steel in GB/T 1591-2008 “Low structural steel alloy and high strength” and the quality assurance certificate.
Table 1: Chemical composition (%) of cracked Q345D steel sheet
| element | W | Yes | P | Mn | s | Cr | No | Mo | v | You | Al | Ass |
| Detection value (mass fraction) | 0.17 | 0.31 | 0.018 | 1.5 | 0.003 | 0.024 | 0.01 | 0.002 | 0.002 | 0.003 | 0.039 | 0.013 |
| Standard value (mass fraction) | ≤0.18 | ≤0.50 | ≤0.030 | ≤1.70 | ≤0.007 | ≤0.3 0 | ≤0.50 | ≤0.07 | ≤0.15 | ≤0.20 | ≥0.020 | ≤0.30 |
1.3 Mechanical performance test
Take a tensile specimen, an impact specimen, a bending specimen and a tensile specimen in the Z direction of a cracked Q345D steel plate and perform a mechanical property test in accordance with the standard for tensile testing of metallic materials ( GB/T 228.1-2010), the Charpy – Pendulum impact test method for metallic materials (GB/T 229-2007), the bending test method for metallic materials (GB/T 232-2010) and steel plates with properties in the thickness direction (GB/T 5313- 2010). The results can be found in Table 2-Table 5. From Tables 2 to 5, it can be seen that the mechanical properties of the cracked Q345D steel plate meet the technical requirements for Q345D-Z25 steel in the relevant standards.
Table 2: Tensile test results
| Test Items | R P0.2 /MPa | R M /MPa | A/% |
| Horizontal recognition value | 340 | 545 | 36 |
| Longitudinal detection value (rotation direction) | 350 | 550 | 36 |
| standard value | ≥325 | 470 – 630 | ≥20 |
Table 3: Impact test results
| Test Items | Shock Absorption Energy (-20 ℃ )/J |
| Horizontal recognition value | 118157166 |
| Longitudinal detection value (rotation direction) | 174144160 |
| standard value | ≥34 |
| Required value of the guarantee certificate | 166 |
Table 4: Flexion test results
| Test Items | Bending angle /(°) | bending diameter /mm |
| Horizontal recognition value | 180 | 75 |
| Longitudinal detection value (rotation direction) | 180 | 7 5 |
Table 5: Results of the tensile deformation test in the Z direction
| Test Items | Individual value/% | Average% |
| 7 0 | ||
| Recognition value | 72 | 68 |
| 63 | ||
| Recognition value | ≥15 | ≥25 |
1.4 Fracture analysis
After cleaning the fracture sample, observe it under a scanning electron microscope. In Figure 4a) – b) it can be seen that the crack starts at the bottom of the groove in the thickness direction of side A of the plate, and several cracks parallel to the cross section can be seen at the bottom of the groove. Upon further magnification, the pitting morphology can be seen near the crack source. In Figure 4c) – d) it can be seen that clear radial bands can be seen in the Eixample close to the crack source. Under higher magnification, it can be seen that the Eixample is characterized by cleavage, the pitting morphology can be seen in the shear lip of the steel plate surface away from the groove, the pitting morphology can be seen in the growth stage in the middle of the fracture, and on both sides of the step cleavage features can be seen. As shown in Figure 4e, the morphology of pits can be seen in the artificially cracked area. 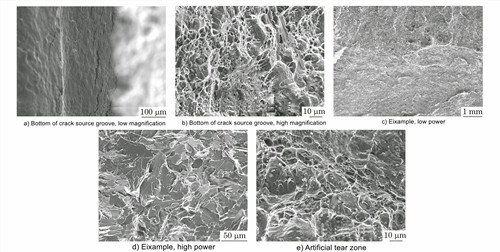
Figure 4: Microscopic morphology of different areas of the fracture surface of a cracked Q345D steel plate
1.5 Metallographic examination
1.5.1 Inclusion test
Take a longitudinal section sample of the crack source of Q345D steel plate, prepare it according to GB/T 13298-2015 “Methods for testing the microstructure of metals”, and observe it under an optical microscope. According to actual inspection method A in GB/T 10561-2005 “Determination of non-metallic inclusion content in steel – Microscopic inspection method of standard evaluation table” and the ISO evaluation table in ISO4967-1998 “Determination of non-metallic inclusion content in steel – Standard evaluation chart microscopic inspection method “are the evaluation results of non-metallic inclusions in cracked Q345D steel plates are shown in Table 6. It can be seen from Table 6 that the purity of the plate Q345D steel is good.
Table 6: Assessment results for non-metallic inclusions in cracked Q345D steel plates
| Types of inclusions | A | B | W | D | D.S. | ||||
| Fine series | Difficult series | Slim S Series | Difficult series | Fine series | Difficult series | Fine series | Difficult series | ||
| level | 0.5 | 0 | 0 | 0 | 0.5 | 0 | 1 | 0 | 0.5 |
1.5.2 Microscopic observation
Figure 5 shows the microstructure morphology of Q345D steel plate polished and corroded at different locations, which was etched with 4% (mass fraction) nitric acid alcohol solution. It can be seen from Figure 5 that the microstructure near the center of the Q345D steel plate is ferrite + pearlite, and the microstructure of the crack source and surface is martensite e+, a small amount of ferrite. The crack starts at the bottom of the groove. After measurement, the depth of the groove is about 1.2 mm, and there are several notches under the fracture surface, indicating that the crack extends into the inside of the steel plate. The surface of the steel plate is composed of a hardened layer formed after cutting, and the hardened layer in the notch has fallen off. Furthermore, there is no obvious accumulation of non-metallic inclusions at the source of the crack. The microstructure of the hardened layer is martensite + ferrite and is obtained by cooling the steel at high temperature at a rate above the critical cooling rate. The microstructure is hard and brittle and cracks form easily when stress is concentrated.
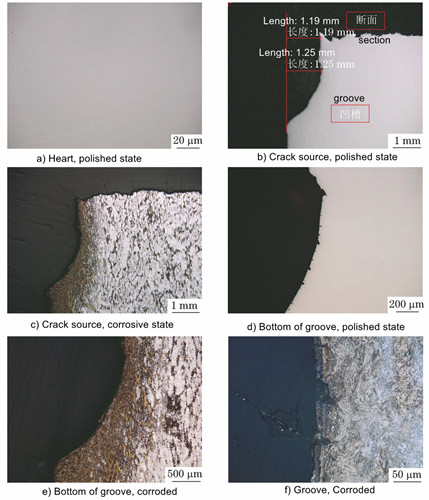
Figure 5: Microstructure of a Q345D steel plate cracked in the polished state and corroded in several locations

Figure 6 Macromorphology of Q345D steel plate cracked after hot acid corrosion
1.6 Hardness test
The Vickers hardness test was performed at the crack source, close to the crack source and in the center of the cracked Q345D steel plate. The results are shown in Table 7. From Table 7, it can be seen that the surface hardness at the crack source of the steel plate is about 481 HV1. The internal hardness of the steel plate is about 181 HV1, which indicates an anomaly in the surface structure of the crack source, which is significantly different from the central structure of the steel plate. This is consistent with the results of microstructure observation.
1.7 Thermal acid corrosion test
Cross-sectional samples were taken from the cracked Q345D steel plate and polished. According to GB/T 226-2015, a mixed solution of industrial hydrochloric acid and water in a volume ratio of 1:1 was used for the thermal acid corrosion test – the macroscopic morphology of the steel plate after thermal acid corrosion thermal acid is shown in Figure 6. In comparison with the evaluation table of GB/T 1979-2001 “Evaluation table for macrostructural defects in structural steels”, the results of macroscopic detection of defects in steel plates show a degree of central porosity of 1.0 and a general porosity grade of 0.5.
Table 7: Hardness test results
| Test site | hardness /HV1 |
| Crack source surface | 481 |
| Near the source of the crack | 18 3 |
| Steel Sheet Core | 181 |
2. Analysis and discussion
The physical and chemical examination results of the cracked Q345D steel plate show that its chemical composition, tensile strength, impact strength and tensile strength in the Z direction meet the technical requirements for Q345D-Z25 steel in GB/T standard and quality 1591-2008 warranty certificate and that there are no anomalies in the non-metallic inclusions and matrix structure.
Macroscopic observation shows that the crack formation on the steel plate originates from the side groove, and the microstructure of the crack source and the adjacent surface is martensite + a small amount of ferrite. The broken steel plate is a Q345D-Z25 brand normalized steel plate, and the normal microstructure should be ferrite + pearlite. The hardness at the center of the steel plate is about 181HV1, and the surface hardness at the source of the crack is 481HV1, with a significant difference in hardness indicating an abnormal microstructure in the groove. Martensite in low carbon steel (mass fraction of carbon less than or equal to 0.25%) is mainly in the form of slats, which are obtained by heating the steel to the austenitic state and cooling it to a temperature below the melting point. transformation into a cooling rate greater than the critical cooling rate. Martensite is characterized by high strength, high hardness and low plasticity.
During cold bending, the outer convex surface of the steel plate cracks first, and the outer convex surface, especially the opposite side of the bending core, is subjected to high tensile stress. If there is a groove, it will inevitably generate a significant stress concentration at this location, resulting in uneven stress distribution on the convex surface of the steel plate. The local stress is very high and exceeds the yield strength of the material. Finally, cracks appear in the lower part of the groove, where the stress concentration is most noticeable.
3. Conclusion
- (1) When the cracked Q345D steel plate is cut, a groove is formed on its A side. The groove is a martensite structure with low plasticity. During bending, stress concentration occurs here, which is the main reason for the cracking of Q345D steel plate during cold bending.
- (2) It is recommended that the steel rolling mill pay attention to the operating conditions of cutting tools on site and strengthen the visual inspection of products before leaving the factory to avoid the appearance of such defects on the steel surface.


