In order to improve the safety and economic efficiency of LNG pipeline system operation, the modular control process of foreign ICHTHYS module for stainless steel pipelines with excellent corrosion resistance and low temperature characteristics is analyzed and discussed. Combined with the ICHTHYS module in construction practice, seven more aspects of quality control are taken into account in the design, starting from the stacking of stainless steel pipes and protection of the finished product, through material, grouping, welding, argon, deformation control , deformation adjustment and others . This improves the stability of the construction quality of the gas pipeline, and the overall construction quality of the project has a certain reference value.
The ICHTHYS module is an onshore LNG project with a module length of approximately 360 m, a width of 48 m and a total of 25 pipeline systems. The total length of construction piping is 93,491 m, of which stainless steel piping is 17,536 m, accounting for 18.76%. This study combines the construction practice of ICHTHYS module, the study of stainless steel pipelines in the area of stacking construction and finished product protection, material, bundling, welding, argon, deformation control, deformation regulation of 7 aspects of management technique and quality control.
1. Stacking of materials and protection of the finished product
To prevent stainless steel pipes from being contaminated by carbon steel and affecting their corrosion resistance, stainless steel pipes must be stacked and protected in accordance with the requirements of the following three rules:
- ① Use special bearings for storage, welding, argon filling, deformation control and deformation control.
- ② As shown in Figure 1 and Figure 2, the stainless steel tube is subjected to spray treatment and wrapped in aluminum foil for additional protection when leaving the workshop.
- ③ Stainless steel tube is not used during transportation. The stainless steel tube is not used during transportation.
- ④ In the transportation process, the prefabricated pipe is stored in the cage to avoid damage caused by repeated transportation upside down.
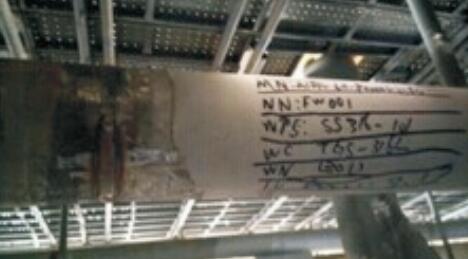
Figure 1 Spray treatment 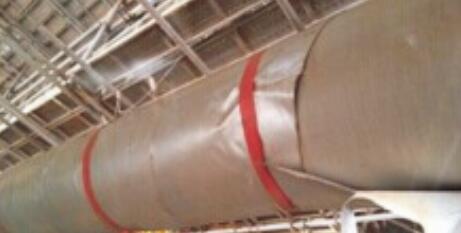
Figure 2: Protection with aluminum foil
2. Materialization of stainless steel pipes
The materialization of stainless steel pipes includes pipe cutting and marking. The following measures can be taken to control the quality of processing:
- ① Marking the material after leaving the warehouse or transplanting the furnace batch number by color marking to ensure the correct use of the material.
- ②Use portable spectral analysis to analyze the quality of stainless steel pipes and ensure that the material is used correctly.
- ③ Check the drawings to ensure that the length, weight and material of the pipes to be discharged meet the requirements.
- ④ Use plasma or cold cutting method to cut the stainless steel tube. Use special cutting tools to ensure the opening is free of defects or burrs, and mark it with a special marker for low-chlorine stainless steel.
3. Pipe alignment
The orientation of the pipes affects the quality and appearance of the weld. To ensure the quality of material alignment, you must do the following:
- ① Make sure the size of the soldering points is sufficient to ensure the connections are aligned. Spot welding thickness is 3.2-4.8mm, spot welding length is 12.5-25.4mm.
- ② Under normal conditions, when the pipe diameter is ≤ 101.6 mm, the number of equidistant welding points is at least 3; for pipe diameters > 101.6 mm, the number of equidistant weld points is at least 4. In special conditions, the responsible person determines the appropriate number of weld points after inspection.
- ③ In the chamfer for group spot welding, welding is completed before all welding spots are removed.
- ④ When welding, use the reverse arc ignition method at the chamfer and do not strike the arc at the base material.
- ⑤ Adjust the chamfer gap, chamfer angle and blunt edges according to the welding method (WPS), as shown in Figure 3. Too large a chamfer size reduces construction costs and creates excessive stress on the weld, resulting in deformation, cracking and other problems. Too small a groove size will result in incomplete welds as well as slagging and other defects.
- ⑥ Pairing of stainless steel tubes is done with adjustable bracket. The upper part of the bracket consists of a stainless steel plate.
- ⑦ the implementation of regional prefabrication to avoid mixing with carbon steel, low-alloy steel or other metallic materials, as shown in Figure 4.
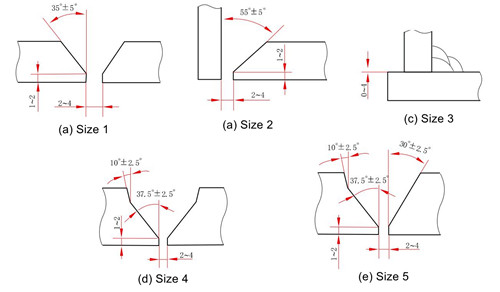
Figure 3 Bevel Size for Different Shapes of Butt Welding 
Figure 4: Prefabrication of zones for stainless steel pipe connections
Pipe welding is an important link in determining the quality of the project. Therefore, strict requirements apply to the welding inspection of stainless steel pipes.
(1) Welding engineers prepare a manual on the welding process and technical instructions.
(2) Welders must have a welding license. Project evaluation and approval only occur after qualification for service.
(3) The welder on duty must be clear about the welding process requirements and check whether the welding consumables used and the process requirements match to avoid misuse.
(4) Before welding, each node is marked with weld identification and inspection information (Figure 5), including weld number, welding method, welder, welding consumables, grouping, appearance and END Examination . 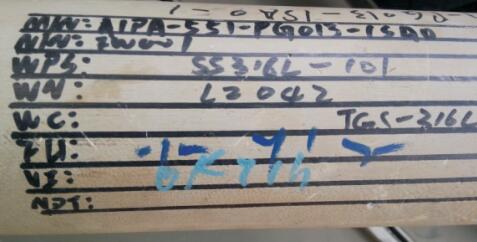
Figure 5: Inspection Information Panel
(5) The longitudinal seams of adjacent welded tubes are offset from each other, and the openings and outer parts and longitudinal seams of adjacent welded tubes are offset by at least 45° or 150 mm to avoid apparent collisions of the longitudinal seams with the channel butt weld of the tube reaches the bottom.
(6) The distance between the two butt welds on the pipes and the distance between the secondary parts of the fillet weld must meet the requirements, see Table 1.
Table 1 Welding distance
| Weld-to-weld distance d | Two But T-Welds | Butt welds and fillet welds |
| 5T or 50mm | Take the maximum value of d | |
|
5T |
OK | |
|
2T |
RT butt weld, PT fillet weld | |
| <2T | Resection | Resection |
(7) Accessories (pipe supports, shields, drill pipes, etc.) should be provided with process holes to accelerate heat dissipation and improve welding quality. Process holes can be used to test the pressure testing process and verify that accessories are welded through the base material. After the test print is completed, the available DOW732 silicone sealing process hole is closed.
(8) When welding under bad weather, the welding area must be adequately protected and tested (e.g. tents, back handles and temperature gun/pen) to ensure welding quality. If the wind is strong, you should pitch a windproof tent; If humidity is high, you must preheat a grill to dry; preheating must be carried out throughout the thickness, the preheating area must be at least 25 mm on both sides of the weld. After preheating, a temperature measuring gun should be used to record the temperature at any time during the welding process. The arc goes out, the torch cannot be lifted immediately, attention must be paid to the protective effect of the remaining gas on the weld seam.
(9) Equipped with the relevant auxiliary tools (heat protection bucket, slag hammer, welding test ruler, etc.), the welding rod is dried in the heat protection bucket, and the heat protection bucket is heated in place to ensure that the temperature in the bucket is not lower than 80°C. The welding test ruler is used to determine the maximum allowable misalignment of 3 mm.
(10) Check the weld end, use endoscopy to determine internal oxidation. If the color is not suitable, for a diameter of 600 mm or more, use chromic acid pickling paste for artificial passivation. Before use, clean the surface of dirt and apply the coloring paste to the surface. The thickness is 1-2 mm. Determine the duration of the coating according to the thickness of the surface oxidation and the temperature to obtain a clean surface. For diameters equal to or less than 600 mm, the online cycle stripping method is used, in which hoses connect the installed pipes to form a cleaning circuit. Additionally, ferrite content must be >5% during testing and content requirements.
5. Argon-filled tubes
When welding stainless steel pipes, the degree of oxidation is reduced, which is why they oxidize easily. When welding, argon is required at the back of the punch. The argon content is different and the oxidation color is different, as shown in Figure 6. 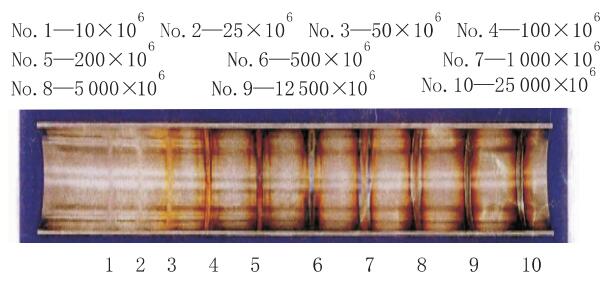
Figure 6: Oxidation color comparison table
Requirements for on-site sweat assessment for the ICHTHYS module: oxygen content < 0.05%. The following three cases meet the conditions for argon filling.
- ① When welding the root weld, a TIG welding process with shielding gas must be used, and the shielding gas must be maintained at least until the completion of welding and monitoring of the second layer. ① In the pipe jacket welding process, shielding gas must be used in the TIG welding process.
- ② When welding pipe protection, it is necessary to use a shielding gas if the pipe wall thickness is < 6.35 mm.
- ③ 25.4 mm (1 inch) tube below the back to maintain continuous argon filling.
- The argon filling method is different for different diameters.
(1) If the diameter is small, the entire tube will be flushed with argon. The pipe length is greater with segmented group welding. A small number of interconnects can be used to weld water-soluble paper on both sides of the lock. Generally, the length of the welding hole on both sides is 200-300mm. Procedure for filling the entire tube with argon: One end of the tube is blocked with water-soluble paper or sponge. Argon is supplied from the other end of the tube. An oxygen analyzer monitors readings to meet welding requirements. Introduction may occur.
(2) For large diameters, argon can be filled locally. Argon is filled before drilling. First, the plate is placed 100-150 mm from the welding point. One end of the tube is inflated and the other end is placed in the center of the plate where the gas comes out. To reduce argon loss from the pipe gap, water-soluble paper can be glued to the pipe along the weld gap before welding. The paper is then removed while welding begins. To compensate for argon leakage, the tube must be constantly filled with the appropriate argon flux throughout the welding process. Special attention should be paid to filling the inflatable air chamber with air before welding.
(3) Large diameter tubes can also be used to seal inflatable capsules. The use of inflatable capsules can solve the difficulties of sealing arc welds. The use of high quality rubber to seal tubes with airbags. Inflation inflates the airbag so that it expands and reaches the prescribed pressure. The airbag fills the entire section of piping. At this time, the purpose of blocking is achieved by the blocked airbag wall and the friction of the pipeline to achieve the purpose of quickly blocking and closing the pipe section. The specific processes are:
- ① Determine the appropriate inflatable capsule according to the tube diameter size.
- ② Place the inflatable capsule into the stainless steel tube. Pull the inflatable capsule so that the central light strip is on the weld, and make sure that the two ends of the inflatable dam are at the same distance on both sides of the weld, as shown in figure 7.
- ③ Argon gas is fed into the inflatable dam through the main gas hose. The inflatable dam gradually expands until it closely touches the stainless steel tube.
- ④ The inflatable dam and the stainless steel tube are close to each other. Inflation continues until the preset pressure of the inflatable capsule exceeds the preset pressure. Then argon begins to be released through the internal pressure reducing valve. The stainless steel tube is replaced according to the replacement principle until the entire stainless steel tube is filled with argon. After complete replacement, an oxygen detector can be used to determine when oxygen levels meet welding requirements. Welding cannot begin until welding requirements are met.
- ⑤ Two-step inflation process. Inflation speed depends on control of the flow control valve to ensure the argon gas supply meets preset specifications. First, high-pressure gas delivery requires a high flow rate to achieve local oxygen exchange. Secondly, a switch is made to low pressure gas supply if local oxygen exchange is required on both sides of the weld seam. Continuous oxygen exchange at low flow rates guarantees the quality of the weld and does not exert excessive pressure on the welding mold. Furthermore, if further adjustment of the gas flow is required, this can be achieved by operating the secondary gas hose. ;
- ⑥ The air release valve should not be emptied immediately after welding the stainless steel pipe, but only after the weld seam has cooled.
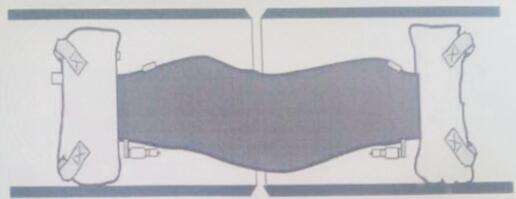
Figure 7: Schematic representation of the placement of the inflatable dam
6. Tube welding deformation
The causes of deformation during welding of stainless steel and carbon steel pipes are similar. Compared with carbon steel, the deformation during welding of stainless steel pipes is greater. The treatment method for deformation when welding stainless steel pipes and carbon steel pipes is the same.
- (1) The use of small diameter and lower current welding consumables, the control of appropriate welding line energy and specific welding parameters are shown in Table 2.
- (2) The center-left-right welding order is used for welding, and a line should not be welded to the end to avoid warping. The large diameter pipe can be welded symmetrically in the same direction by two people at the same time. If the wall thickness of the base metal pipe is greater than 8 mm, the weld shall be welded in multiple layers and the maximum temperature between the layers shall be less than 150°C.
- (3) The welding device is fixed before welding to prevent warping.
- (4) Reduce the welding gap and the number of grooves.
- (5) Pay attention to the correct size of the weld.
- (6) After welding, take anti-deformation measures to avoid deformation.
Table 2 Welding parameters
| Weld layer | Welding process | Filler diameter/mm | Current/A | Voltage/V | Welding speed/(mm/min) | Gas flow rate/(L/min) | Maximum heat input/(kJ/mm) |
| source | TIG | 1.6 | DCSP50 – 80 | 45181 | 50 – 80 | 15 – 25 | 1.3 |
| source | TIG | two | DCSP60 – 90 | 45212 | 50 – 80 | 15 – 25 | 1.3 |
| source | TIG | 2.4 | DCSP 80 – 120 | 45212 | 50 – 80 | 15 – 25 | 1.6 |
| filling | TIG | 1.6 | DCSP60 – 120 | 45212 | 80 – 120 | 15 – 25 | 1.2 |
| filling | TIG | two | DCSP90 – 130 | 45212 | 70 – 120 | 15 – 25 | 1.2 |
| filling | TIG | 2.4 | DCSP 100 – 200 | 45215 | 70 – 140 | 15 – 25 | 1.6 |
| filling | TIG | 3.2 | DCSP 160 – 220 | 14 – 16 | 90 – 150 | 15 – 25 | 1.6 |
| filling | FCAW-G | 1.2 | DCRP 130 – 180 | 22 – 24 | 130 – 165 | 15 – 25 | 1.3 |
| filling | VISA | 2.4 | DCRP300 – 400 | 27 – 32 | 350 – 500 | 1.5 | |
| filling | VISA | 3.2 | DCRP350 – 420 | 28 – 33 | 400 – 500 | 1.6 |
7. Tube deformation adjustment
In the case of pipes, it is possible to correct the straightness of the pipe by exploiting the weld contraction caused by partial or complete welding of the circular weld seam.
- (1) For pipe diameters >50.8 mm (2 in.), mark the grind weld. The groove area should be 2/3 of the girth weld and the groove depth should be 1/3-1/2 of the pipe wall.
- (2) The same seam correction can only be used twice. If both patches still need to be corrected, the seam must be cut and welded again.
- (3) If there is a large deviation in the straightness of the pipe, the joint must be removed and welded again.


