This tutorial is about interfacing 7 segment LED display with stm32 microcontroller using keil arm mdk 5 with HAL stm32 libraries for code compilation. Stm32cubemx is used to initialize the stm32f103c8t6 microcontroller variable peripherals/pins, operating frequency, oscillator selection, etc. The initialized Stm32cubemx settings are then imported into the keil mdk arm 5 project. Stm32cubemx automatically generates code for the ide we want to work on and in this project I will use keil arm mdk 5 ide. If you are new and don't know about stm32cubemx and keil uvision arm ide. I suggest you learn more about Stm32cubemx and keil uvision mdk arm ide used in conjunction with stm32 HAL libraries for stm32 microcontroller code generation. Just click the button below to do the tutorial
Getting started stm32cubemx and keil mdk arm ide
Coming to the main project. In this tutorial I will interface a seven-segment display with the stm32f103 microcontroller. I will print numbers from 0 to 9 and characters from A to F on a single seven-segment display. The seven-segment display is made up of LEDs arranged in a matrix format. Turning the LEDs on and off in a dedicated pattern prints the desired number or character on a 7-segment display. There are two types of seven-segment displays, common anode and common cathode. The common anode seven-segment display has all of the LED's anode pins connected to a single point. Where as in common cathode all the cathode pins are connected to a single point. To learn more about the difference between types, sizes and special 7-segment displays, follow the tutorial below. Click the button below to do the tutorial.
Difference between 7 thread sizes and types.
I will use 7 segment common anode display in this project. Stm32 microcontrollers are not easy to use. They do not come in a DIP package. So you can't do a DIY project with them on a breadboard. We need to design a special board to work with stm32 microcontrollers, which is still a time-consuming job. Fortunately, there are a number of pre-assembled STM32 input boards available on the market. They are not only cheap but also easy to work with. I will also use a pre-assembled stm32 board that houses an stm32f103c8t6 microcontroller.
|
First, the stm32cubemx microcontroller is initialized for stm32f103c8t6. 7 pins of the stm32 microcontroller are initialized as output that will interface with the seven-segment display. The pins have the same name as the seven-segment display pins. Port A pins of stm32 microcontroller are used in the project. Port A of the stm32 microcontroller is a 16-bit wide port. I will use your first 7 pins from 0 to 6 in the project. The Stm32cubemx configuration for declaring pins as output is shown on the right side.
|
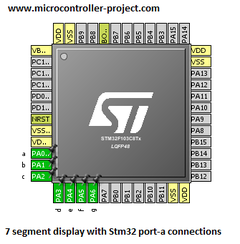
Stm32cubemx 7-segment configurations for stm32f103 microcontroller
|
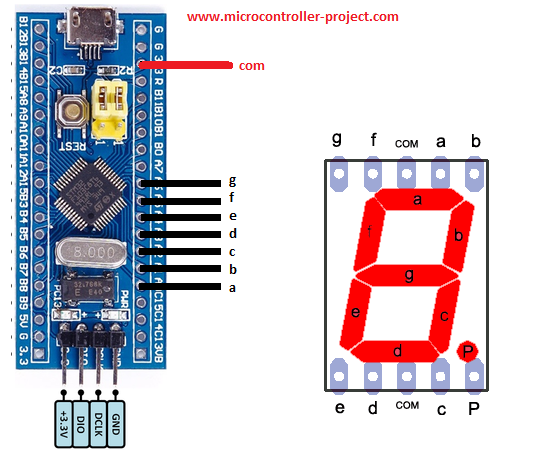
Project circuit diagram
The board I am using in the project is in the circuit diagram below. Although on the board not all of the stm32f103 microcontroller's GPIO pins are exposed, it still has a decent amount of GPIO pins to work with. Port A of the stm32f103 has 16 GPIO pins, but only 12 are exposed on the board. Fortunately, port-a pins 0 to 6 are present on the board and are sufficient for our project needs. I connected
- Pin #0 of port A is connected to pin A of 7-segment display
- Pin #1 of port A is connected to pin b of the 7-segment display
- Pin #2 of port A is connected to pin C of the 7-segment display
- Pin #3 of port A is connected to pin d of the 7-segment display
- Pin #4 of port A is connected to pin E of the 7-segment display
- Pin #5 of port A is connected to pin f of the 7-segment display
-
Port A pin #6 is connected to 7-segment g pin show
Since I am using the 7-segment common anode display, the 3.3 volt output pin of the stm32 is connected to the com pin of the seven-segment display. I loaded the code into the microcontroller using the stlink v2 debugger.
Stm32 Microcontroller with 7-segment Common Anode Display
Coming to the project code. The code is written in keil uvision mdk arm ide. Stm32 HAL libraries are used in the project. The Stm32cubemx code configurator is used to configure the oscillator, gpios and timers of the stm32 microcontroller. Only the while loop part 1 is important here. I wrote the code just in this loop. The remaining code is generated by the stm32cubemx ide.
The ODR register of the Stm32 is used to write to the ports of the stm32 microcontroller. It is a 16-bit register. To access this register the code syntax for HAL libraries is below. As I am using Port A of stm32 in the project, the syntax becomes
GPIOA->ODR = 0x003F; //Displaying 0
The above code writes a 16-bit word to Port A of the stm32 microcontroller. The 16-bit word is 0x003F. It is a 16-bit hexadecimal number. If we translate it to its binary equivalent, the command will be translated to 0000 0000 0011 1111. Each binary bit is written to the individual pin of port a of the stm32. The smallest bit starts from the right and goes to the top left. We are only concerned with the first 7 pins of the stm32, as we use them in the project. Therefore, 011 1111 are written to the first seven bits of port-a of the stm32 microcontroller. The highest port A pin (6) will be written 0 and all others will remain high. Pin 6 of port a is connected to pin g of the seven-segment display. What happens is when this word is written to port a of stm32. The seven-segment g pin will be turned off and all others will be turned on, totaling 0 on the seven-segment display. I hope this makes sense to you. All other characters are displayed in the same way. A delay of 1 second is inserted between each character to clearly see the character/number on the seven-segment display.
Future work
You can connect a series of seven-segment displays with the single port of the stm32 and control them with individual pins of the stm32 to display numbers from 0 to 100. You can make a clock with a seven-segment display. Special LED bars can be used to make special character diagrams, etc.
Code/Files


