The types and causes of internal defects in large forged rings made of 20# steel were analyzed through macroscopic examination, metallographic examination, chemical composition analysis and fracture analysis. The results indicate that the defect is a white spot caused by internal stress generated during the cooling process of the steel after hot processing under pressure.
A continuous casting round billet with a diameter of 20# and a diameter of Φ500mm is cut, heated and forged in a large round forging. Ultrasonic testing found many scattered defects in some areas of this batch of large round forgings. Ultrasonic testing can detect defects such as coarse slag inclusions, cracks, white spots, and delamination in forgings, but it is often impossible to determine the specific type. In this paper, an anatomical analysis of large round forgings was carried out to determine the specific types of internal defects in this batch of large round forgings with internal defects through chemical composition analysis, macroscopic inspection and metallographic analysis.
1. Physical and chemical inspection
1.1 Macromorphology
The size of the large forged circular rings is Φ 870 mm (outer circle) × Φ 192 mm (inner hole circle) × 175 mm thick. Ultrasonic inspection revealed a large number of scattered defects in a few areas approximately 80 mm from the end face, as shown in the fan-shaped area in Figure 1.
Cut out the sector area in Figure 1 using flame cutting to obtain the sample. The saw was then cut horizontally about 80mm from the end face. No coarse inclusions, slag inclusions, pores or other defects were found on the saw surface. However, on the surface of the saw (i.e. in the cross-section of the forging), several protruding particles with external protrusions were found, some of which were smaller, generally 1 mm × approximately 1 mm in size, while the larger particles were approximately 4mm in size. size mm × 4 mm. All particles were metallic in color (consistent with other areas of the sawn surface). There are saw marks on the surface, which protrude outwards in a circular shape and are irregularly distributed on the sawn surface of the forging, as shown in Figure 2.
Take the axial section of the forged circular ring for hot acid etching, perform low magnification inspection after acid cleaning, and evaluate according to the GB/T1979-20#01 standard: generally, the porosity is 1.0; No segregation defects were found, but several small cracks approximately 0.5–1.5 mm long were found. The direction of crack length is perpendicular to the axial direction of circular forging, similar to the characteristics of white spot defects, as shown in Figure 3-4. 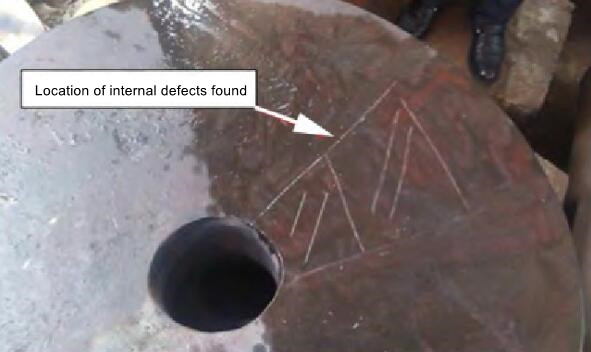
Figure 1: Localizing internal defects in forged parts through non-destructive testing 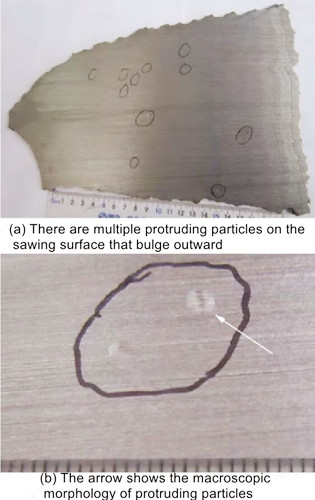
Figure 2: Protruding particle 
Figure 3 Macroscopic morphology of the axial profile of forged rings 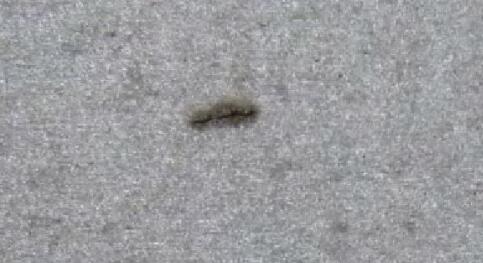
Figure 4: Morphology of the white spots of cracks in the profile
Table 1 Chemical composition of large ring forgings (mass fraction, %)


Figure 5: Particle profile morphology 
Figure 6 Morphology of small cracks on the fracture surface 
Figure 7 Morphology of silvery-white spots on the fracture surface
1.2 Analysis of chemical composition
Samples were taken from large round forged rings and analyzed for chemical composition using a direct reading spectrometer. The results are listed in Table 1. It can be seen that the chemical composition of the large round ring forging meets the requirements of the chemical composition specification for 20# steel in the standard GB/T699-20# 15 “Carbon Structural Steel of High quality". 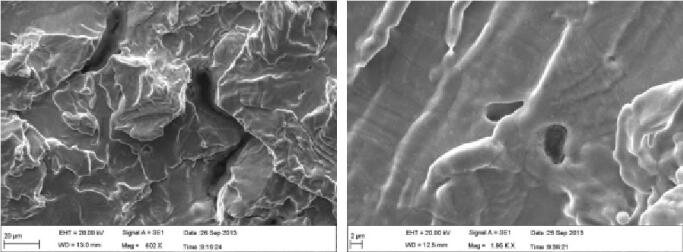
Figure 8 Morphology of silvery-white spot defects in cross section 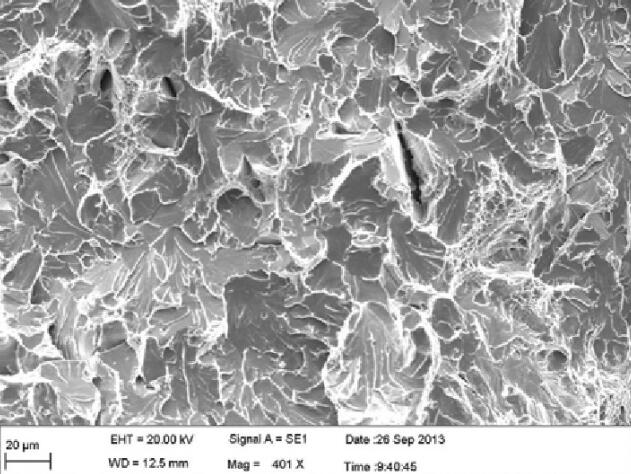
Figure 9 The microscopic characteristics of the fracture on the normal fracture surface are cleavage + pitting corrosion
1.3 Metallographic analysis of protruding particles
When the protruding particles in Figure 2 were dissected along the axial direction of the circular forging, an expanding crack was found in the particles, which had already expanded towards the sawn surface, causing the edges to protrude and forming a circular particle. protruding. The metallographic structure around the particle is the same, both composed of ferrite and pearlite, with a small amount of tartar structure in the morphology, as shown in Figure 5. When analyzed with an X-ray energy spectrometer, no large inclusions or slag inclusions, such as furnace slag and shielding slag, in these cracks.
1.4 Break test
Two test pieces are taken from the defect area of the forged circular ring and subjected to a fracture test after drilling and quenching.
The fracture morphology of the axial surface of the circular ring forging is shown in Figure 6. Several small cracks were found in the fracture, and the length direction of the crack is perpendicular to the axial direction of the circular ring forging.
The fracture morphology of the cross-sectional surface of the circular ring forging is shown in Figure 7. Silver-white spots can be seen on its elliptical cross-section with concave curvature.
Through scanning electron microscopy analysis, the silvery-white spot-like defects were identified in the cross section as small, relatively flat elliptical areas. The surface morphology of the silvery-white spot is characterized by irregularities, there are no edges or corners, and the convex parts are mostly curved surfaces that have a cloud-like floating feature with visible wavy folds. There are strip-shaped depressions and small pores. No fracture features such as intergranular, fissures and depressions were found (see Figure 8). The microfracture features on the normal fracture surface are cracks + pits, as shown in Figure 9.
2. Analysis and discussion
- (1) The chemical composition of large forged circular rings meets the requirements of the chemical composition specification for 20# steel in the GB/T699-20#15 “High Quality Carbon Structural Steel” standard. The hydrogen content in steel is relatively low. The forging die structure is blocked ferrite + a small amount of pearlite, which is the normal structure after forging 20# steel.
- (2) Ultrasonic inspection defects of forged round rings appear as protruding particles protruding outward on the saw surface. These protruding particles are circular and project outward, have saw marks on the surface, and are metallic in color consistent with other areas on the saw surface. They are irregularly distributed on the cutting surface of the forging, indicating that the particles only protrude after cutting. After metallographic dissection, the cross-sectional morphology of the particle is a small crack that expands, causing its edge to protrude and form a protruding circular particle. The above characteristics indicate that these small cracks exist in the forging, and the gas is stored in the cracks at a certain pressure. When these cracks are close to the sawn end face, the metal layer on the end face close to the crack is thinner and has lower strength. At this point, gas pressure inside the crack causes the crack to expand and form protruding particles that resemble bubbles. Through X-ray energy spectrometer analysis, no large inclusions or slag inclusions, such as slag and protective slag, were found in these cracks, indicating that the formation of bubble-like protruding particles is not related to inclusions, slag, protective slag and other slag inclusions, but rather to Steel gas.
- (3) Defects in circular forged rings appear as small cracks in the low-magnification test profile and the axial plane of the fracture test, all with the characteristics of white spot cracks. Furthermore, the longitudinal direction of the cracks is perpendicular to the axial direction of the forging (corresponding to the transverse direction of the ring), indicating that the cracks are directed. The longitudinal direction of the cracks is perpendicular to the direction of forging under compression, indicating that the formation of cracks with white spots is related to forging.
- (4) In transverse fractures of forgings with circular rings, the defects are silvery-white spots, elliptical in shape, with concave features and relatively flat elliptical surfaces. The micromorphology of the silvery-white spots did not exhibit fracture characteristics, such as intergranular cracks, fissures and depressions; instead, it shows floating clouds and wave-like wrinkles, one of the microscopic characteristics of white spot defects.
- Due to the silvery-white spots on the fracture surface of the circular ring forging defects, the microstructure has characteristics of white spot defects; small cracks appear in low magnification and metallographic test sections and in axial fracture test sections; All of these characteristics correspond to the characteristics of white point defects, and it can be assumed that the defects found in the non-destructive testing of large forged circular rings made of 20# steel are white point defects.
- (5) White spots are caused by the combined effect of excessive hydrogen content and internal stress in the steel, which is mainly related to two factors: the hydrogen content in the steel and the internal stress generated during the cooling process after processing under hot pressure; Furthermore, high hydrogen content is only a necessary condition for the formation of white spots, while the internal stress generated during the cooling process of steel after hot processing under pressure is a sufficient condition for the formation of white spots. 20# steel belongs to ferrite steel and is generally difficult to form white spots. Furthermore, the hydrogen content of round forging is already very low, indicating that the reason for the formation of white spots is not necessarily related to the hydrogen content of the raw material. Forging processing technology (such as the rapid cooling rate after forging) plays an important role in the formation of white spots.


