In this article, we will learn how to access Raspberry Pi from anywhere in the world using MQTT. This will all be done with a python script.
Several applications are already available to access Linux based terminals through remote/network but they all require port forwarding but MQTT allows without port forwarding.
We won't need any port forwarding. This will also be platform independent because we will use python to interact with the system to run it inside Linux, Windows and even OSX.
Required tools/required libraries
MQTT based python library – paho
Python IDE
Linux/Windows system
Technical information
We will be binding the MQTT protocol stack to the terminal using python. Python’s “OS” library is also capable of interacting with system processes and terminals.
Therefore, we will write a python script that will communicate with an MQTT broker and transfer and receive data. All received data will be channeled (transferred) to the system terminal process.
The output of system processes will also be redirected into an MQTT response/message on a topic (MQTT uses topics to communicate).
Block diagram
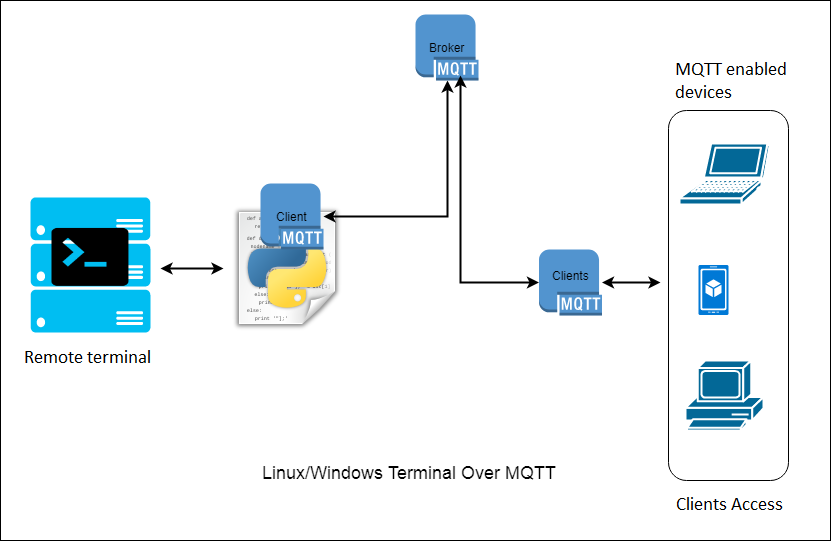
Figure 1 MQTT Terminal
The terminal script is subscribed to a topic – terminal
Post on topic – terminal/output
Clients are subscribed to a topic – terminal/output
Post on topic – terminal
Both are connected to the broker – broker.hivemq.com
In port – 1883
How does the system work?
The system is installed with the python script, listening to a specific MQTT topic (terminal) and connected to an MQTT broker. Any client that wants to access the terminal is publishing commands on that topic (terminal). When a client sends a command to our terminal script, it reads it and the command is filtered from that message. That command is then sent to the terminal, the result of that command is combined into a string and published to that client in that thread.
Understanding the source code
We can write two scripts, one for the terminal itself and another to access it.
Terminal script
We will be dividing our source code into two categories for easier understanding.
- Interacting with the system terminal
- MQTT Communication
Interacting with the system terminal
Python is a high-level programming/scripting language. Python has several libraries available for doing things. Firstly, we will need a library that can interact with our system; it must also be platform independent. So, there is a library called “ OS ” in built-in python to access the operating system. We will import the library at the top of our script. With this, you can get a lot of work done easily.
Import operating system
Now we know that the script must be multitasking or threaded, because sometimes a command takes a long time to complete and we don't want it to be rejected in the period in which we pass another command. This can be done using the subprocess library, so let's import that as well.
Import subprocess
Now that we have imported the libraries, we need to create a variable that can contain the command and its output. Later we will see how to store commands to this MQTT variable.
To save the command – data
For command output – stdout_value
Everything we need is done. We will be sending and receiving data on these variables. So, let's create a subprocess, which will directly send the “data” command to the terminal and store the output in the “stdout_value” variables.
 The meaning of this line now is the following:
process = It is a variable that stores the complete subprocess, input-output and errors.
subprocess.Popen = this means we are telling the process that we will pipe (give input and get output) some data and take some of it out.
standard output = Stores the output of the above process.
stderr = Stores the error, if any
stdin = is for string input command input
Now that we have started the process, we need to remove the command output and the error, if any.
stdout_value = proc.stdout.read + proc.stderr.read
Now we are stroing the output by reading “ proc.stdout.read” .
The “stdout_value” is the variable that we will send to our client in MQTT for output. So, let's submit below and learn how MQTT communication is done.
MQTT Communication
Firstly, we will import the necessary libraries for MQTT.
import paho.mqtt.client as mqtt
import paho.mqtt.publish how to publish
Now we will declare a variable called client with mqtt client.
client = mqtt.Cliente
Now we will make two functions which are callbacks 1. To receive messages 2. To do something on successful connection.
client.on_connect=on_connect
client.on_message=on_message
Finally, we will connect to the MQTT broker on a port and start the client inside a non-blocking loop
client.connect(“corretor.hivemq.com”, 1883, 60)
client.loop_start
After the connection is successful, we can send messages using this publishing method.
publish.single(topic, message_data, hostname=”broker.hivemq.com”)
or we can create a function/method to do this.
def send(message,publish_t):
This method uses the “ message ” input parameter as the message we need to send to the broker with the theme.
Now we have a function that is triggered upon receiving any data from the MQTT broker. We will store any message received from the broker in a variable message, within the “ in_message ” method.
message = str(msg.payload)
The syntax of the received message will be.
cmd: “command to execute”
Now we need to remove the “cmd:” string and store the remaining command
in the “data” variable to process the command.
data = message.replace(“cmd:”,””)
Now to send the output, we call our send method with the output parameters and pass the result.
submit(stdout_value,toipc_publish_result)
Access route
The access script is just a function, which receives messages from the MQTT broker and receives user input to publish to the script, which is self-explained within the code.
So this is how we can access the complete system using MQTT.
Note – Do not use common threads to create terminal access because you will be giving access to the entire system.