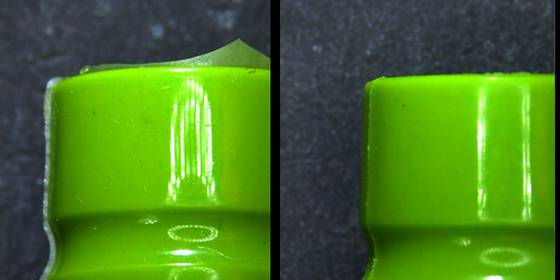
Injection molding flash is a defect that occurs when molten plastic flows out of the mold and solidifies during injection. This defect reduces the quality of the molded part and can destroy the mold. Therefore, it is important to know the causes of burr formation, find appropriate solutions and prevent defects. This article will tell you everything you need to know about injection molding burrs so you can correct or avoid the defect.
What is flash in injection molding?
An injection molding flash occurs when a thin plastic film flows out of the mold cavity during injection. It can have several causes, such as: B. high injection speed and high pressure, and occurs mainly at the parting line (it can also occur in other locations).
As it escapes the mold cavity, the molten plastic solidifies on the outside and appears fluffy, which can be aesthetically unattractive or non-functional. Therefore, they must be removed in injection molding of large and small quantities, otherwise they may damage the mold.
What causes flash in injection molding?

There are several reasons why burrs can occur when plastics are injection molded. Below are some reasons to pay attention when injection molding parts:
Incompatibility of dividing lines
The shape dividing line is the line where the two halves of the shape meet. Misalignment of the parting line due to dirt or poor design can prevent the mold from completely sealing. As a result, molten plastic comes out during injection.
Inadequate ventilation
Inadequate ventilation may result in air being unable to escape the mold cavity during injection. In this case, the trapped compressed air can increase the pressure in the injection mold and force the molten material out. Ventilation problems can also be due to old/worn vents that allow too much or too little air to escape.

Clamping pressure
Clamping pressure is the force required to keep the mold closed during the injection process. If there is a problem with the clamping pressure, the high injection pressure that builds up in the mold, even with a perfect parting line, can cause it to be forcibly opened. This can result in an injection molding flash.
Low viscosity
Low viscosity molten plastic flows easily from the mold. Viscosity indicates how easily the molten material flows depending on operating temperature and pressure. Additionally, nozzle and cylinder pressure and temperature can increase the viscosity of the melt and contribute to the formation of injection molding burrs. This means that there is a high chance of the error defect occurring.
Overfilling the mold
Of course, overfilling the mold with material will result in leaks because the injection pressure is greater than the clamping pressure. These additional cavity materials adhere to the final product and create burrs.
Ways to eliminate burrs in the injection molding process

If you have previous experience with overmolding, there are several ways to correct the defect. Below are the most common solutions you can try:
1. Use hot air
If burrs appear during injection molding, you can use hot air to melt them into the molded plastic. However, this is only suitable for removing fine and fine burrs. Coarse burrs may be difficult to melt into the surface of the part or may affect the appearance of the final product. Instead, you can use hot air as a secondary deburring method after mechanically removing the burrs.
2. Cryogenic deburring
Cryogenic deburring is the most effective method for eliminating burrs during injection molding. The part is cooled with liquid nitrogen to a temperature at which burrs can be easily removed. The process does not affect the surface of the parts. However, commercial cryogenic deburring machines are expensive.
3. Manual deburring
Manual deburring is popular because of its versatility. Injection molding burr is cut using devices such as scissors, knives and grinders. This removes burrs along the parting line of the final product.
Almost all technical materials can be deburred manually. Manual deburring results in the highest quality (although this depends on the operator) without overworking the material. Furthermore, it allows for quick inspection during the deburring process.
4. Use of open fire
Occasionally an open flame may be used for deburring. However, this can alter the surface of the material, degrading its appearance and making post-processing, such as painting, difficult.
How to avoid burr formation during injection molding?
Rather than correcting flashes in injection molding, it is better to prevent them from occurring in the first place. Below are some ways to avoid burrs during injection molding:

Proper mold cleaning and maintenance
Mold cleaning is necessary to avoid burrs in injection molding. To do this, you can use a clean cloth, mold cleaner, and compressed air to clean the surface of the molds. Before the molding process, be sure to remove dirt, plastic, and other contaminants that could prevent the mold from closing completely. Also, carefully inspect the mold for plastic fragments hidden behind the sliders and deep in the dowel pin pockets.
Apply sufficient clamping force
The success of a molding process depends on the tonnage, the point of application of force and the clamping mechanism. However, care must be taken, as too much force can damage the mold and the final product. To avoid burrs and other damage, apply appropriate clamping force.
Design for Manufacturability (DFM)
DfM is an effective method to prevent burr formation during injection molding. It is a set of industry-recommended design rules to help you produce parts at the lowest cost, in the shortest time, and with the highest quality. With a properly executed DfM, you can obtain several parameters such as the ideal injection molding port design, wall thickness, hole design, and mold parting line design to produce a burr-free part.
This is very important when injection molding prototypes. However, keep in mind that as complexity increases, features such as cutouts are required, which are used in cutout injection molding, which can increase the cost of the injection mold.
Use a burr-free mold
Prevent burrs from forming on your molded parts by using a burr-free mold. The shape has a high tolerance for injection molding and is perfect when aesthetics and functionality are important. Although they guarantee the best results, many companies may not be able to afford them.
Decrease the injection rate
A high injection rate increases the pressure when injecting the molten plastic. This increases the trend towards injection molding. Decreasing the injection rate reduces the injection pressure. However, reducing the injection rate also increases the cycle time.
Other injection molding defects
In addition to burrs, other defects can also occur during injection molding. Below are the most common injection molding defects that can occur:

1. Weld lines
A weld line occurs when two or more flow fronts come together but do not merge completely due to partial solidification. This defect occurs because the temperature and pressure are not high enough, leading to premature solidification. To avoid weld lines, increase pressure and temperature. Also adjust the wall thickness to obtain a different filling time.
2. Surface delamination
Surface delamination occurs when the molding surface becomes loose. Although this can happen anywhere on the molded part, the defect usually occurs in the gate area.
Contaminated material is the main cause of surface peeling. Additionally, the surface of a material may peel off layer by layer as excess moisture heats and creates steam. To prevent surface peeling, ensure the material is free of contaminants or incompatible polymers.
3. Rays
Spatter occurs due to uneven solidification as the plastic that initially enters the cavity begins to harden before the cavity is filled. This forms a film made of cooled plastic. By reducing the injection pressure and increasing the material temperature, the early solidification of the initial material jet is delayed.
4. Cracks
Cracks often appear in the weld area, but sometimes over the entire surface. The main cause of cracks is stress and deformation caused by the external environment, cold mold surfaces and low injection rates. Increase injection speed and mold/operating temperature to prevent breakage or surface damage.
5. Simplify
Flow lines appear as a wavy or ring-shaped pattern on the plastic part, which can affect the function or aesthetics of the part. These patterns often form due to changes in the plastic's cooling rate as it flows through the mold in different directions. You can avoid flow lines by increasing the injection rate and mold pressure and ensuring that the plastic resin cools before filling the cavity.
Concluding
Common questions
What is the most effective method for preventing burr formation during injection molding?
The most effective solution is to reduce the injection speed to reduce the injection pressure and viscosity of the molten plastic. Another option is to increase the clamping pressure.
Which is better: hot air or cryogenic deburring?
This depends on the type of mold flash. Both are suitable for large mold deburring, although cryogenic deburring has advantages because it does not use heat. However, hot air can melt the burr back to its original state, making it suitable for small and thin burrs.
What is the main cause of mold stains?
The main cause is leakage of molten plastic along the mold parting line due to high injection pressure and poorly designed parting line.


