In order to ensure the normal production of the 16Mn and L245NB elbows used in the West-East gas pipeline project, stabilize the quality of the products and comply with the requirements of the technical specifications in accordance with the requirements of the “Technical Conditions for DN350 and Below”. Pipe Fittings in Oil and Gas Transmission Pipeline Engineering” (Q/SY FYX 106-2009) and (Q/SY FYX 105-2009), the “Manufacturing Process Specification for Elbow Shaping ” (MPS document) has specific wording.
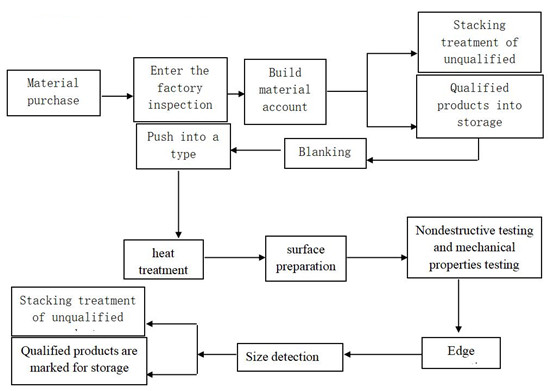
1. Flow of the elbow joint formation process

2. Acceptance of raw materials
1). Raw materials must meet the requirements of technical conditions DN350 and below for the construction of oil and gas pipelines.
two). The surface of raw materials should be free from oil, excessive rust corrosion and obvious defects, low melting point metal pollution, etc.
3). Check the quality certificate, furnace number, batch number, specification, manufacturer and implementation standard of the raw material.
4). Raw material with steel brush wheel or corner milling machine for mechanical rust removal.
5). After entering the factory, the steel pipe must be re-inspected by ultrasound and qualified in accordance with JB/T4730-2005, Class I.
6). A piece is used for physical and chemical testing steel sheet Upon arrival at the factory, samples are collected according to the batch number and furnace specifications and tested for analysis of chemical elements, mechanical properties and hardness after quality adjustment treatment . Test results must meet the requirements of the technical conditions for pipe connections DN350 and below for oil and gas pipeline construction.
table 1
|
Quality of materials |
technology |
Furnace inlet temperature ℃ |
Heating speed |
Holding temperature ℃ |
Thermal insulation time (min) |
Cooling method |
Recognition content |
|
16 million L245NB |
normalization |
≤300 |
≤200℃/h |
900-930 |
20-30 |
Empty cold |
– |
|
Note: Deformation can also be performed instead of heat treatment. The final forming temperature is above 800 °C. |
|||||||
Table 2 Requirements for chemical composition analysis (W max. T %)
Material: 16 Mn
|
element |
Product Analysis |
Comments |
|
Carbon (C) |
≤0.20 |
|
|
Manganese (Mn) |
1.20-1.60 |
|
|
Phosphorus (P) |
≤0.025 |
|
|
Sulfur (S) |
≤0.010 |
|
|
Silicon (Si) |
≤0.50 |
Material: L245NB
|
element |
Product Analysis |
Comments |
|
Carbon (C) |
≤0.16 |
|
|
Manganese (Mn) |
≤1.1 |
|
|
Phosphorus (P) |
≤0.025 |
|
|
Sulfur (S) |
≤0.010 |
|
|
Silicon (Si) |
≤0.40 |
7). After retesting, it must be numbered and registered in accordance with factory regulations
8th). See Table 3 and Table 4 for mechanical properties testing
Table 3: Requirements for testing mechanical properties
| Project | frequency | Questions | ||||||
| To pull | Every game | Quality of materials | thickness | Stretch limit σ S MPa | tensile strength σ b MPa | Return rate |
Stretch δ |
|
| 16 million | 9-16 | ≥345 | ≥ 510 | ≥22 | ||||
| L245NB | 5-16 | ≥245 | ≥415 | ≤0.90 | ≥21 | |||
| Charpy Punch | Every game | J (L245NB, -5°C; 16 Mn, -20°C) | ||||||
| Minimum value for single attempt | The average of the three attempts | |||||||
| ≥30 | ≥40 | |||||||
| Guided push-up | Every game | After the bending test, there should be no obvious cracks or the crack length should not be more than 3㎜. The crack originating at the edge of the sample must not be greater than 6.35㎜ in any direction. | ||||||
| toughness | Same batch of heat treatment manifolds, same specifications for testing a part | The detection point of each part cannot be less than 5 points (isometric). The surface hardness of the outer wall of the base material and the heat-affected area should not exceed 160 HB (16 mn) and 240 HV 10 (L245). | ||||||
9). Appearance recognition
- ① The angle should not have cracks, burns, overheating or other phenomena, and the surface should not have hard spots.
- ② The inner and outer surface of the elbow should be smooth and have no destructive resistance and appearance defects such as scars, scratches, double skin, etc. After the defects are identified, it needs to be repaired. The grinding at the grinding point must not be less than 93.5% of the original wall thickness. The grinding point must be smooth and tested with dye or magnetic powder to confirm defects.
- ③ If the pipe elbow is defective, repair by welding will not be possible.
10). Size detection
① Calibration diameter: Use a caliper to measure the inner diameter and outer diameter of the elbow (using the circumference method) at least 3 points at each end.
Table 4 Sampling direction and elbow test position
| Test type | Sampling direction and location | |||
| Angled head | Accept the default | |||
| The outer side of the arch | Center line | The inner side of the arch | ||
| Voltage Test | 1 (horizontal) | 1 (horizontal) | 1 (horizontal) | GB/T228 |
| Charpy impact test | One group, 3 pieces | A group, 3 pieces. | A group, 3 pieces. | GB/T229 |
| (on the whole) | ||||
| Directional bending test | 1 (face flexion) | – | 1 (face flexion) | Q/SI 106-2009 |
| 1 (back bend) | 1 (back bend) | |||
| Vickel hardness test | Outer side of the arch, inner side of the arch, center line, (outer wall, equiometric) | Q/SI 106-2009 | ||
② The height of the test center: Place the elbow naturally, draw a line along the two ends of the tube, and use a ruler to measure the distance between the inner slope of the tube end and the intersection of the tube tip. The value of half the diameter of the pipe end is the center height of the bend.
③Wall thickness measurement: After treating the elbow surface, measure the thickness of the inner elbow, outer elbow, neutral surface and elbow tube end with the ultrasonic thickness gauge, and measure at least 3-5 points in each position.
④ Measure roundness: Use a caliper to measure the roundness of the end of the angle tube. Measure 4 points each. The circularity must be 1% of the caliber.
⑤ Hardness: After surface treatment, measure the surface hardness in at least 5 points. Each point cannot exceed 160 HB (16M) and 240 HV 10 (L245NB).
⑥ Belt measurement: Measure the end groove and blunt edge of the knee tube with a universal angle ruler and ruler. The value must meet the requirements of the drawing.
⑦Measuring flat runout: Place the angle vertically on the angle piece so that one end of the angle piece is close to the angle piece and the body of the angle piece is on the other side of the angle piece. Measure the distance between the handpiece and the handpiece body with a ruler or limit gauge. The value must correspond to Table 5.
⑧ Measuring the slope: Place the angle on the curve so that the two ends of the angle meet, and measure the distance between the angle and the end face of the angle with a ruler or limit gauge. The value must correspond to Table 5.
⑨ Geometric dimension tolerance (mm)
The unit is mm.
| The DN nominal ruler | Outer diameter Da in the groove | Inner face diameter a, b | 90° and 45° elbow and tee dimensions from center to end | tube reducer | Tampa 's boss | The shape of the deviation | |
| A , B , W 、 M | F 、 H | AND | Elbow, T-piece, tube diameter Q | 90° and 45° elbow and TP piece | |||
| 16-65 | 1.6 | ±0.8 | ±2 | ±2 | ±3 | 1 | two |
| -0.8 | |||||||
| 80-90 | ±1.6 | ±1.6 | ±2 | ±2 | ±3 | two | 4 |
| 100 | ±1.6 | ±1.6 | ±2 | ±2 | ±3 | 3 | 5 |
| 125 – 200 | 2.4 | ±1.6 | ±2 | ±2 | ±6 | 3 | 6 |
| -1.6 | |||||||
| 250 – 350 | 4 | ±3.2 | ±2 | ±2 | ± 6 | 4 | 10 |
| -3.2 | |||||||
- The. The inner diameter of the end must be determined by measuring the circumference and then calculating to tolerance the difference between the nominal diameter (outer diameter) and twice the nominal wall thickness.
- B. The roundness tolerance is the difference between the maximum and minimum diameter measured at any radial section.
- w. The minimum wall thickness is equal to the nominal wall thickness minus 0.25 mm, but does not include the local discontinuous reduction permitted in the “Technical conditions for connections of DN350 and lower pipes in the construction of oil and gas pipelines”.
- d. If the bow needs to be cut into pieces for delivery to site, this can be negotiated between the manufacturer and the owner. The roundness tolerance of the cut end can be 1%, measured by the outer diameter.
11). identification
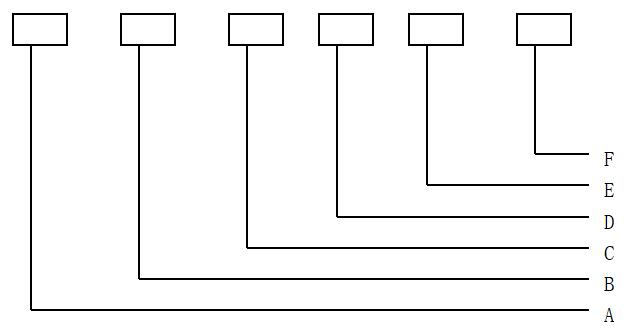
After sheet inspection is completed, nonconforming products are stacked and processed. Qualified products will be marked and saved in the following format and entered into the product book according to the number specified in the program file. At the same time, markings are sprayed onto the inner and outer surfaces of one end of the bend using the stencil brush method at a distance of 100 mm from the end of the pipe.

- A) Size (㎜)
- B) Nominal wall thickness: (㎜)
- C) Steel class symbol
- D) Identification code of the steel casting batch
- E) Manufacturer's name or trademark
- F) Elbow number
12). For qualified finished product sheets, a product quality certificate and a product quality certificate will be issued in the unified format required by the design department of “Xinjiang Petroleum Engineering-East Gas Construction Co. Pingdingshan-Tai'an Pipeline Project.” , LTD. “
13). Stacking and transporting pipe bends
- ① The finished angle iron must be stacked at a distance of 150 mm x 150 mm square timber, with a minimum distance of 200 mm to the floor.
- ② The elbow must not come into contact with any part of the cart during transportation, and must be separated from the cart by a straw cover thicker than 40mm.
- ③ Tube end protection with tube cap.
1). Material selection and cutting, selecting steel tubes suitable for bends and clearly identifying the furnace, batch number, tube specification, project name and raw material number.
two). Shape your elbow
- ① The required cable is loaded into the pushing machine with a crane, the blank is subsequently cleaned, the inner wall is coated with graphite, and then installed on the rod (depending on the length of the blank, several can be installed at once), the cable is connected to the plug plate is locked and the inner mold is preheated to about 800°C for pushing (the heating temperature and driving speed must be optimally coordinated).
- ② socket curvature, Correct the radius of curvature of the arc formed using an appropriate die in the hydraulic press. .
- ③ According to the specifications of the elbow, fix the end on the ramp machine with the appropriate tire, then fix the cutting gun, cut off the excess blank, and leave a machining margin for the inlet.
- ④ Whole, with special tire for fixing the elbow, with support head at the end of the press connection.
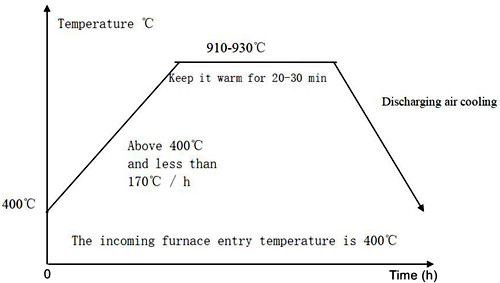
3). Heat treatment : According to the heat treatment process, put the angle iron into the furnace for normal ignition treatment. (For the heat treatment process, see Appendix A.) If the final molding temperature is greater than 800°C, heat treatment can be omitted.
4). Surface treatment: After heat treatment, the oxide layer on the surface of pipe fittings needs to be removed with a sander to reveal its metallic luster.
Appendix A
Heat Treatment Process
1. Normalize
- The. Oven: Oven temperature 400 °C.
- B. Heating rate: The heating rate is set to 170 °C/h.
- w. Insulation: When heated to 900-930°C, the insulation time is controlled to 20-30 minutes.
- d. Cooling mode: air cooling.
Heat treatment regime:

HSE management policy, management objectives and commitments
1). Our company's SMS management policy:
Safety first, prevention first, people-oriented, environmental protection and creating excellence
two). SMS management objectives:
- Safety objective: Prevent and control all work accidents and reduce the rate of work accidents to zero.
- Health objective: Prevent the occurrence and spread of infectious diseases, guarantee the physical health of employees and ensure the smooth functioning of production.
- Protection objective: Wastewater and waste must be disposed of and treated in accordance with regulations so that the environment and surrounding waters are not contaminated or damaged.
3). Commitment: Treating the environment well, treating employees well, carrying out inspections well, evaluating well, inspecting well, satisfying owners and employees.


