After working a lot with 8-bit microcontrollers and learning all the protocols and functions they offer, I now thought of switching to 32-bit microcontrollers. I decided to opt for 32-bit ARM processors due to their popularity in the market. I choose the ARM Cortex-M3 series of processors for my new hobby/learning projects. The reason behind choosing ARM Cortex-M3 series is that Cortex-M3 processors are specially made for connected embedded applications, and microcontrollers built with this series are used in many mid-level projects/applications/embedded products. After so much Googling, I finally made the decision to move forward with stm32 microcontrollers. Stm32 is a family of 32-bit microcontrollers offered by STMicroelectronics. Stm32 microcontrollers are built around the Cortex-M7 , Cortex-M4F , Cortex-M3 , Cortex-M0+ and Cortex-M0 processors.
After deciding to use stm32, I started making initial tutorials on how to get started with stm32. I found a lot of information on how to get started, but none of it is well organized. So I decided to make a series of tutorials on how to start using stm32 microcontrollers. Throughout this series I will discuss all the protocols/functions that stm32 microcontrollers offer. I will present a practical example of easy protocol/interface/function with source code and circuit diagram.
There are many IDEs (integrated development environments) that support stm32 series and you can use any of them to program your stm32 microcontroller. Some Ide are Coocox, keil, mBed, Attolic, microC for Arm. I decide to go with keil and stm32CubeMx. Keil offers in-depth knowledge of the microcontroller and its interface. If you don't want to go in-depth and want a piece of cake, choose MikroElectronica microC for Arm. It is very easy to work with microC ide, it has many examples and libraries you just need to call the functions and everything is done. Stm32CubeMx is a microcontroller peripheral configurator. When using stm32cube you don't need to write configuration code for your stm32 microcontroller. It is a visual platform where you can make microcontroller pins move in, out, enable pull-ups and pull-downs can set the operating frequency of the microcontroller visually and much more. After the visual configuration you can generate the code for the configuration you made. I prefer to work with stmCube because it is officially provided by STMicroelectronics and it is good to work with the material provided by the owner.
Note : Stm32CubeMx is not an Ide, it is a configuration manager. You configure your stm32 microcontroller on it and then generate the configuration code you made to be used with any other IDE. You can directly generate the keil ide project with stmCubeMx by selecting the stmCubeMx option to translate the configuration to the keil ide project.
Installing StmCubeMx and Keil MDK ARM
Installing StmCubeMx is also simple. Download StmCube from the link You may be asked to log in. Log in and you will be theirs. Once StmCubeMx is installed, you must install the packages for each stm32 series or series you want to work with. The StmCubeMx and stm32 series packages are two different things. The package for each STM32 series must be installed separately. It is also an option in the StmCubeMx software that installs the series packages. It's under Help > Install new libraries. Since we are starting with stm32f103, we need to install the package for the stm32f1 series. The diagram below explains well about installing the packages.


LED flasher with stm32f103 keil and stmcubemx
The upper module has an LED connected to pin no. 13 of port c. To start, let's blink. Stm32 microcontroller pins offer multiple features on a single pin. Selecting one and disabling others must be done carefully. The I/O pins of Stm32 microcontrollers can be used in five modes
- Entry mode
- Analog mode
- Output mode
- Alternative function mode
- External interrupt/event lines
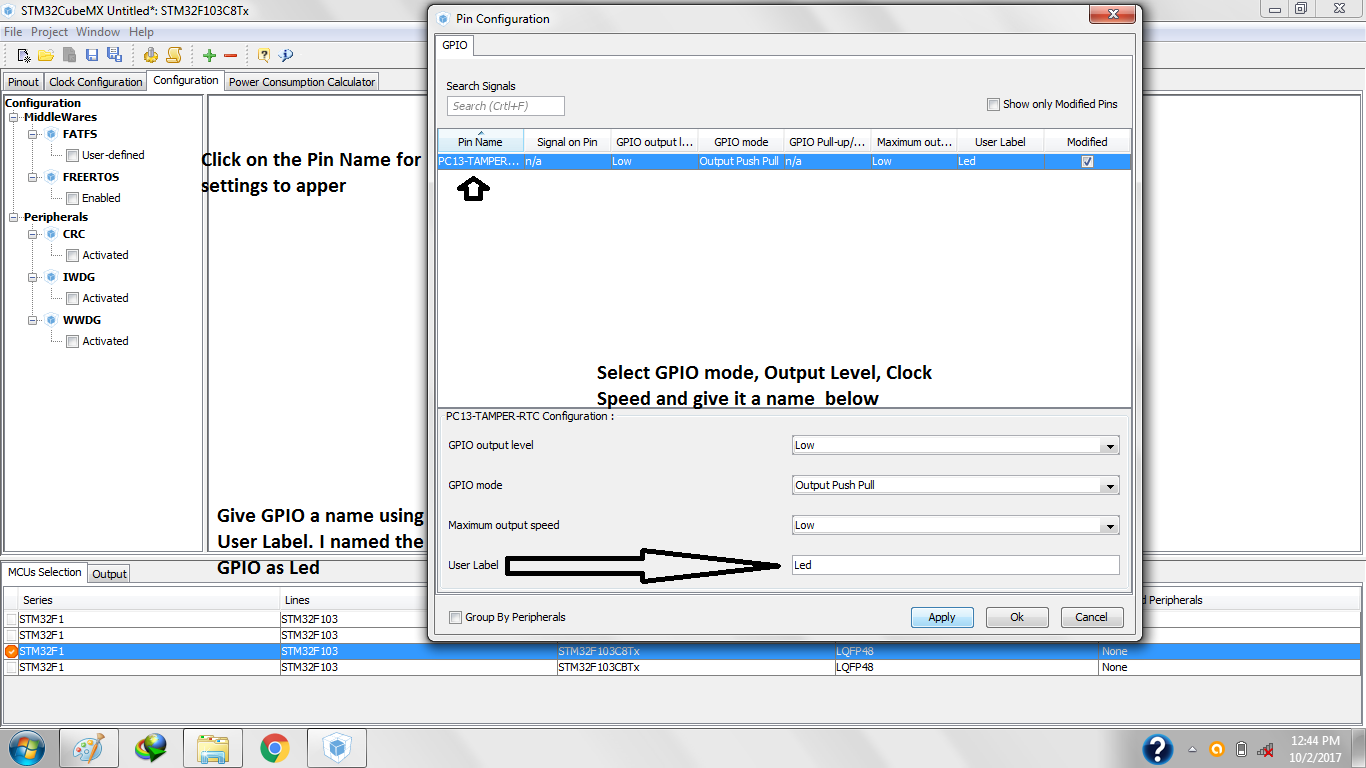
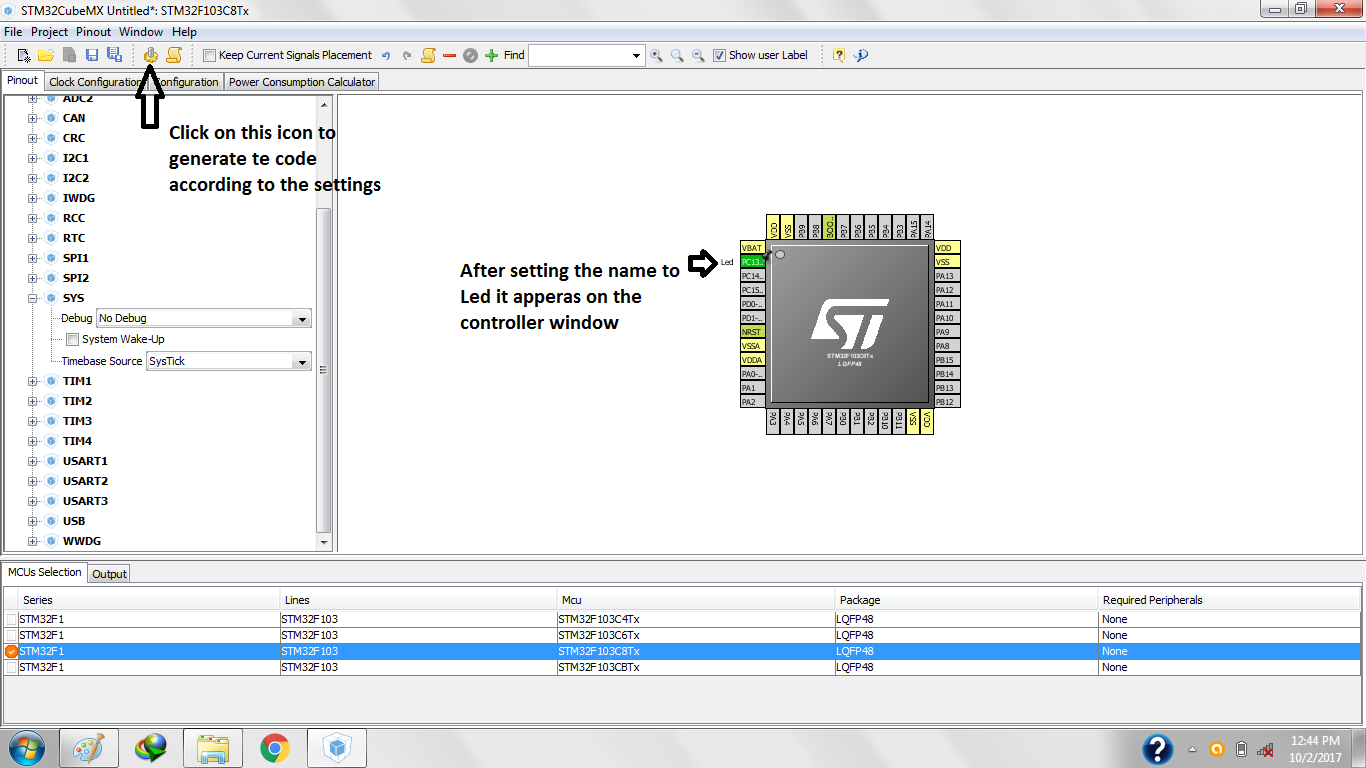
For our purpose, we will use pin 13 of port c as the output. Almost all stm32 pins have internal pull up and pull down resistors. Since we are not using gpio in input mode, we are not using pull up and down resistors. Stm32 pins can work at different frequencies, let's operate the pin at low frequency. The Stm32 pins can also be initialized low or high after initialization. I placed pin #13 low.
Note: I will use the microcontroller's internal 8Mhz RC oscillator. The top plate has an external 8Mhz crystal but I won't use it. In later tutorials we will use it.
Creating new project in StmCubeMx


HAL_GPIO_TogglePin(Led_GPIO_Port,Led_Pin);
HAL_Delay(1000);

Upolad code for stm32 microcontroller

|
Project files/code folder
|

