MicroPython is an implementation of Python 3 for microcontrollers. It's an incredible firmware that combines the powerful features of the Python programming language with the low-level access of microcontrollers. The following is a list of microcontrollers supported by the MicroPython framework.
Arch Mix, Actinius icarus, Arduino Nano RP2040 Connect, Arduino Primo, B_L072Z_LRWAN1, B_L475E_IOT01A, blueio_tag_evim, C3 mini, CERB40, Discovery F4, Discovery F411, Discovery F429, Discovery F7, Discovery F769, Discovery Kit H7, Discovery L476, Discovery L496G, DVK_BL652, E407, ESP32, ESP32-C3, ESP32-C3 USB, ESP32 D2WD, ESP32 OTA, ESP32 SPIRAM, ESP32-S2, ESP32-S2 WROVER, ESP32-S3, ESP8266, EVK_NINA_B1, EVK_NINA_NINA_B3, Feather M0 Express, Feather nRF52840 Express , Feather RP2040, Feather S2, Feather S2 Neo, Feather S3, GARATRONIC_NADHAT_F405, GARATRONIC_PYBSTICK26_F411, H407, H743VI, HYDRABUS, ibk_blyst_nano, idk_blyst_nano, ItsyBitsy M4 Express, ItsBitsy RP 2040, Lego Hub No. 6, LILYGO TTGO Lora32, LIMIFROG, M5 Stack Atom, micro:bit v1, MicroE Clicker 2 STM32, Micromod STM32, MikroE Quail, MIMXRT1010_EVK, MIMXRT1015_EVK, MIMXRT1020_EVK, MIMXRT1050_EVK, MIMXRT1060_EVK, MIMXRT1064_EVK, Mini M 4, NETDUINO PLUS 2, F091RC, Core F401RE, Core F411RE, Core F412ZG, Core F413ZH, Core F429ZI, Core F439ZI, Core F446RE, Core F722ZE, Core F746ZG, Core F767ZI, Core G744RE, Core H743ZI, Core H743ZI2, Core L07 3RZ, cleo L432KC, Core L452RE, Core L476RG, Core WG55, Core WL55, dongle usb nrf52840 mdk, pca10000, pca10001, pca10028, pca10031, pca10040, pca10056, pca10059, pca10090, Pico LiPo, Pro Micro RP2040, Pro S3, Pyboard D series SF2, Pyboard D series SF 3, Pyboard D-series SF6, Pyboard Lite v 1 .0, Pyboard v1.0, Pyboard v1.1, PYBSTICK26 RP2040, QT Py RP2040, Raspberry Pi Pico, Seeduino XIAO, SAMD21 TinyPICO, Tiny S2, Tiny S3, Thing Plus RP2040, Trinket M0, USBDONGLE_WB55, Xennon, Wio Terminal D51R, WiPy, wt51822_s4at
Well, the above list seems very long. This list will only be expanded in the future. Without a doubt, MicroPython already supports all major microcontrollers and embedded platforms.
In addition to supporting a wide variety of hardware platforms, MicroPython facilitates a large set of standard Python libraries on the software side. These libraries include array, binascii, builtins, cmath, collections, errno, gc, hashlib, heapq, io, json, math, os, random, re, select, socket, ssl, struct, sys, time, uasyncio, zlib, and _fio . It also facilitates several hardware-specific libraries such as Bluetooth, btree, cryptolib, framebuf, machine, micropython, neopixel, network, and uctypes. It also provides many microcontroller-specific libraries called port-specific libraries. Many libraries are available as modules that are original libraries rewritten for special needs. Even embedded engineers are free to rewrite or modify any MicroPython library.
MicroPython is an excellent tool for designing and implementing your embedded systems with the power of the Python language. In this tutorial, we will discuss setting up MicroPython development environment using uPyCraft IDE. Let's start exploring MicroPython firmware with the popular microcontroller boards – ESP8266 and ESP32.
Setting up the MicroPython development environment
To start programming microcontrollers with MicroPython, all you need is a microcontroller board of your choice and a computer. Depending on your hobby or need, you can select electronic components like sensors and displays. We chose ESP866 and ESP32 boards to work with the MicroPython framework. The first step to starting your MicroPython journey will be to set up a development environment on a computer system. This essentially involves four steps –
- Installing Python: MicroPython is a subset of Python 3. Therefore, you need to install the latest Python3.x on your computer system.
- Installing uPyCraft IDE: Various IDE can be used to write MicroPython scripts. The uPyCraft IDE is the simplest. It allows you to start programming MicroPython within minutes.
- Loading MicroPython firmware to the selected microcontroller: MicroPython scripts will not work on a microcontroller until MicroPython firmware is inside it. So, before you start writing real Python scripts to control embedded hardware, you need to upload the firmware to the microcontroller of your choice. This tutorial will show you how MicroPython firmware is loaded into the ESP8266 and ESP32.
- Get your hands dirty with great Python scripts: Once the firmware is loaded into the ESP8266/ESP32 or other supported microcontrollers, you can write, upload, and run programs embedded in Python scripts on the selected microcontroller.
We will go through all these steps in this tutorial and finally test an LED blinking program on the ESP8266.
Installing Python on Windows
To install Python on Windows, navigate to the Python download page and download the installation file. Double-click the installation file to start Python setup. Remember to check the “Add Python 3.x to PATH” option before continuing the configuration. Within a few seconds, the setup will be completed and a window showing the message “Setup was successful” will appear. Close the window. You have Python installed on your Windows computer.
Installing uPyCraft IDE on Windows
uPyCraft is the most hassle-free programming environment to get straight to MicroPython programming for embedded devices. The project can be found at the DFRobot Github link. The configuration for Windows can be downloaded from this link. Download the configuration file and double click. A window will appear asking you to install the SourceCodePro font. Click ok and continue.
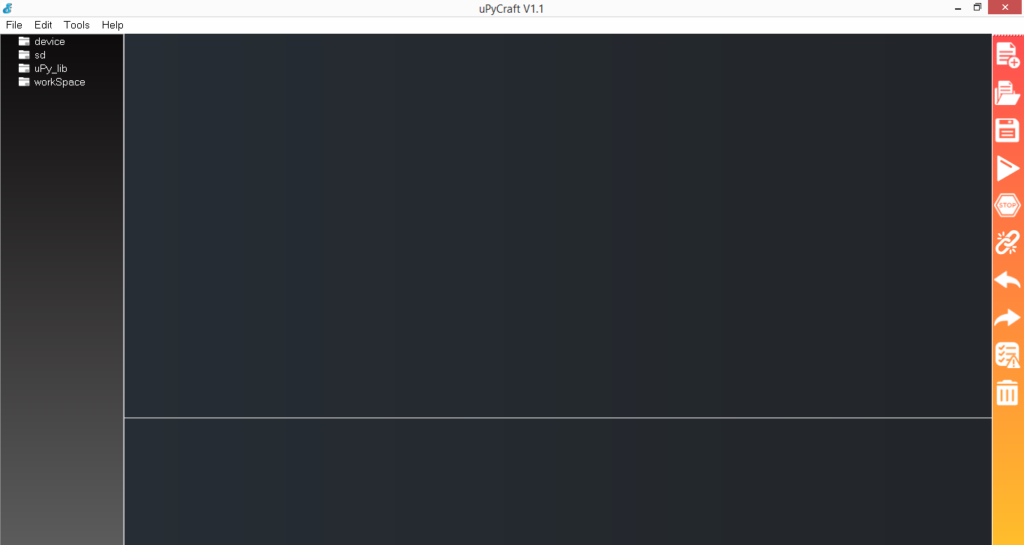
The IDE does not require installation. When you click ok, the IDE will open in a few seconds as shown below.
Installing Python on Linux
To install Python 3.x and pip python package manager on Linux, type the following commands in the terminal window and press Enter.
$ sudo apt install python3 python3-pip
If Python is installed successfully, its version can be checked by running the following command.
python –version
or
python -V
Installing uPycraft on Linux
UPyCraft IDE does not have sound support for Linux systems. For MicroPython programming on Linux Ubuntu, I prefer Thonny IDE over uPyCraft IDE. The official uPyCraft download page has also removed the Linux distribution setup link.
However, uPyCraft can be installed on a Linux distribution from its source code. Download the ZIP source code from this Github link and follow the instructions to install uPyCraft on Linux given in the same link.
Installing Python on Mac OS X
To install Python 3.x on Mac OS X, type the following commands in the terminal window and press Enter.
$ brew install python3
Installing uPycraft on Mac OS X
Unfortunately, uPyCraft is again not the best IDE for MicroPython programming on Mac OS X. The Mac setup link on the uPyCraft download page is missing. Likewise, you may prefer Thonny IDE for Mac computers.
However, uPyCraft can be installed on Mac using the source code. Download the ZIP source code from this Github link and follow the instructions to install uPyCraft on Mac given in the same link. Please note that uPyCraft behaves strangely on Mac systems.
Loading MicroPython firmware for ESP8266
Once uPyCraft or Thonny IDE is installed on your computer system, you will need to upload MicroPython firmware to your microcontroller. If you are working with ESP8266, it is very simple to upload the firmware to the ESP board using uPyCraft IDE. MicroPython firmware for various microcontrollers and hardware platforms is available at this link. For ESP8266, MicroPython firmware can be downloaded from this link.

Now connect the ESP8266 to the computer via a USB cable. Navigate to Tools->Serial and select the COM port that the ESP8266 is connected to. This is COM5 in our case.
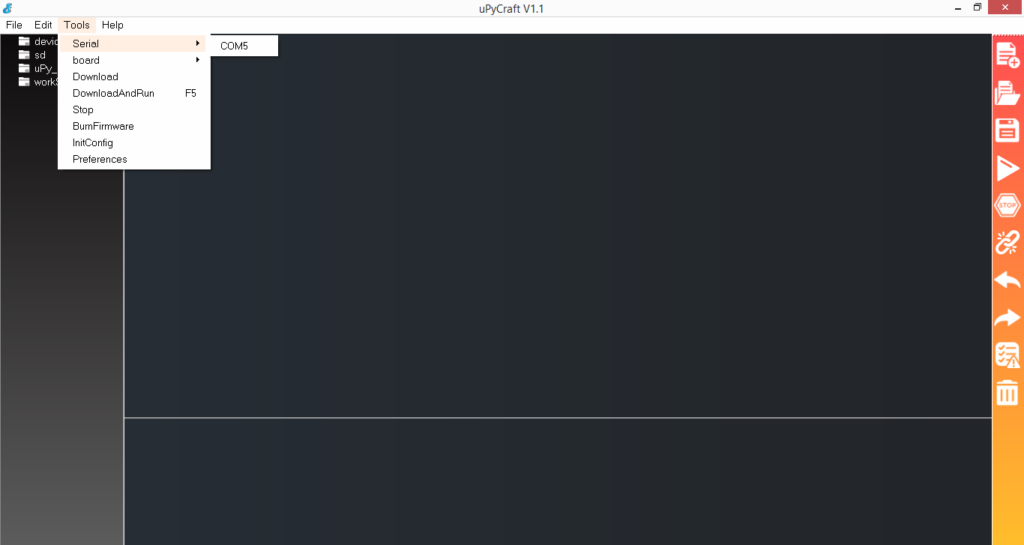
If the COM port is not shown in the uPyCraft IDE, either the ESP8266 is not installed with the CH340 driver or the USB cable does not have data wires. The cables that come with power banks or chargers usually do not have data wires. Therefore, you need a suitable USB cable with data wires. Drivers can be downloaded from the Silicon Labs website.
Then navigate to Tools->Board and select ESP8266.

To upload MicroPython firmware, navigate to Tools -> BurnFirmware.
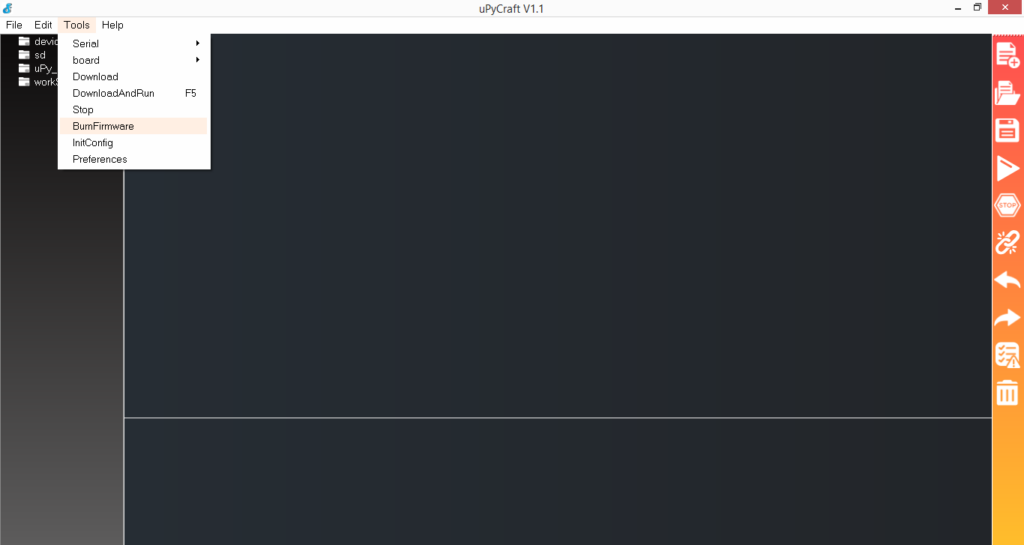
Uploading MicroPython Firmware on ESP8266 ESP32 in uPyCraft IDE
A window will open. Select the following options in this window.
board: ESP8266
burn_addr: 0x0
erase_flash: yes
com: comX
Firmware choice: Select the downloaded firmware file (.bin file)
Now hold the Flash/Boot button on the ESP8266 board and click OK.
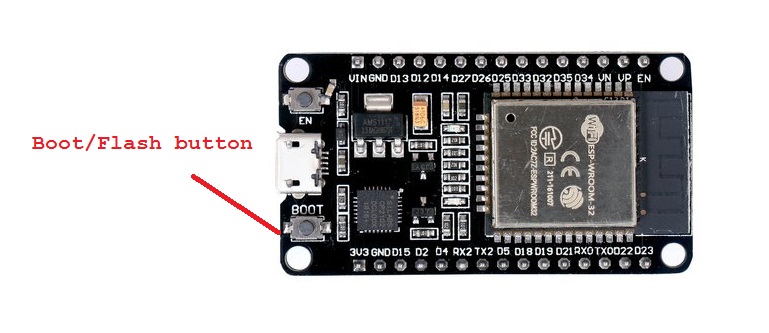
You can release the Boot/Flash button after clicking ok.
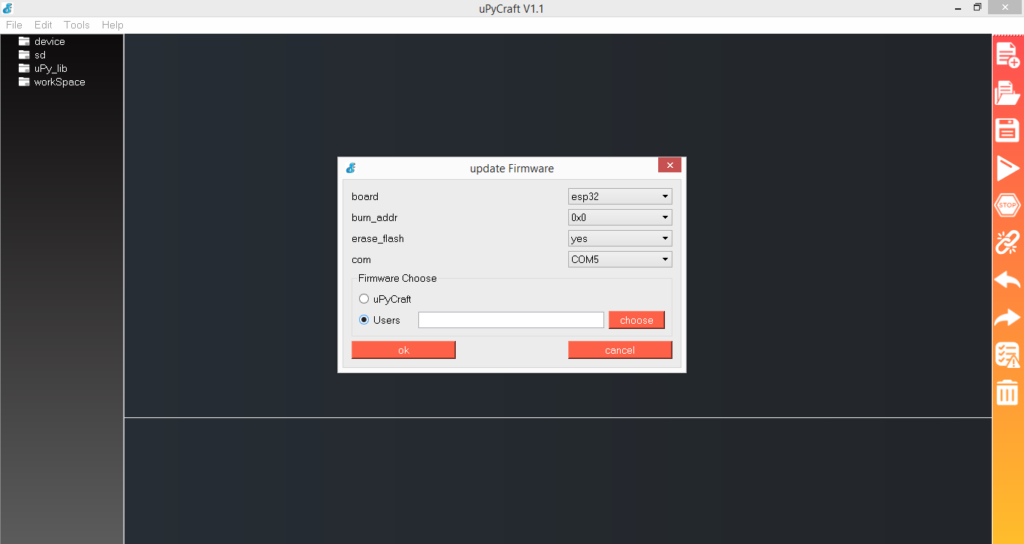
Uploading MicroPython Firmware on ESP8266 ESP32 in uPyCraft IDE
It will then erase the flash memory on the ESP8266 and load the MicroPython firmware.
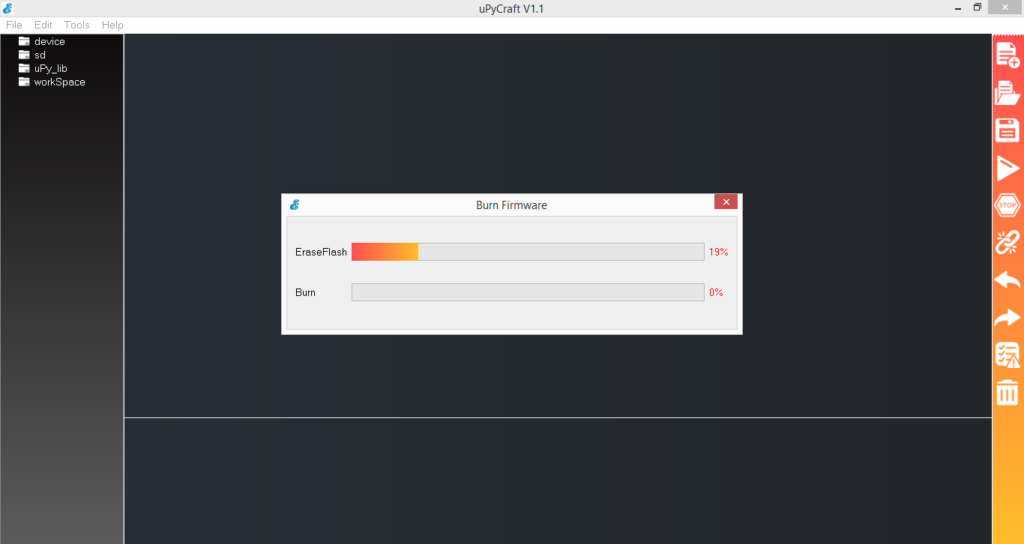
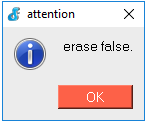
If you see an error shown in the image below, ESP8266 is not boot mode. You didn't press the boot/flash button correctly. Repeat the above process from selecting a port to burning the firmware and remember to press the boot/flash button correctly before clicking ok in the burnFirmware window.
Exploring the uPycraft IDE
uPyCraft IDE is simple, efficient and easy to use. The IDE interface is mainly divided into five sections.
- Menu bar: This bar contains the IDE's main menu, which includes the Files, Edit, Tools, and Help tabs.

- Folders and files: There is a file explorer on the left side. This shows the file currently loaded into the ESP8266/ESP32's flash memory, files stored on an SD card, files from the built-in library, and files stored on the desktop. If the ESP8266/ESP32 is connected to the IDE (by clicking the connect button in Tools), the device folder shows the files loaded into the ESP8266/ESP32's flash memory. If the firmware is successfully loaded onto the ESP8266/ESP32, this folder essentially contains a boot.py file. Any python script to be executed can be saved with any name such as LEDblink.py or sendEmail.py, etc. If the script to be executed has already been loaded into the ESP8266/ESP32, it will be displayed in the device folder. This script always runs after boot.py.
The SD folder shows the files stored on the microcontroller's SD card. This folder only works with boards with an SD card slot like PyBoard. The built-in IDE library files are shown in the uPy_lib folder. The workspace directory shows the files stored in the workspace folder on your computer. To refresh this directory with the IDE, navigate to File->Reflush Directory.
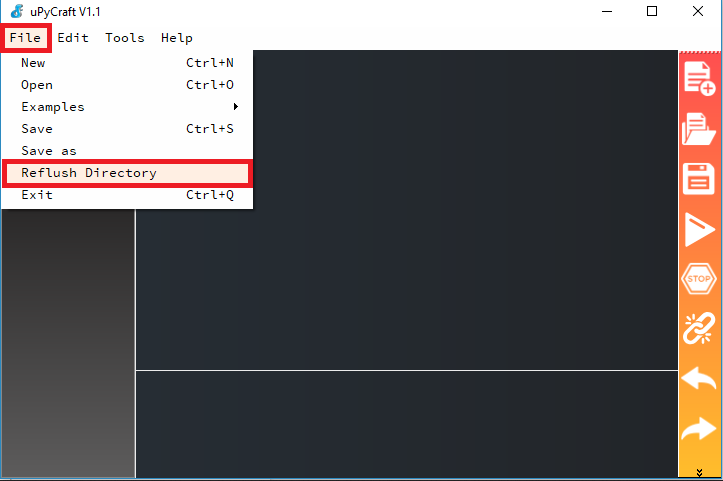
Updating workspace folder in uPyCraft IDE
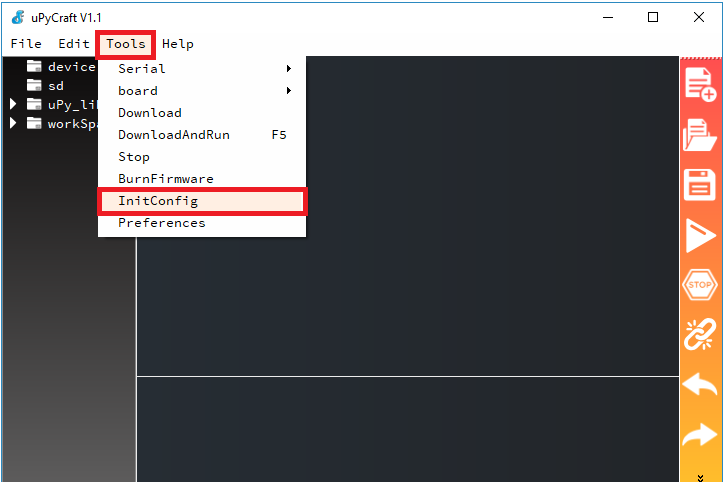
Later this directory can be changed by navigating to Tools->InitConfig.
- Editor: This is the space where you write Python scripts to control embedded hardware.
- MicroPython Shell/Terminal: This is a debug console in uPyCraft IDE. You can enter commands here that you want to run immediately on the ESP8266/ESP32. It also shows errors, serial messages and program execution status.

- Tools: There are a series of quick icons for various tools on the right side.
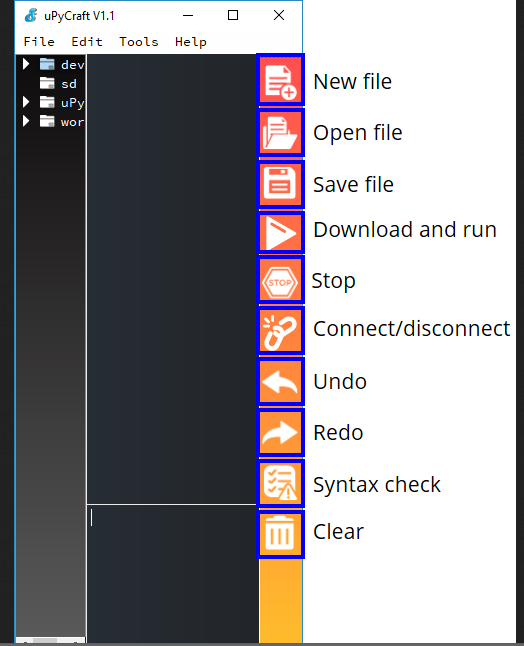
These tools are described below:
New : To create a new file in the editor.
Open File : To open a file from the workspace folder.
Save File : To save changes to a currently open file.
Download and Run : To upload the main Python script to ESP8266/ESP32 and start running the program on the board.
Stop : To stop program execution on ESP8266/ESP32.
Connect/Disconnect : To connect or disconnect the ESP8266/ESP32 board via serial communication (USB cable). Before connecting, you need to select the board and serial port in the Tools menu.
Undo : Undo the last change in the code editor.
Redo : Redo the last change in the code editor.
Syntax Check : To perform a syntax check on the currently open script tab.
Clear : to clear Shell/Terminal messages.
Writing and Uploading Python Scripts for ESP Boards
First of all, select the board and serial port from the Tools menu. Then connect by clicking the connect button in the Tools icons. Now you can write your Python script for your intended embedded application. The firmware must already be loaded on the ESP8266/ESP32. After writing the script and checking for errors, click the Download and Run button on the Tools icons to upload the main run script to the ESP8266/ESP32. You can stop the script from running by clicking the Stop button on the Tools icons. The Shell/Terminal window shows any serial messages communicated during code execution on the ESP8266/ESP32 are shown in the Shell/Terminal window.
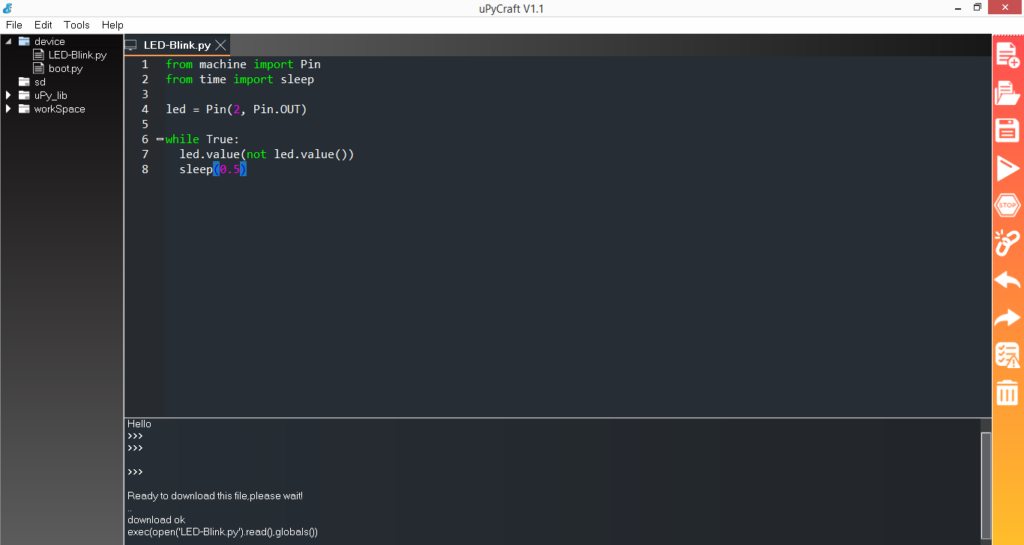
LED blinking on ESP8266 using MicroPython
After uploading the MicroPython firmware, write the following code in the code editor.
Machine Import Pin
of time matter sleep
led = Pin (2, Pin.OUT)
while True:
led.value(not led.value )
sleep (0.5)
Note that the text above is a Python script and the loop bodies are perfectly indented. Check for syntax errors and click the “Download and Run” button. The script will be loaded into the ESP8266/ESP32 and the built-in LED will start blinking.
(Link to ESP03-DV demonstration video)

