This tutorial will teach you how to scan QR codes using the Raspberry Pi module and the official Raspberry Pi camera. To connect the camera to the Raspberry pi, we use a dedicated header available on board. You can also use a USB camera with Raspberry Pi. The downside is that the USB interface is slow. Also, the USB port version of Raspberry Pi is 2.0, which is slow compared to 3.0. Some extra configuration and configuration is also required to tell Raspberry that a USB camera is connected to its USB port. The official camera is easy to use and all supporting files are already installed.
Before we begin, I assume you have already connected the camera to the Pi.
First, we must enable the camera in the Raspberry configuration file. The easiest way is to do this graphically. Go to main menu>Preferences>Raspberry Pi Configuration next window and go to camera interfaces , select the enable button.

Now it's time to update and install the necessary camera packages to activate the camera. Picamera is a lightweight package. It offers many functions and, above all, it is easy to play with. I installed this package. Open the Raspberry pi command prompt and type the following commands.
$ sudo apt-get update
$ sudo apt-get install python-picamera python3-picamera
Note : Both versions of Python 2 and 3 packages will be installed at the same time with the above command. It depends on you which version of python you are working with. I'm working with python 3 .
Another required package is zbarlight. This package decodes the QR code present in the image. To install zbarlight, type the following commands at the command prompt.
$ apt-get install libzbar0 libzbar-dev
$ pip3 install zbarlight
The image processing package called PIL is pre-installed on the Raspberry pi. If it is not present, you can install it with
pip install –no-index -f -U PIL
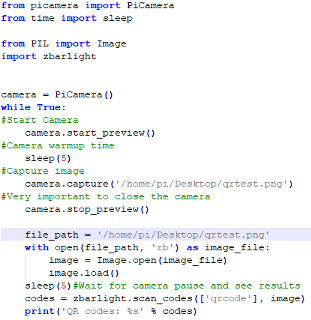
 In the code, I first imported the packages at the top.
- Pi Camera package to work with Raspberry Pi camera
- Time> sleep By delay
- PIL for image processing
- Zbarlight to decode and find the QR code present in the processed image.
Next, an instance of PiCamera called camera is created. Camera.start_preview opens the camera feed and you can see the camera view on an LCD screen that the Raspberry pi is connected to. Sleep(5) the control remains suspended for 5 seconds. You can see the camera image in these 5 seconds. Camera.captura captures the image and stores it in the location specified in the function arguments. Camera.stop_preview ending camera power means no camera will be displayed on the screen.
Now the image decoding and QR code extraction part begins. A variable named file path path assigned to the image. With open statement opens the image as an image file. ' rb ' means that the file under consideration is not a text file. Variable image is holding the file, which is opened by PIL(Imagem.open(image_file)) image processing library. Image.load loads the image. Image vectors are now present in the image variable. The vectors are then passed to zbarlight to extract the QR code from the vectors. The extracted QR code is stored in the codes variable and at the end print statement prints the extracted text in the console.
Test
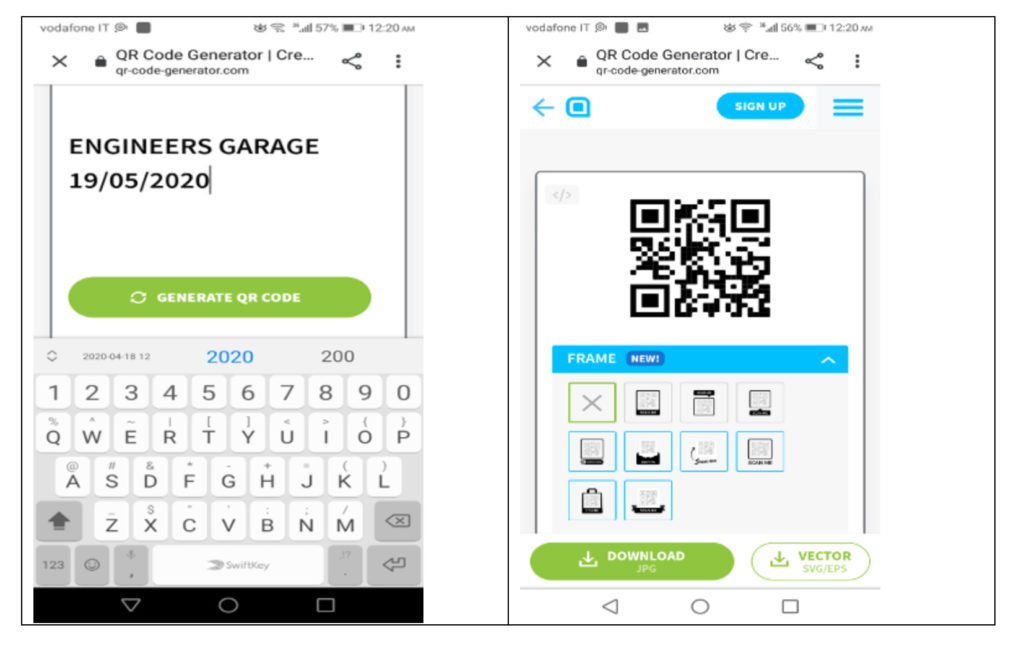
I generated a QR code using an online website on my cell phone. The QR input text is on the left side and the encoded QR image is on the right side.

I ran the code on the Raspberry pi and placed the cell phone in front of the camera ( You can see the video at the following link
The decoded message is

I used the standard Thonny python ide on the Raspberry Pi. You can run the python file from the command prompt. I suggest using any python ide. Ide will inform you of any errors and type if any errors arise.
Let's do this DIY project: Where to buy parts?
Raspberry Pi (Mouser Electronics)
Raspberry pPi Camera (Mouser Electronics)

