In this tutorial, we will learn how to interface the BME680 four-in-one pressure, gas, humidity and temperature sensor with Raspberry Pi (RPi). This will include understanding how to log and retrieve data from a database.
The BME680 can “talk” to external controllers over serial peripheral interface (SPI) and I2C protocols. For this project, we will use the RPi's I2C port to connect to the sensor. Like the Arduino, the RPi offers predefined libraries, including one for the BME680 and its predecessors.
To get started, install Raspberry OS on your RPi by enabling the I2C interface/port. To do this, use the graphical user interface or GUI – go to Start Menu > Preferences > Raspberry Pi Configuration and select the radio button next to I2C interface).
You can also do this from the command prompt/Shell by typing sudo raspi-config and enabling the I2C port in blue screen .
Then install the latest version of Python.
sudo apt update
sudo apt install python3 idle3
Then install the Python package intended for the BME680 sensor. Note: If the system says “pip not found”, you need to install pip first.
sudo pip install bme680
For data logging purposes, we use the Python RPI package “PyMySQL”. We will simultaneously use RPI as a server to host our database.
To install PyMySQL:
python pip install pymysql
The above installation instruction for PIP will only work with Python 2.0. For Python 3, you will need to use PIP 3. After installing the packages, you need to import them into the code.
The code
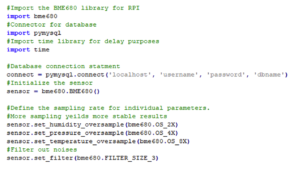
First, import the BME680 sensor and PyMySQL library. The timing library is included so that you can insert a delay between instruction executions if/when necessary.
The connection to the database must be established next. Since we are using RPI as the server, localhost is passed as a server parameter.
Observation:
- The username is the name of the database administrator
- The password is the database password (if set)
- The name of the database (DB) is “dbname”
You need to ensure that these names are correct or replaced if possible. The sensor is initialized with this instruction: bme680.BME680 instruction.
Next, the sampling rate of the individual sensor parameters must be defined.
For the:
- Humidity – 2X
- Pressure – 4X
- Temperature — 8X
- Filter out all background noise
The body of the program follows. The loop continuously reads sensor data, filters it, and passes it to the database for storage.
- The statement, get_sensor_data , checks for the presence of any data. If considered “true”, the data will be read and stored in the output variable.
- The sensor.data.temperature statement provides the temperature reading. This reading is placed in the output string variable.
- Where in {0:.2f}, 0 means the first placeholder and .2f means the floating point number (with two decimal places).
- The remaining parameters 2{1 and 2} refer to pressure and humidity.
- The thermostable instruction allows you to read the gas. If the data is reasonably stable (and not fluctuating drastically), it prints the output variable – which stores the temperature, humidity and pressure values with the gas readings.
- A three-minute delay is included to stabilize the sensor.
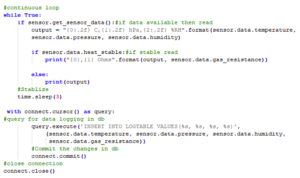
To record data in the database, you need to enter data into the database. SQL query statement. The “%s” serve as placeholders for each of the values. Finally, confirm the data to update the database and close the connection.
The SQL insert query enters the table name as LOGTABLE. However, you must first create this table to record data in it. Let's assume we create a database name “MasterDB”, with a table inside it called “LOGTABLE”.
The SQL statements would be:
CREATE MasterDB DATABASE; #Create a database called MasterDB
USE MasterDB; #Set's MasterDB in use – Every query now goes to this database
CREATE TABLE MestreDB ( #Create table with coulombs
Fluctuating temperature ,
Floating pressure ,
Fluctuating humidity ,
Gas floating
);
SQL statements are general MySQL statements. To execute them in Python code, first place them in the appropriate Python MySQL binder – just as we did with PyMySQL in the code above (INSERT statement).
To extract data from the database, the Python statement for the PyMySQL binder is:
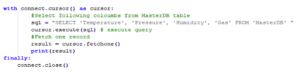
Select coulombs (for temperature, pressure, humidity, gas) in MasterDB. Obtain a log and print it to the console.
Any RPI Python IDE can be used for this project. We used Thonny .
Circuit Diagram

Where to buy the parts?
- Raspberry Pi: mouse
- BME680 sensor: mouse