
Small organic light-emitting diode (OLED) displays are commonly used in embedded devices. This is because OLEDs generally cost the same as character LCDs, but feature a better user interface (UI) and user experience (UX).
Typically, embedded OLED screens are used to display text messages, but what about videos? For example, is it possible to play a video on a small 0.96″ OLED?
This is not a problem for an OLED, which offers few limitations on its display. The challenge here lies in the microcontroller. Microcontrollers are designed for simple tasks that do not include video processing. So displaying a short video clip on a 0.96″ OLED requires a trick of the trade.
To be clear, microcontrollers cannot be programmed to process video formats. However, it is possible to extract enough frames from a video clip and convert them into executable code. When frames are displayed in sequence, it will appear as if the same video clip is being played through the microcontroller.
For this project, we will prepare and play a video clip on a monochrome SSD1306 OLED.
Choose your microcontroller
It's important to note that not all microcontrollers will be up to the task of displaying selective frames from a video clip – even if those frames are only a second or two long.
For example, the maximum flash memory on Arduino boards is typically 256 Kb. This is insufficient to store the code of five or more video frames with dimensions of 128×64. So for this project, we will need a microcontroller with large flash memory.
ESP32 is a suitable option for video playback as its memory ranges from 4 to 16 MB, which is enough to store the code of several frames. To ensure reliability, we will cut a 12-second video clip into 36 frames so that the ESP32 can play the frames easily.
SSD1306 OLED interface with ESP32
First, we need to interface the OLED with our microcontroller. Here we are using a 0.96″ monochrome SSD1306 OLED and ESP32. A 7-pin OLED module connects to the ESP32 via an SPI interface.
The SSD1306 OLED and ESP32 have the following circuit connections…
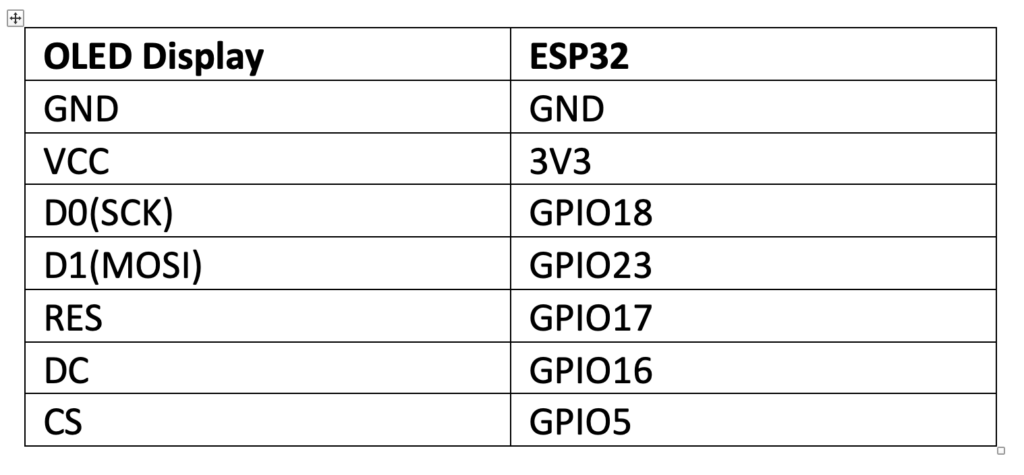
The SSD1306 OLED, interfaced with ESP32, has this circuit diagram:

The music video
You can record any video clip that is a few seconds long. In this project, we selected one that is about 12 seconds long. This clip has a resolution of 1920×1080 and a frame rate of 30 fps.

Preparing the video
The music video is an RGB video, but we will play it on a monochrome OLED, which means it should be in grayscale. It's easy to convert the clip to grayscale video using an online video editor. We use MovieMakerOnline.
If you use the same tool, simply navigate to moviemakeronline.com and upload the target video file by clicking the “Add File” icon.

After uploading the file, click on the “Effects” button.

Then click the “Add effect” button.

Choose the “Threshold” option in the effects.

Click the “Create Video” button and wait for the video to finish processing.

After processing the video, click on the “Watch Movie” icon.

When the grayscale video plays, right-click and select “Save Video As…”
Make sure to save the grayscale video under a different name.

The new grayscale video will still display a resolution of 1920x1080 and a frame rate of 30 fps.

The grayscale video looks like this…
Cropping the video to the right size
Our OLED display has a resolution of 128×64, which does not correspond to the video frame size. Therefore, we must adjust the grayscale video resolution to ensure that the frames fit on the OLED screen for proper viewing. It is also necessary to reduce the frame rate.
To do this, use a professional video editor. We use VLC media player which is a free and open-source cross-platform multimedia player. It can be downloaded for Microsoft Windows, macOS and Linux.
Open VLC media player and navigate to Media->Convert/Save.

In the pop-up window, click “Add”.

Then select the target grayscale video and click the “Convert/Save” button.

In the next window, click on the “Create a new profile” button.

Then select the “AVI” tab under “Encapsulation”.

Now, change the Codec to “MPEG-4″ and set the frame rate to 5 fps in the “Encoding Parameters” tab of “Video Codec”.

Make sure the scale is set to “2” as the SSD1306 has a resolution ratio of 2:1 (128:64). Also, set the frame size width to 128 and height to 64 in the “Resolution” tab of “Video Codec”.

Then set the profile name to SSD1306.

Click the “Create” button and you will return to the conversion window. In the conversion window, select the “SSD1306” profile and look for a location to save the converted video.


Click “Start” to finish the conversion.

Now we have a grayscale video with a resolution of 128×64 and the frame rate is reduced to 5 fps.
(Link to sample video-BWC)
Extracting the frames
Next, we must extract the frames from the 5 fps grayscale video. You'll want to use a professional video editor for this, like VLC media player.
Run VLC media player as administrator.

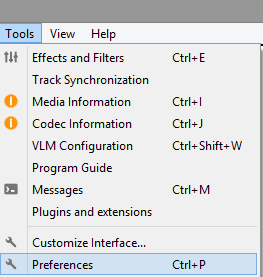
Click the “All” radio button under “Show Settings”.

Navigate to Video->Filters.

Select “Scene Filter” and set the image format to “jpg”, the file name prefix to “Frame”, and the recording aspect ratio to “5”. Select a destination path to save the extracted frames by navigating to “Directory Path Prefix”. Then click “Save”.

Once again, open “Preferences” and choose the “Video Scene Filter” option by navigating to Video->Filters. Make sure to click “Save”.

Close VLC media player and run administrator again. Open and play the 5 fps grayscale video. Video frames will be extracted into the folder defined in “Directory Path Prefix”.
 Converting the frames
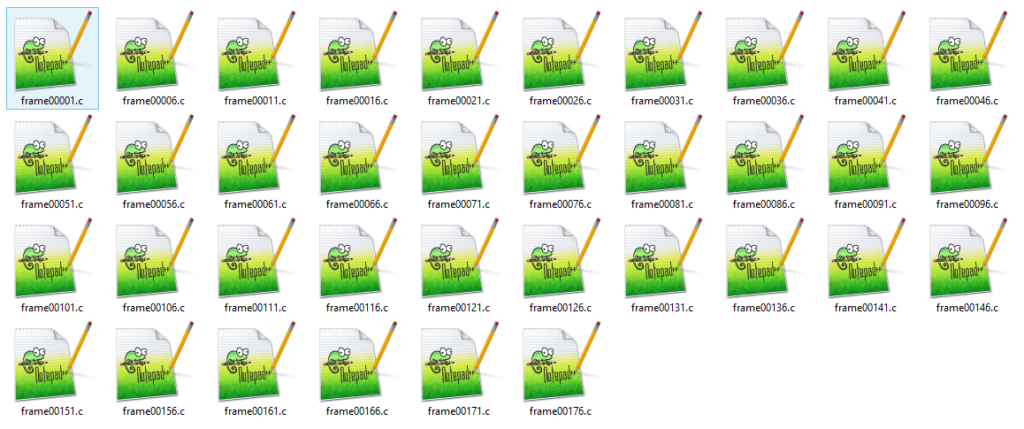
Select the grayscale frames from the original video at 128×64 resolution (the resolution of our OLED). Next, you need to convert the frames to binary format. To do this, we must first convert the frames to C arrays using any online/offline image converter.
We use LGVL, which is available here.
Ideally, it should be possible to upload all frames simultaneously to this online converter.
Upload the frames and select the color format for “CF_INDEXED_1_BIT”. Then click the “Convert” button.

In return, we will receive .c files containing a C array for each frame. We will only copy the 64 x 16 hexadecimal array from each file.
The libraries
To install the required libraries, open the Arduino IDE and install Adafruit_GFX.h and Adafruit_SSD1306.h by navigating to Tools->Manage Libraries. We use ESP32-Dev-kit-V1 for this project, so “DOIT ESP32 DEVKIT V1” is selected by navigating to Tools->Board->ESP32.
The port is selected by navigating to Tools->Port.
The code
The sketch starts by importing SPI.h, Wire.h, Adafruit_GFX.h and Adafruit_SSD1306.h. These libraries are required for the OLED SSD1306. Variables are defined to store the width and height of the OLED. Variables are also defined for the circuit connections of the OLED for use with ESP32.
A “display” object of class Adafruit_SSD1306 is instantiated. The C arrays for each frame are stored in PROGMEM as follows…
The C arrays for all frames are enumerated in another array: epd_bitmap_allArray .
In the configuration function, the SSD1306 OLED is started by calling the display.begin(SSD1306_SWITCHCAPVCC) method.
In the loop function, a “for loop” is executed to clear the screen, showing the bitmap matrix for each frame and providing a 200 ms delay. All video frames are played as the “for” loop completes navigation through the epd_bitmap_allArray array. Finally, a one-second delay is added to provide a pause in playback.
Results


