How to install and run Arduino on Linux
This tutorial explains how to install and run Arduino on a Linux distribution such as Ubuntu. Arduino is now available in the Ubuntu software center which is one of the Linux repositories.
Ubuntu needs to meet the required Arduino dependencies. So, before installing Arduino, make sure the dependencies are met.
Required Arduino Dependencies on Linux
Two dependencies are required before installing Arduino on Linux:
- Java runtime environment
- GCC AVR Compiler
Java runtime environment
Arduino software is made in java environment and to run java program we need to download and install Java runtime environment. There is no need to install java run time if it is already installed on your system. Since the Arduino software already includes java, you can install it individually from the Ubuntu software center using the following command terminal command line:
sudo apt-get install openjdk-7-jre
GCC AVR Compiler
Complier is an extended tool that converts the source file into an object file (machine code) so that the CPU can understand it. As Arduino belongs to AVR family, we need AVR compiler to compile Arduino source code. But you don't need to install it as the software already includes GCC AVR Compiler.
We can install Arduino from the Ubuntu software center if it is not already installed on the system.
Type the following command in the terminal and press the Enter key:
Arduino
If Arduino is installed, it will open, but if it is not installed, the following output will be displayed on the screen:
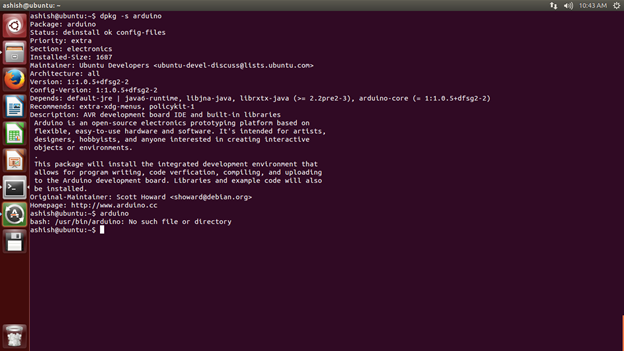
Fig. 1: Screenshot of output in Linux console if Arduino is not installed on Ubuntu
Type the following command in the terminal and press the Enter key:
sudo apt-get install arduino
Arduino is now starting to install from the Ubuntu software center. Wait for the installation process to finish. Now open Arduino in the command terminal by typing the following command:
arduino
Now the Arduino opens and displays the dial box on the screen.
Note: Here you must be added to the 'dialout' group to be able to upload sketches to Arduino.
After adding the dial box, exit the system and restart the system. It will look like the following:
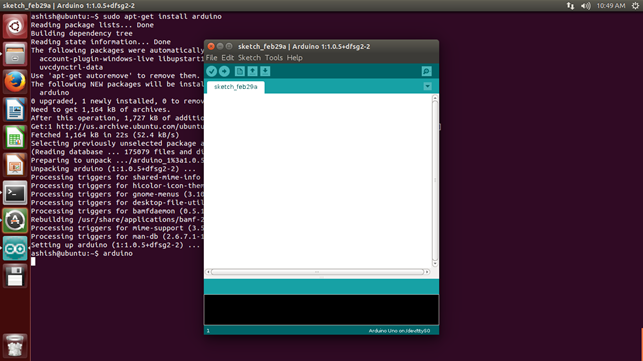
Figure 2: Screenshot of the Arduino IDE in Ubuntu
Now connect the Arduino board via the USB cable and check whether it is connected or not by typing the following command:
lsusb
On my system it is logged in and displays the following:
Bus 002 Device 004: ID 2341:0001 Arduino SA Uno (CDC ACM)
Now, open Arduino and go to the Tools > Serial Port > tab and select the Arduino port.
Select the specific board in Tool > Board. Select a simple Blink example and compile it.
Now you can work with Arduino on Ubuntu Linux.
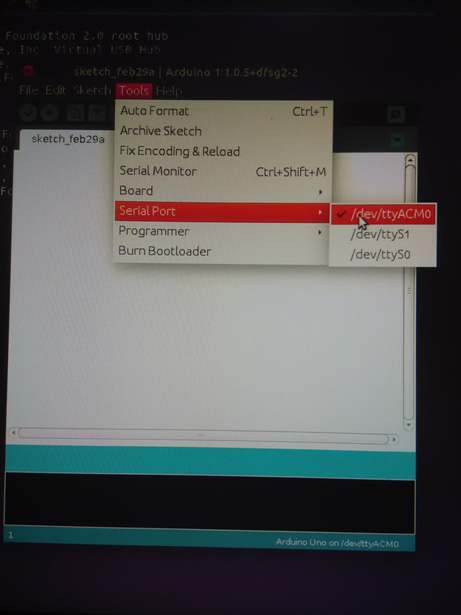
Figure 3: Screenshot of the Arduino IDE in Ubuntu