Nodemcu is a popular WiFi module among hobbyists building DIY home projects. In some projects/applications, Bluetooth is required to be connected to the nodemcu. For example, I was recently working on a project where a DIY washing machine delivered the status of cloths every 2 minutes to a Bluetooth device. One can easily see the status of the machine on a Bluetooth app. I decided why not view the status in a browser and also list the history. I connected a Bluetooth device and an SD card to the nodemcu. Bluetooth receives the status of the machine and saves it to the SD card. Nodemcu is working as a server, serving a web page. Whenever a client makes a request to the server, nodemcu fetches the saved data from the SD card, lists the history on a web page and sends it to the client. It was a big project, I will share just a small part of it in this tutorial on how to connect HC-05 and HC-06 Bluetooth module with nodemcu.
HC-05 and HC-06 Bluetooth Module
The difference between the two modules can be many, but the only ones that are serious to consider before choosing them for a DIY project are
- Hc-05 can work as master and slave. It can initiate a pairing request to others, and other devices can also request it for pairing.
- The Hc-06 Module can only work in slave mode. Unable to initiate pairing request for other nearby devices. It can only accept the pairing request made by my others.
- The Hc-05 module has some extra pins that can be used as GPIO.
Both Hc-05 and Hc-06 modules work with 3.3V TTL level signal. Input power can be between 3.3 and 6 volts. The integrated regulator converts the voltage suitable for the Bluetooth module to operate constantly. Hc-05 and Hc-06 communicate with external controller on UART interface.
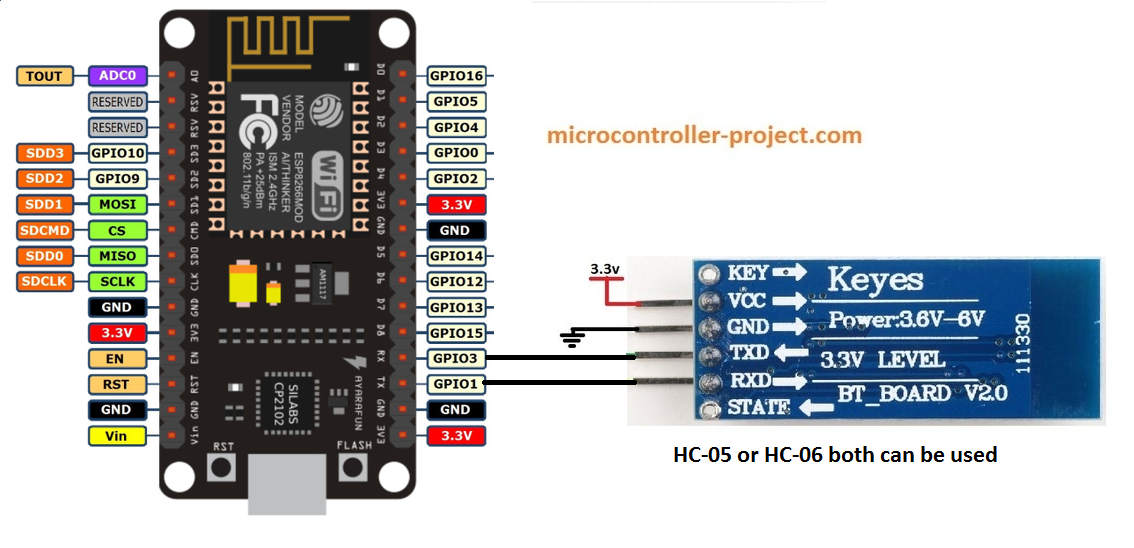
Nodemcu also works with 3.3v TTL level signal. The module can be powered by a 5 volt source. Its integrated regulator also levels the input voltage to 3.3 volts. The UART interface of both modules can be connected directly since both modules are working on the same 3.3v TTL level signal. No pull up or pull down circuits are required. Pull up down networking is required when modules are running at different TTL levels such as 3.3v and 5v. Directly connect the nodemcu Tx to the Hc-05 Rx and the nodemcu Rx to the Hc-05 Tx. The circuit diagram of the project is given below.

Hc-05 and Hc-06 Bluetooth Module with nodemcu
The Hc-05 or Hc-06 module can be directly powered by the nodemcu Esp8266-12E WiFi board. The 3.3 volt Nodemcu output provides sufficient current for the Bluetooth module to be operated.
Android application – Bluetooth Terminal
I downloaded a simple app from the Play Store for this project. The app can easily locate and pair nearby Bluetooth devices. You can download the application by clicking here.
The code is simple. It is written and compiled in Arduino IDE. Just upload the code to nodemcu. Make sure you select the right card. After uploading, open the Arduino Ide serial monitor.
Hc-05 Hc-06 Pairing with Android App
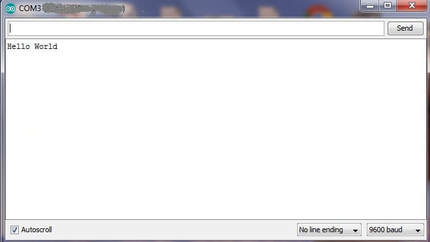
Power the nodemcu and Bluetooth module. Open the Android app and search for available networks. You may see HC-05 or HC-06 in the available devices depending on the module you are using. Select your Bluetooth device, a window will appear asking for the password. The default password for the HC-05 and HC-06 module is 0000 or 1234. Enter it and your cell phone will be paired with the Bluetooth module. The application's default communication baud rate is set to 9600 bps. On the nodemcu side, we set the communication speed to 9600 bps, so we don't need to change any settings on the application side. Now enter your message in the app and send it. Your message will be displayed on the Arduino serial monitor.

Arduino serial monitor received data
|

Android app checking available devices
|
I have shown in this tutorial how to communicate effectively between Hc-05, Hc-06 and nodemcu WiFi module. The project can be expanded further. When receiving data, various triggers can be generated, for example, lamp on, fan starting, water pump starting, etc.
Download the project code. The folder contains the project's .ino file. Please provide us with your feedback on the project. If you have any questions or concerns, feel free to write them in the comments section below.
Bluetooth with Nodemcu.ino


