This article aims to make readers explore how to interface CAN Bus with Arduino, which is used in communicating sensors, actuators, and controllers in a car.
This project helps to understand the insights of interfacing CAN protocol with Arduino. Controller Area Network or CAN protocol is a communication methodology between various electronic devices such as engine management systems, gear control, active suspension, ABS, lighting control, air conditioning, airbags, central locking, etc. For more learnings, check this article.
Here you will get an idea about programming Arduino to interface with CAN Controller (MCP2515) to act as a transceiver.
DESCRIPTION:
Prerequisites and equipment:
You will need the following:
-
Two Arduino boards or Arduino clone (here's a guide if you need it)
-
A 5v TTL-UART Bluetooth module.
-
Arduino IDE for programming.
-
Two MCP2515 CAN Tranciever.
Features MCP2515 CAN Transiever:
-
Implements CAN V2.0B at up to 1 Mb/s
-
SPI interface up to 10 MHz
-
Standard (11-bit) and extended (29-bit) data and remote frames
-
Two receive buffers with prioritized message storage
-
Two LED indicators
Demonstration:

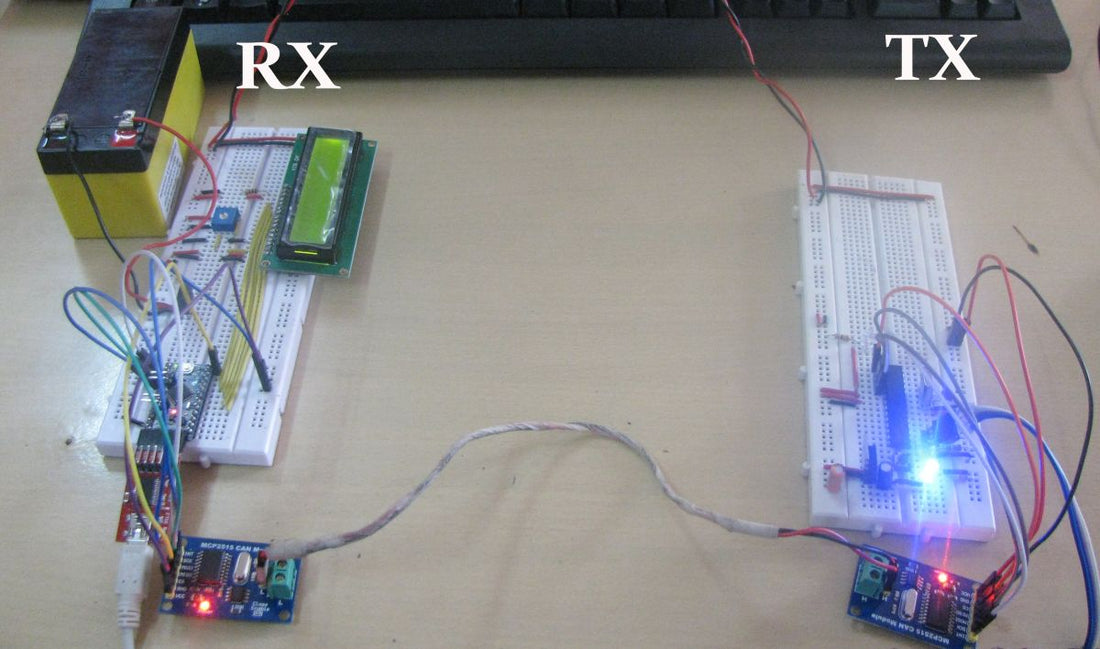
Fig. 1: Prototype of Arduino-based transmitter and receiver circuits for communication via the CAN interface
1. Download the CAN-BUS library code file for Arduino 1.0 and unzip it into the libraries directory of the Arduino IDE folder. For my computer configuration, it is in this directory
XXXarduino-1.0.1 Libraries
After copying the files, the directory
XXXarduino-1.0.1librariesDHT
2. Open Arduino-1.0 and navigate to Examples where you will find examples: receive_blink, receive_check, receive_interrupt, Send, Send_blink. Here we will use send and receiver_check to check our CAN bus.

Fig. 2: Screenshot of navigation for CAN receiver example code in Arduino IDE
3. Upload Send examples to an Arduino board. Choose the board by navigating to: Tools -> Serial Port -> COMX.
Note: Remember which board you selected as the “sending” node and which board you selected as the “receiving” node.
4. Open the “Serial Monitor” by selecting the Com port you selected for the receiver, you will receive the predefined message “0 1 2 3 4 5 6 7” which is sent from the “send” node. This can be seen in the following image.

Fig. 3: Screenshot of the Arduino serial port receiving predefined messages via the CAN interface
Functions in the CAN library:
1. Set the baud rate
To initialize the baud rate of the CAN Bus system, use the following functions.
The available transmission rates are:
CAN_5KBPS, CAN_10KBPS, CAN_20KBPS, CAN_40KBPS, CAN_50KBPS, CAN_80KBPS, CAN_100KBPS, CAN_125KBPS, CAN_200KBPS, CAN_250KBPS, CAN_500KBPS and CAN_1000KBPS
2. Check Receive
MCP2515 has two receive check modes, one is Polling where the code checks the received frame and the other mode is Interrupt mode where separate interrupt pin is used to notify the received frame.
Following is the Polling method to get the received frame.
INT8U MCP_CAN::checkReceive(void);
The function will return 1 if a frame is received and 0 if nothing is received.
3. Get CAN ID
If you want to know the CAN ID of the sending node when a message is received, you can use the following function.
INT32U MCP_CAN::getCanId(void)
4. Send data
The function below is to send data to the bus:
CAN.sendMsgBuf (ID INT8U, extension INT8U, len INT8U, data_buf);
Where,
“id” provides CAN ID of the sending nodes.
“ext” '0' means standard frame. '1' means extended frame.
“len” gives the length of this frame.
“dados_buf” is the main content of this message.
For example, in the 'send' example, we have:
unsigned character stmp(8) = {0, 1, 2, 3, 4, 5, 6, 7};
CAN.sendMsgBuf(0x00, 0, 8, stmp); //sends the 'stmp' message to the bus and tells other devices that this is a standard 0x00 frame.
5. Receive data
The following function is used to receive data from the bus:
CAN.readMsgBuf (unsigned char len, unsigned char buf);
“len” gives the length of the data.
“good” is the main content of this message.

Fig. 4: Arduino-based CAN transmitter circuit prototype designed on a breadboard

Fig. 5: Arduino-based CAN receiver circuit prototype designed on a breadboard
Circuit diagrams
| circuit_30 | 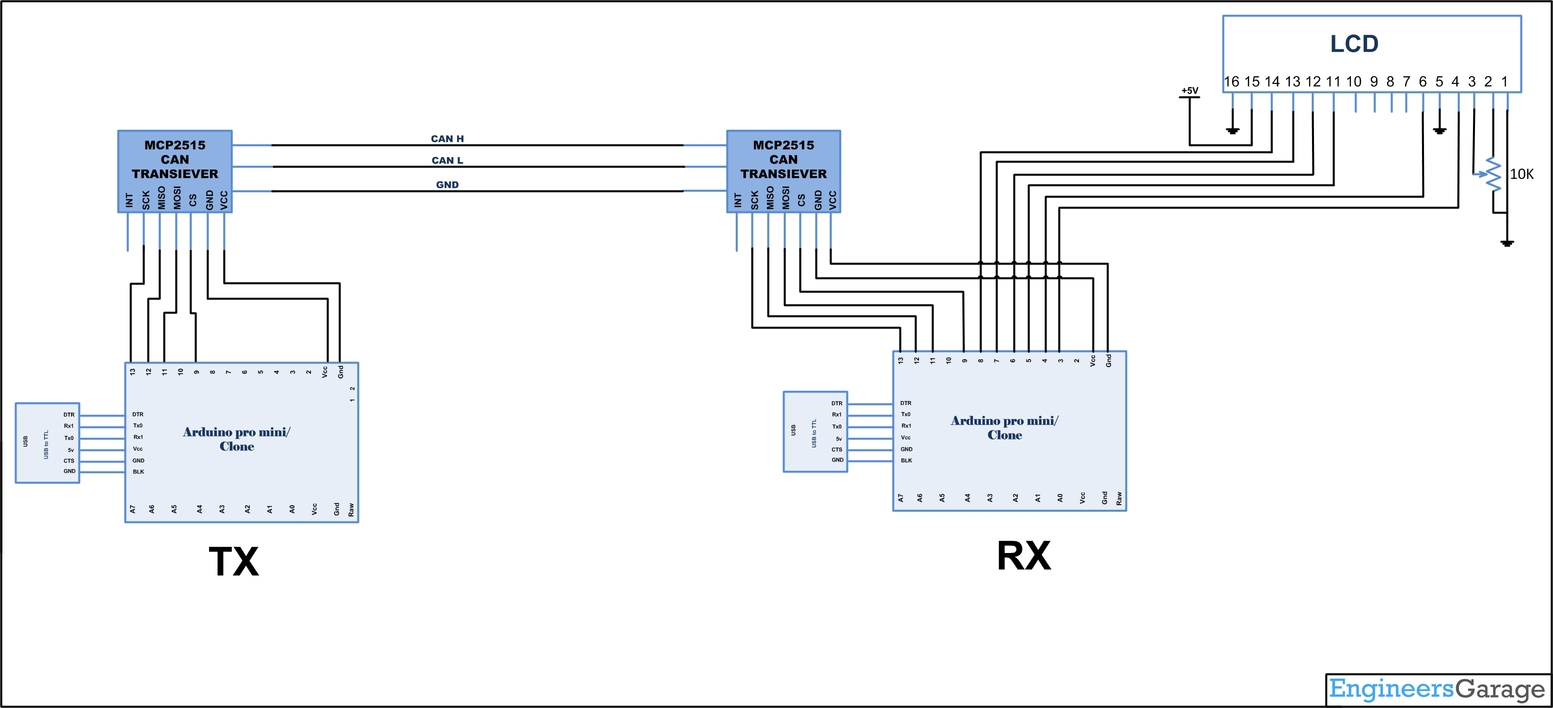 |
Project video