In all previous tutorials, power amplifiers were designed. Based on the application, there are two types of audio amplifiers –
1) Preamplifier
2) Power amplifier
Preamplifiers are used to level audio signals from a microphone or audio source to standard voltage levels, while power amplifiers are generally used in the output stage of audio systems to boost audio signals. audio before being played through the speakers. As the name suggests, a preamplifier prepares the signal coming from the microphone or line input for further signal processing and transmission. A preamplifier is the hidden part of any device. It is integrated into USB microphones, sound cards and mixers.
Preamplifier can be classified into two types –
1 ) Passive preamplifier – These preamplifiers use discrete OPAM transistor or tube for amplification of the input signal.
2) Active Preamplifier – These preamplifiers use transformer or other impedance matching components for signal amplification.
Preamplifiers are generally used to provide the voltage gain to flatten a signal in milli Volts to a few volts, such as increasing the amplitude of a signal by a few milli volts to the 1 V level. to remove any noise from the input signal coming from a microphone or audio source. Ideally, the microphone should be connected with the shortest connect device to avoid any noise or distortion, but this is not practically possible. So, preamps help by removing noise from the original audio signals.
Obviously, preamplifiers must necessarily level signal amplitudes to line levels. This is the most primitive and essential function of any preamplifier. The preamplifier sets the input signal to a line level. Line level is the standard audio signal strength for transmitting the signal between audio sources to amplifiers, radios, TV and DVD players. Line level is expressed in dBu (discharged decibels) or dbV (voltage in decibels). According to telephone standards, if 1 Vrms is equal to 0 dBV then the reference discharged voltage in decibels or 0 dBu is the AC voltage required to generate 1 mW of power into a load with an impedance of 600 ohms. The most nominal line level is -10dBu which is 0.316 V and +4 dBV which is 1.228 V.
The preamplifier is intended to strengthen the input signal. They do not provide high output current . Therefore, after a preamplifier, a power amplifier must be used if the audio signal is to be reproduced using a speaker, CD player or headphones at the output. Therefore, it can be assumed that a preamplifier is a small amplifier before the power amplifier that has output current in the microamp range.
Passive amplifiers are the preferred choice among preamplifiers as they do what a preamplifier is actually supposed to do. Therefore, in this series, passive preamplifiers are designed. In this tutorial, a passive preamplifier will be designed using IC MAX4468. MAX4468 is a low-cost, micro-power microphone preamplifier. This IC operates on a supply voltage in the range of 2.4 V to 5.5 V and provides high voltage gain of up to 125 dB.
In the introductory article of this series, various design parameters of audio amplifier circuits were discussed such as gain, volume, slope rate, linearity, bandwidth, clipping effect, stability, efficiency, SNR, output power, THD and grounding. loop. This amplifier circuit will be designed considering the following design parameters –
Gain (voltage) – 20 dB
Bandwidth – 20 Hz to 20 KHz
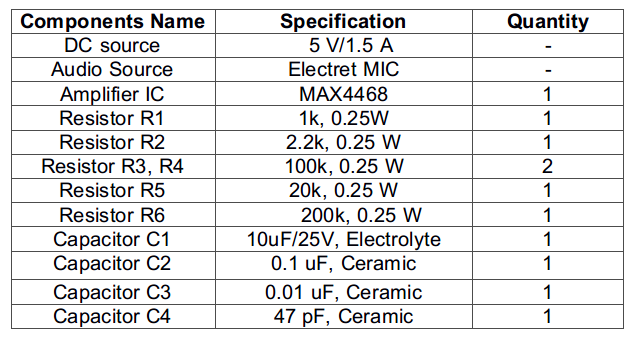
Required components –
Fig. 1: List of components required for the MAX4468 IC-based preamplifier
Block diagram –
Fig. 2: Block diagram of IC-based microphone audio preamplifier MAX4468
This preamplifier circuit is constructed by assembling the following components –
1) DC Source – A 5 V and 1.5 A battery is used to power the circuit.
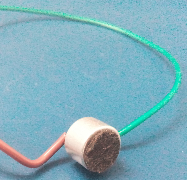
2) Input Source – A microphone is used to provide the input audio signal. An electret MIC was considered as the input source. The electret MIC requires a bias voltage between 1 to 5 V to power the built-in FET buffer that is present in the MIC. Generally, this microphone is powered by 1V to 5V DC through a resistor with a value of 1K ohms to 10K ohms. There must be enough voltage on the microphone's bias pin so that it can detect the audio signal.
Fig. 3: Typical electret microphone image
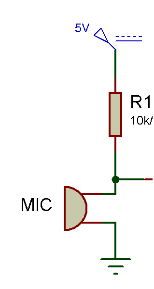
The bias circuit for this microphone has been shown below –
Fig. 4: Electret Microphone Bias Circuit Diagram
In the circuit diagram, a resistive divider network (shown as R1 and R2 in the circuit diagram) is used to supply a fixed voltage to the MIC. A capacitor (shown as C1 in the circuit diagram) of 10 uF is connected at the junction point of the resistor, which helps maintain voltage at the microphone pin. The other pin of the electret microphone is connected to common ground.
3) MAX4468 Microphone Amplifier - MAX4468 is a low-cost, micro-power microphone preamplifier. This IC operates on a supply voltage in the range of 2.4 V to 5.5 V and provides high voltage gain of up to 125 dB.
Fig. 5: Typical image of IC MAX4468
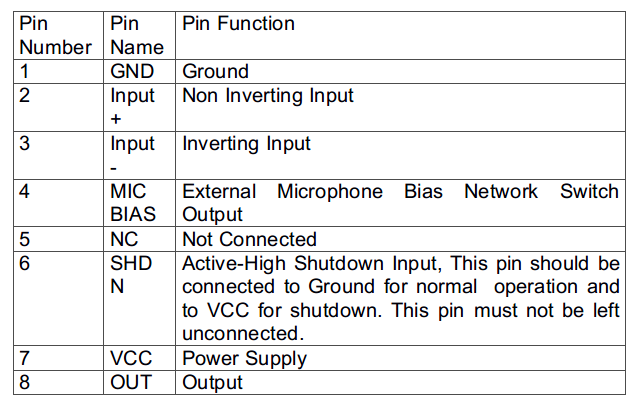
IC MAX4468 has the following pin configuration –
Fig. 6: Table listing the pin configuration of the IC MAX4468
IC pins are the same as OPAM pins, with the only difference being the MIC bias pin. The IC comes in an SMD package and has the following pin diagram –
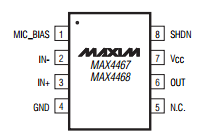
Fig. 7: Pin diagram of IC MAX4468
The IC is used as an inverting amplifier. Inverting amplifier has negative feedback which makes them better than non-inverting amplifiers. The inverting amplifier changes the phase of the output (signal amplitude) by 180 degrees with the input (signal amplitude). However, this phase reversal does not affect the audio signal, as human ears only respond to sound intensity. Intensity is the energy that flows through an area in a given time, expressed in joule/s/m2. The energy of the wave is proportional to the square of its amplitude. So for a unit area the intensity is also proportional to the square of the amplitude.
I A2
Therefore, changing the sign of the wave does not affect I.
To provide DC bias to the non-inverting pin of the amplifier, a capacitor (shown as C3 in the circuit diagram) of 0.01 uF is connected along with a divider network of resistors at pin 3 of the IC. A capacitor (shown as C2 in the circuit diagram) of 0.1uF is connected to the inverting input pin of the IC to provide decoupling of the AC signal from the DC. A capacitor (shown as C4 in the circuit diagram) of 47 pF changes the frequency response of the amplifier. This capacitor acts as a short circuit at high frequency and allows signal to bypass resistor R2 so that the gain of the amplifier is reduced at high frequency. At low frequency, this capacitor acts as an open circuit, so it does not affect the gain. Therefore, this capacitor acts as a high-pass filter in the circuit.
The typical application circuit given in the MAX4468 datasheet is used to design this preamplifier. The line output is taken from pin 8 of the IC.
The following precautions should be taken while assembling this circuit –
1. Hold the shutdown pin low to activate the amplifier.
2. Always place components as close together as possible to reduce noise in the circuit
3. Follow star topology when grounding, this will keep the noise low.
4. Use high voltage rating capacitor instead of input signal.
5. Always use the filtering capacitor on the power supply input terminal to avoid unwanted ripple.
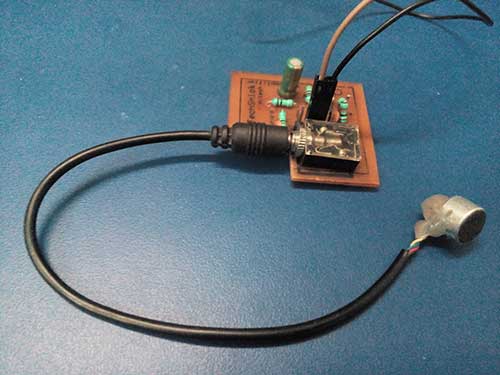
Fig. 8: Microphone audio preamplifier prototype based on IC MAX4468
How the circuit works –
IC MAX4468 is a micro power OPAM designed for microphone preamps. Since the preamplifier is only for providing gain and filtering, the IC is not capable of providing higher currents. The input signal of the electret MIC varies from 1 mV to 10 mV when the user speaks in a normal voice. In the case of screams, the input level can increase up to 50 mV. Therefore, the average value of the input signal can be considered 20 mV. The maximum voltage that must be obtained at the output is 200 mV. Therefore, the desired voltage gain can be calculated as follows –
Gain = Vout/Vin
since Vout = 200 mV and Vin = 20 mV
Gain = (0.2/0.02)
Desired Gain = 10
Therefore, the desired gain is 10 or 20 dB. In the circuit, the voltage gain can be defined through the network of resistors R5 and R6 where the gain can be calculated as follows –
Gain = -(R6/R5)
If resistor R5 is assumed to be 20K ohms and the desired gain is 10 or 20 dB, then the value of resistor R6 is obtained as follows –
R6 = Gain * R5
R5 = 200 thousand ohms
The negative sign means the inversion in the output. Therefore, a 20K ohm resistor is used as R5 and a 200K ohm feedback resistor R6 is used in the circuit. The amplifier provides an output signal that is 10 times the input signal.
Testing the circuit –
For testing the amplifier circuit, the function generator is used as the input source. The function generator is used to generate a sine wave of constant amplitude and frequency. Any audio signal is also basically a sine wave, so a function generator can be used instead of a microphone or actual audio source. Therefore, the function generator can be used as an input source to test the audio amplifier circuit. During the test, at the output, the line voltage needs to be checked.
To test the amplifier circuit, first the input voltage is set within the applicable range between 10 mV and 50 mV. The frequency of the input signal is set to 1 KHz. Then, the output and input waveforms are observed on the DSO.
The following input waveform (red waveform) is observed in DSO –

Fig. 9: Graph of the microphone input waveform observed on the digital storage oscilloscope
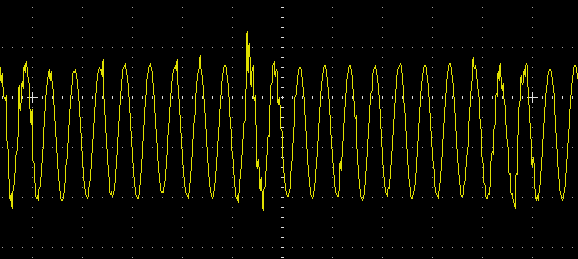
The following output waveform (yellow waveform) is observed in the DSO.
Fig. 10: Graph of MAX4468 preamplifier output line level observed on digital storage oscilloscope
Thus, it can be seen that the microphone input audio signal is successfully leveled to the line voltage. Therefore, the preamplifier is working at its best. This preamplifier circuit can be used in cell phones, microphones, hearing aids and portable audio devices.
In the next tutorial, a preamplifier will be designed using IC LM358.
