In the previous tutorial, the FTP protocol and file transfer between a client and a server were discussed. The FTP protocol can be really useful in many IoT applications. Many IOT devices are installed in places such as nuclear power plants, power grids and other industrial facilities where these types of devices may have some bugs and need application software updates to fix them. In standard IoT protocols like MQTT, CoAP, etc., it is difficult to update and reinstall application software because most IoT protocols are designed for IoT communication between devices and network, but not for tasks like application updates. Updating the application on an IoT device is only possible through the TCP/IP stack. The FTP protocol is the protocol designed specifically on top of the TCP/IP stack for transferring files between a client and a server. Therefore, it can be used by an IoT device to download updated application software and reinstall it after download.
In this project, a Raspberry Pi is used as an IoT device that runs a simple python application to blink an LED. Therefore, the IoT device designed in this project is a Raspberry Pi interfaced with an LED. Another python application also continues to run on the daughterboard, which continues to look for an update of the blinking LED code from an FTP server. The update fetching application connects to the FTP server and tracks the version number of the flashing LED code available on the FTP server. If the version number of the blinking LED code changes, the update fetch code downloads the updated code and reinstalls it on the Raspberry Pi. The update process occurs automatically and does not require any human intervention. Therefore, uploading and downloading FTP files is reliable and fast as many applications use FTP on update servers.
Required components –
1) Raspberry Pi 3
2) LED
3) 1KΩ resistor
4) Jumper wires
Required software –
1) Raspbian OS
2) Leafpad/GNU Nano/Python 3 IDLE (for writing python scripts)
Block diagram –
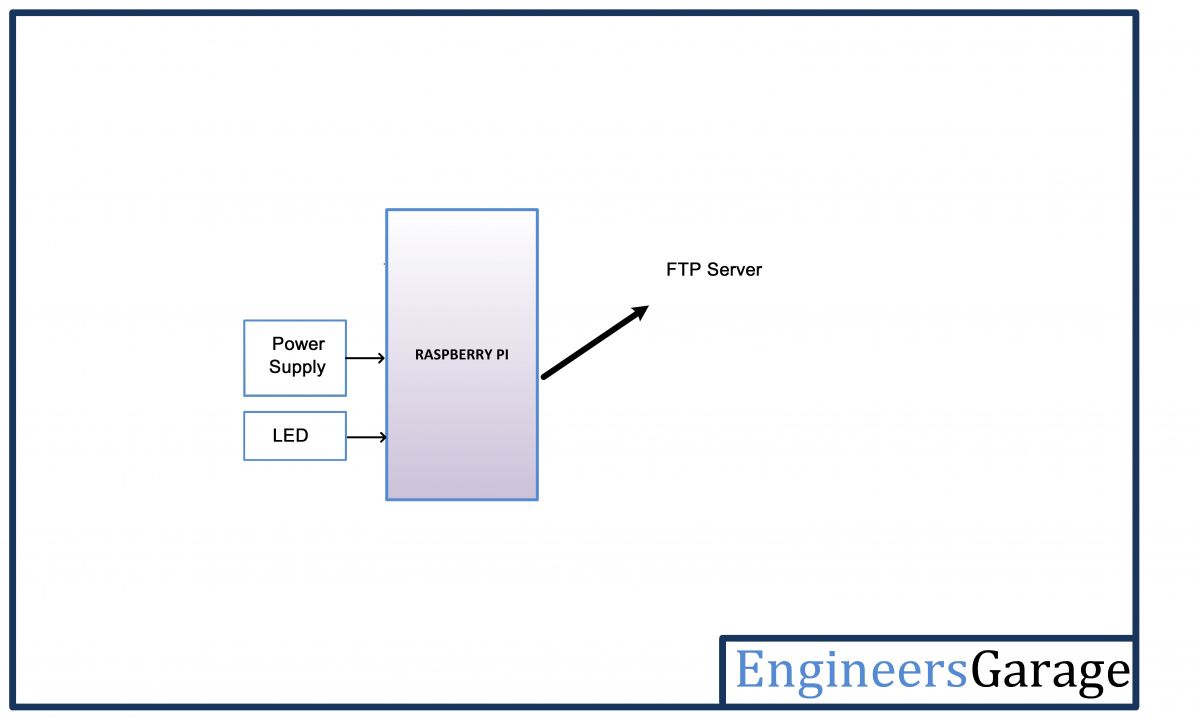
Figure 1: Block diagram of Raspberry Pi 3-based IoT FTP client
Circuit Connections –
A simple IOT device is designed in this project. It has an LED connected to the Raspberry Pi 3. The device is designed by assembling the following components.
Raspberry Pi 3 – Raspberry Pi 3 is the third generation Raspberry Pi. It's a miniature marvel, packing considerable computing power into a space no bigger than a credit card. The Raspberry Pi system's central processor is a Broadcom BCM2837 system-on-chip (SoC) that houses a 1.2 GHz Quad Core ARM Cortex-A53 processor. The vast majority of the system's components, including its central and graphics processing units, along with the audio and communications hardware are built into this single component, along with the 1GB LPDDR2 memory chip at the center of the board. It's not just this SoC design that makes the BCM2837 different from the processor found in a typical desktop or laptop; however, it also uses a different instruction set architecture (ISA) known as ARM.
The Pi comes equipped with an integrated 10/100 BaseT Ethernet socket, composite HDMI and RCA port for video, 3.5mm audio output jack, 15-pin MIPI camera serial interface (CSI-2), display serial interface , Bluetooth 4.1, 802.11 b/g/n Wireless LAN, Micro SDIO to Micro SD card, 4 USB 2.0 connectors, 40-pin connector containing 27 GPIO pins and Micro USB socket for power supply.
The Raspberry Pi is a single-board computer designed to run an operating system called GNU/Linux Raspbian. Hereinafter referred to simply as Linux. Unlike Windows or OS X, Linux is open source, so you can download the source code for the entire operating system and make any changes you want. The Raspberry Pi 3 can also run Windows 10 IoT and many other embedded operating systems, many of which are derived from Linux. The operating system must be loaded onto a MicroSD card and booted from it. With powerful computing capabilities, large number of multimedia interfaces and GPIO pins, Raspberry Pi 3 is a suitable choice for running a complex software-driven IoT or Embedded project that requires sufficient computing power as well as large-scale sensor connectivity. With built-in Bluetooth and Wi-Fi, this 3rd generation Pi can be easily deployed in an IoT network. The main specifications of the Raspberry Pi 3 are summarized in the following table –
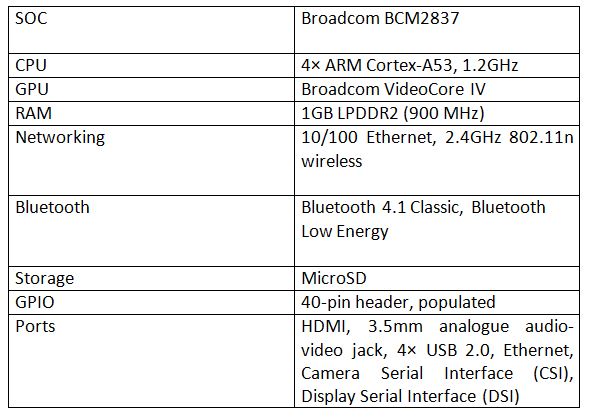
Figure 2: Table listing the technical specifications of the Raspberry Pi 3
The 40-pin header on Raspberry Pi 3 has the following pin configuration –
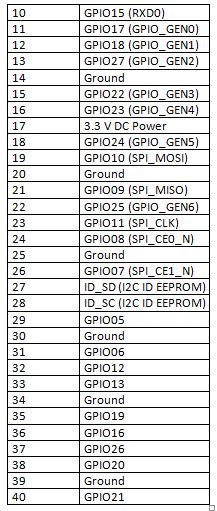
Fig. 3: Table listing the pin configuration of the Raspberry Pi 40-pin header
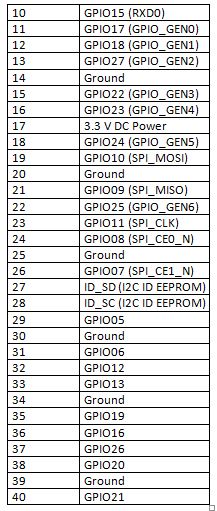
Fig. 4: Table listing the pin configuration of the Raspberry Pi 40-pin header
In this project, an LED interfaces with the Raspberry Pi's GPIO18 pin. The board is powered by a USB adapter.
LED – An LED is connected to GPIO18 of the Raspberry Pi. Its anode is connected to the Raspberry Pi pin and the cathode is connected to ground. The LED is connected to the Pi via a 1K ohm pull-up resistor in series.
Power supply – The power supply is connected to the Raspberry Pi. The Pi must be powered by a 5V adapter with 2.5A current output. The adapter can be plugged into the Micro USB socket.
How the circuit works –
The IoT device designed here is simply a Raspberry Pi 3 controlling an LED. To control the LED and keep the Pi connected to an FTP server, two separate python scripts need to be run on the daughterboard. A python script controls the blinking LED and another python script can automatically update the blinking LED script. First of all, the Raspberry Pi needs to be loaded with an operating system. The official Raspberry Pi operating system – Linux Raspbian – is installed here. During operating system installation, the Raspberry Pi must be connected to a monitor using an HDMI cable and a keyboard and mouse via USB ports.
To install Raspbian OS on MicroSD card, first download the latest Raspbian OS image from the Raspberry Pi website at the following link –
Raspbian Operating System
Copy the latest Raspbian operating system image to the MicroSD card. If the MicroSD card used is 32 GB or less, it must be formatted to FAT32 (file system) before copying the image, or if the MicroSD card is more than 32 GB, it must be formatted to exFAT before copying the image. Extract the operating system Zip and copy it to the MicroSD card. The image can be written to the card by connecting it to a laptop or PC using a MicroSD card reader. After copying the extracted image, insert the card into the MicroSD slot as shown below –
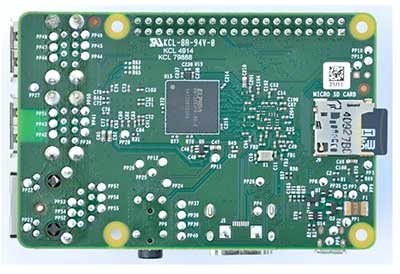
Fig. 5: Typical image of the Raspberry Pi 3 MicroSD card slot
Connect the Raspberry Pi to a monitor using an HDMI cable, a keyboard, and a mouse. Power the card by connecting it to a power adapter. The red LED on the board will begin blinking and the operating system will begin booting from the MicroSD card. The boot process will be displayed on the monitor and once the boot is complete, the green LED will light up on the Raspberry Pi. After successfully installing Raspbian OS on Raspberry Pi, it is recommended to perform a software update. This can be done by running the following Linux commands in the Linux Terminal –
$ sudo apt-get update
$ sudo apt-get update
After installing Raspbian, it's time to write and run python scripts on Raspbian. A python script can be written in Raspbian using a text editor like Leafpad or GNU Nano. Python script can also be written using standard python IDE such as Python 2 IDLE or Python 3 IDLE. Open Python 3 IDLE by navigating through Menu -> Programming -> Python 3 IDLE. A window called Python 3.4.2 Shell will open. Write the python scripts and save them in a directory.
The python script written for this project must be run at startup when the Pi 3 is turned on. The script runs an infinite loop so it never ends. There are a few methods by which the Raspberry Pi can be configured to run a python script at startup. Any of the following methods can be used –
1) Editing rc.local –
Commands can be added to the /etc/rc.local file to run a program or command when the Raspberry Pi boots. This is especially useful if the Pi needs to be plugged into headless power and run a program without manual configuration or initialization. The file must be edited with root by running the following commands in the Linux Terminal –
sudo nano /etc/rc.local
Now add commands to run the python script using the full file path and add an ampersand at the end of the command so that the script runs in a separate process and initialization can continue. The following command must be added where the python scripts are saved as FTP.py and CODE.py-
sudo python /home/pi/FTP.py &
output 0
The command must be added just before the exit 0 line in the rc.local file.
2) Editing .bashrc –
The .bashrc is a hidden file in the home folder that contains user configuration options. Open the .bshrc file by running the following commands in the Linux terminal –
sudo nano /home/pi/.bashrc
Add the following lines after the last line of the file –
echo Running at startup
sudo python /home/pi/FTP.py
3) Adding script to init.d directory –
The init.d directory contains the scripts that are launched during the boot process (additionally, all programs here run when the Pi is turned off or rebooted). Add the script to be run at startup to the init.d directory using the following commands –
sudo cp /home/pi/securitysystem.py /etc/init.d/
Go to the init directory and open the python script by running the following commands –
cd /etc/init.d
sudo nano FTP.py
Add the following lines to the python script to make it a Linux Standard Base (LSB) –
# /etc/init.d/sample.py
### STARTING INFORMATION
# Provide: sample.py
# Mandatory start: $remote_fs $syslog
# Mandatory stop: $remote_fs $syslog
# Default start: 2 3 4 5
# Default stop: 0 1 6
# Short description: Start daemon at boot time
# Description: Enables the service provided by the daemon.
### END START INFORMATION
Make the python script in the init directory executable by changing its permission by running the following command –
sudo chmod +x FTP.py
Then run the following command –
defaults sudo update-rc.d FTP.py
Then restart the Pi by running the following command –
sudo restart
Any of the above methods can be used to run the python script at startup. Now the Pi 3 can be disconnected from the monitor, keyboard and mouse. Connect the LED to the Raspberry Pi and turn it on.
Now when the Pi turns on it will run both scripts on startup. The main script (CODE.py) controls the LED blinking. He let the LED blink for a few seconds. The other script (FTP.py) continues checking the file on the FTP server to get the main file version. The file checked by the script and containing the version number is called 'Readme.txt' and simply contains the version number of the flashing LED script as plain text. If the update script (FTP.py) finds any changes in the version indication file (Readme.txt) on the FTP server, which means that the application file has been changed, (in this case the LED blinking period may have been changed in CODE.py uploaded to the FTP server), indicates that a new version of the main file is available. Now the updated version of the main file has been downloaded from the FTP server. After downloading, the main script is restarted for the changes to take effect and thus the duration of the LED blinking is changed.
FTP.py runs at startup and checks the application code (CODE.py) of the FTP server. FTP.py itself can download, install and run the main code, that is, CODE.py.
Programming guide –
There are two python scripts written that run on startup. One of the python scripts simply blinks the LED connected to the Raspberry Pi and is saved as CODE.py. This script starts with importing the necessary libraries – RPi.GPIO library to handle digital input and output and timing library for delays. RPi.GPIO is a module for controlling Raspberry Pi GPIO channels. There may be more than one script/circuit in the Raspberry Pi's GPIO. As a result of this, if RPi.GPIO detects that a pin has been set to something other than default (input), it may issue a warning when the Pi tries to set the script. To disable these warnings, the false argument is passed to the setwarning method. A variable is initialized and set to 24. The GPIO numbering system is set to BCM, which refers to the channel numbers on the Broadcom SoC. BCM channel number 24 is configured as GPIO output using the setup method and is set to LOW using the output method. An infinite loop is executed in which the GPIO output is set to HIGH and LOW alternatively using the output method and the time delay is provided using the sleep method of the time module which accepts the delay interval as a parameter in milliseconds.
The second file (FTP.py) is the update script. The application file can be any script file which in this case is CODE.py. The update script is divided into four parts –
1. Configuring FTP server
2. Connecting to the FTP server
3. Downloading the version file and comparing
4. Downloading the application file and restarting the application
1. Configuration server: The FTP server must contain two files, readme.txt (containing the version information) and code.py (containing the main application code file). Any open FTP server like www.biz.nf can be used for web hosting. Create an account there and upload these two files.
2. Connecting to the FTP server: To connect to the FTP server, a python library that supports FTP commands “ftplib” is imported. It must be imported into the beginning of the update script.
import ftplib as ftp
To connect to the FTP server, the connection is initiated in a session variable. The server address and your username and password are supplied to the variable.
session = ftp.FTP('192.168.1.100′,'iot_user','123123123′)
3. Downloading the version file and comparing: The readme file on the server contains information about the current version of the application code. Also in the update script, the current version is defined with a variable.
c_version = “1”
The readme file from the FTP server is downloaded and stored in a “version” variable. The file is opened and read to detect the version number.
with open('README.txt', 'r') as myfile:
version=myfile.read .replace('n', ”)
After storage, the version variables are compared and if changes are found, the process of downloading the Application code from the FTP server begins.
if (version != c_version):
c_global version
c_version = version
4. Downloading the application file and restarting the application: After comparing the version and detecting the version change, the updated Code.py starts downloading from the FTP server.
session.retrbinary('RETR CODE.py', open('CODE.py', 'wb').write)
The file is retrieved and stored with the same name as the application's main file. First, the running application is killed.
check_kill_process(“CODE.py”)
Then a separate thread is started to restart the application.
start = 'sudo python CODE.py'
proc = subprocess.Popen(start, shell=True, stdout=subprocess.PIPE, stderr=subprocess.PIPE, stdin=subprocess.PIPE)
So, this is how the FTP protocol can be used in an IOT application for automatic application updating. Check out the python scripts in the code section and try them out. In the next tutorial, learn about the SFTP protocol. SFTP is a secure variant of the FTP protocol.
Project source code
 ###


 //Program to

 import ftplib as ftp

 import time

 import os,signal

 import subprocess

 version = ""

 c_version = "1"

session = ftp.FTP('192.168.1.100','iot_user','123123123')


 #stop = 'sudo kill $(ps aux grep CODE.py awk ' {{print $2}} ')'

 start="sudo python CODE.py"


 def update:

#ftp.cwd('debian')

 #session.retrlines('LIST')

 session.retrbinary('RETR README.txt', open('README.txt', 'wb').write)

 with open('README.txt', 'r') as myfile:

 version=myfile.read .replace('n', '')


 if(version != c_version):

 global c_version

 session.retrbinary('RETR CODE.py', open('CODE.py', 'wb').write)

 c_version = version

 time.sleep(1)

 check_kill_process("CODE.py")

 print "STOP pass"

 time.sleep(1)

 proc = subprocess.Popen(start, shell=True, stdout=subprocess.PIPE, stderr=subprocess.PIPE, stdin=subprocess.PIPE)

 print "START Pass"

 time.sleep(3)

 print "UPDATED!"

 else:

 time.sleep(5)

 print "NO UPDATES"


 def check_kill_process(pstring):

 for line in os.popen("ps ax grep " + pstring + " grep -v grep"):

 fields = line.split

 pid = fields(0)

 os.kill(int(pid), signal.SIGKILL)


 whileTrue:

 try:

 update

except Exception as e:

 session.quit

 print and


###
Circuit diagrams
| Circuit Diagram-Raspberry-Pi-3-based-IoT-FTP-Client |  |

