A bolted flange connection is the most commonly used form of detachable connection structure in the petroleum and chemical industries, which is widely used and used as a standard part in many countries. Appropriate patterns have been developed for designers to choose from. China has also developed relevant industrial standards, such as: For example, GB/T 13402-2019 “Large Diameter Steel Pipe Flange”, HG/T 20592-20635-2009 “Steel Pipe Flanges, Gaskets, Fasteners” , NB/T 47020-47027-2012 “Pressure vessel flanges, gaskets, fasteners” and SH/T 3406-2013 “Flanges for petrochemical steel pipes”. The use of standard flanges simplifies calculations, reduces design costs, improves design efficiency, and ensures flange reliability and interchangeability. However, due to the size and specialization of the equipment, flanges that exceed standard usage limitations and necessarily meet the requirements of GB/T 150.1-150.4-2011 “Pressure Vessels” or ASME Sec.Ⅷ Div.1-2021 “Rules for Construction” are often found in pressure vessels.” The Annex 2 method is mandatory for the design or structural optimization of pressure vessels.
Bolted flange connection consists of flanges, gaskets and fasteners. The sealing surface of the flange is compressed by the action of screw preload, which presses the gasket fixed between a pair of flanges, so that the gasket deforms elastically or plastically under the action of screw preload to fill the microgeometric gaps on the flange sealing surface and achieve the purpose of sealing. The main failure mode that must be considered in flange design is leakage between the flange sealing surfaces, for which it is necessary to ensure that the bolts, gaskets and flanges have sufficient strength. Sensible flange design is based on selecting the appropriate gasket major failure mode, configuring an appropriate bolt set, and determining the appropriate size of the flange structure to prevent leakage from the flange connection. This article presents the optimized design of flanges for large diameter, high pressure equipment using the example of a separator filter in an offshore platform engineering project.
1. Project example
An offshore platform design has a separator filter at the inlet of the internal ethylene glycol treatment system. To facilitate the installation and maintenance of the upper polymerization filter on the separator, the upper head must be designed as a flanged connection. The design parameters of the filter separator are inner diameter Φ1200mm, design pressure 13.2MPa, design temperature 70°C, cylinder material Q345R (normalized), thickness 54mm, corrosion margin 4mm, flange material 16MnⅣ. Flange size, high pressure, parameters are outside the existing standard range for equipment flanges, therefore, in accordance with GB/T 13402-2019, select a size closer to the A series class 900 pipe flange DN1200mm; its structural dimensions are listed in Table 1.
Table 1: Flange frame size before and after optimization
| Flange condition | Original design | After optimization |
| Flange OD/mm | 1785 | 1760 |
| Tapered flange neck, small end diameter/mm | 1262 | 1316 |
| Tapered Flange Neck Big End Diameter/mm | 1343 | 1412 |
| Flange height/mm | 419 | 350 |
| Minimum flange ring thickness/mm | 233.4 | 200 |
| Screw hole circle diameter/mm | 1587.5 | 1600 |
| Screw Specifications | M100 | M80 |
| Number of screws | 24 | 28 |
| Flange projection diameter/mm | 1,384 | 1,472 |
| Raised surface height/mm | 7 | 21 |
However, attaching the pipe flange to the filter separator presents the following problems:
- (1) Due to the high design pressure of the equipment, to improve the sealing effect between the flanges, it is necessary to replace the original flange face gasket with an annular gasket face gasket and replace the gasket with a metal ring gasket .
- (2) If the diameter of the flange is larger, a larger bolt specification must be selected, which will affect the thickness of the flange neck and increase the axial stress of the flange.
- (3) The flange stress calculation must be qualified and the size of the flange structure must be optimized.
2. Device flange design optimization
2.1 Seal construction
2.1.1 Determination of seal format
The seal design is the basis of the entire flange connection design. The selection of gasket shape, material, inner diameter and width has a great influence on the design outcome of the flange connection. The design pressure of the separator filter is high. To ensure that the gasket is not damaged during the working process and maintains excellent sealing performance, the sealing coefficient m and specific pressure y must be higher than that of the metal gasket. Compared with the metal gasket, the octagonal metal gasket has certain radial self-tightening effect, good sealing effect, not easy to leak, long service life and can be reused. Compared with the elliptical gasket, the octagonal metal gasket is easy to process and manufacture, therefore the octagonal metal gasket is chosen as the flange gasket. The sealing material is made of UNS S31603 stainless steel, the hardness of the material is no more than 150 HBS.
2.1.2 Determination of joint size
Referring to GB/T 150.3-2011 “Pressure Vessels Part 3: Construction” Annex C.6, part “Octagonal metal joint and elliptical joint”, select the appropriate octagonal metal gasket for ring number R105 of Class 900. The dimensions of the cross-section of the octagonal metal joint and the dimensions of the trapezoidal groove of the flange ring contact surface are shown in Figure 1. The diameter of the center circle of this type of octagonal metal joint cannot meet the equipment requirements and needs to be redetermined. For a certain diameter of the screw center circle, as the diameter of the sealing circle increases, the screw preload state and the operating state of the design load increase, and the internal pressure caused by the entire force arm axial axis decreases, which affects the design of the moment change. When calculating different sealant circle diameters, the flange calculation torque is determined with the sealant circle diameter change curve, see Figure 2.
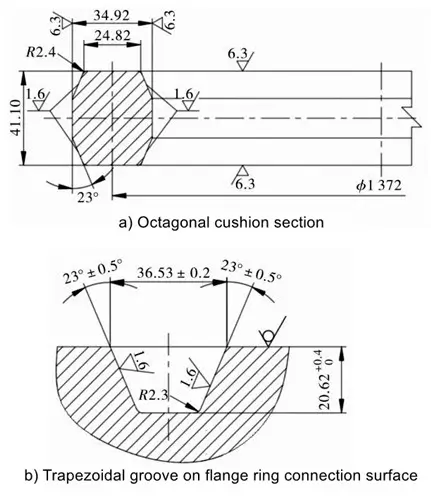
Figure 1: Cross-sectional dimensions of the R105 octagonal metal gasket and size of the trapezoidal groove on the flange ring contact surface
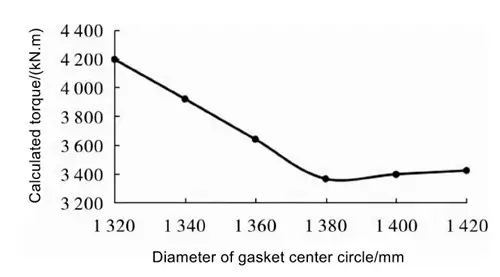
Figure 2: Diameter of the sealant circle in the moment curve for flange calculation
From the curve in Figure 2, it can be seen that the diameter of the sealing circle is about 1380 mm when the flange design moment value is the smallest. The sealing circle diameter is less than 1380mm, the flange calculation torque gradually decreases as the sealing circle diameter increases. When the diameter of the sealing circle is greater than 1380 mm, the flange design torque increases slowly as the diameter of the sealing circle increases. To minimize the flange calculation moment, the diameter of the sealing circle should be selected close to 1380 mm. In this case, the diameter of the sealing circle of the flange joint is finally assumed to be 1372 mm.
2.2 Screw construction
Once the seal material and size are determined, the seal can be calculated under the required preload and compressive load operating conditions. The bolt provides the compressive load and the minimum bolt area required for preload and operating conditions can be calculated accordingly:

Formula (1) – Formula (2) in Am1 for the prestressed state of the minimum required bolt area, A m2 for the operating condition of the minimum required bolt area, p A for the allowable bolt stress at room temperature, the allowable stress of the screw at design temperature, Wm1 for the preloaded state of the minimum screw force, W m2 for the operating condition of the minimum required screw load. The selection of bolt specifications and the number of actual uses of the bolts should result in the total cross-sectional area Ab being equal to A m1 and a m2 at greater value. The selected screw material is 35CrMoA because the screw specification exceeds the value recommended in GB/T 150.3-2011 to facilitate the design of screw configuration in accordance with TEMA-10.-2019 “Tubular Exchanger Standards”. Manufacturers Association”, Part 9, Table D-5M, recommended bolt spacing requirements calculated to meet specifications bolt configuration requirements and bolt numbers, see Table 2.
Table 2 Bolt Specifications and Counts to Meet Bolt Configuration Requirements
| Nominal screw diameter dB/mm | Number of screws n | Bolt center circle diameter Db/mm | Total cross section of required screws Am/mm2 | Actual total cross section of bolts Ab/mm2 | Bolt cross section tolerance in percentage/% |
| 100 | 24 | 1,587.5 | 105,757.8 | 176,449.6 | 66.8 |
| 90 | 28 | 1,645.0 | 105,757.8 | 165,503.2 | 56.5 |
| 80 | 28 | 1,600.0 | 105,757.8 | 129,546.9 | 22.5 |
| 76 | 32 | 1,632.0 | 105,757.8 | 133 023.8 | 25.8 |
As can be seen from Table 2, with a nominal diameter of 76 mm, the greatest number of bolts is required to achieve the required total cross-sectional area Am of the bolts. To ensure the operating space of the machine, the diameter of the screw center circle inevitably increases accordingly. Suppose the nominal diameter of the screws is 100 mm. Although the required total cross-sectional area of the screws must be achieved, the number of screws is less. In this case the diameter of the central circle of the screw is smaller. However, the corresponding nut size is the largest, so the distance between the center of the bolt and the base of the tapered neck of the flange is greater than with other bolt sizes. The size of the tapered neck of the flange affects δ. 1 and the axial stress of the cone neck σ H . When the nominal screw diameter is 90 mm, the diameter of the screw center circle is maximized to ensure that the machine's working space is optimally utilized. If the screw has a nominal diameter of 90 mm and the cross-section clearance is too large, it is easy to waste material. Comprehensive consideration: Choosing a screw with a nominal diameter of 80 mm is most suitable.
2.3 Flange structure optimization
2.3.1 Influence of flange design size on flange tension
The flange load is jointly carried by the three-part flange ring, tapered neck and cylinder. The load applied to the flange generates three stresses, namely the axial stress of the cone neck σ H, the radial stress of the flange ring σ R and the circumferential stress of the flange ring σ T . The Waters method used for flange design mainly aims to bring the 3 stresses as close as possible to the corresponding allowable stresses, that is:
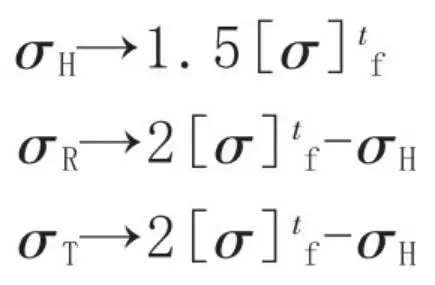
In the formula: (σ) F T is the value of the allowable stress of the flange material at the design temperature, unit MPa.
In actual design, when calculating the flange 3 stresses, the pressure of the vessel in the cone neck in the axial tension, as well as the pressure under the action of the flange 3 parts of the flange due to the deformation of the stresses generated by the calculation, is often ignored . The value of the 3 voltages must be lower than the specified allowable voltages and maintain a certain richness. The influence curve of flange ring thickness δ F and cone neck thickness δ 1 The 3 flange stresses are shown in Fig. 3 and Fig. 4 respectively.
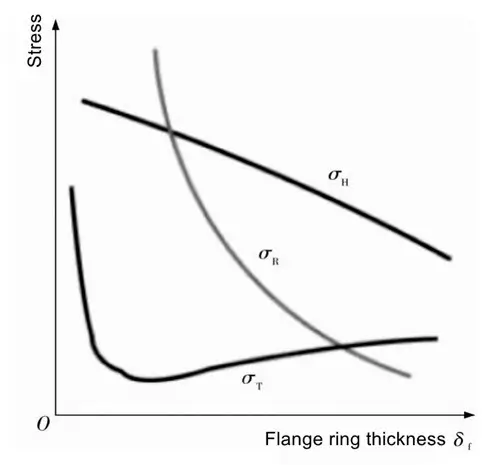
Figure 3. Flange ring thickness relationship curve with flange stresses
From Fig. 3 it can be seen that as the thickness of the flange ring increases, the radial stress of the flange ring σ R greatly reduced, axial stress of the cone neck σH, although reduced, the downward trend is much less obvious than the radial stress of the flange ring, the flange ring in the downward trend of stress σ T has less influence if the flange ring and cone neck stiffness are comparable, but also the ring in the stress σ T appears to be a upward trend. As shown in Fig. 4, as the thickness of the large end of the cone neck increases, the axial stress of the cone neck σ increases and H decreases sharply. The flange ring stress σ T decreases, but the decreasing trend is much less obvious than the axial cone neck stress σ H while the radial flange ring stress σ R gradually increases.
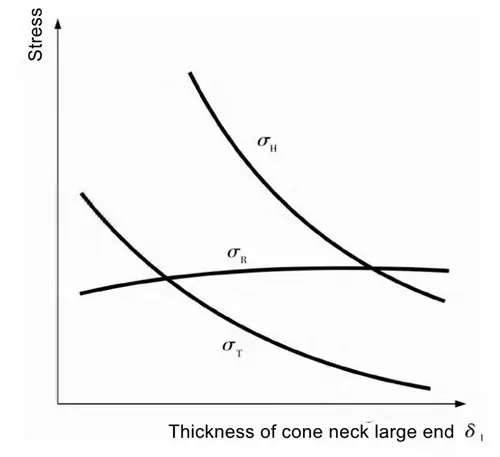
Fig.4 Relationship curve of the influence of the thickness of the large end of the tapered neck on the flange tension
2.3.2 Recommended method for adjusting flange size
Flange size is determined by first assuming tension and then checking it. Normally, after assuming the flange size once, the calculated stress cannot be well approximated to the corresponding allowable stress and the flange size needs to be adjusted. The influence of flange ring thickness δf and taper neck thickness δ 1 The three flange stresses are related to each other.
2.3.3 Flange tension calculation and frame size adjustment
Based on the determined joint shape and size, the bolt specification and the diameter of the center circle of the bolt hole, the planned flange stress is calculated using the SW6 software.
The axial tension of the flange cone neck and the tension of the flange ring are too large in the original design. The sensitive factor affecting these two stresses is the thickness δ of the large neck of cone 1 . After several adjustments, the thickness of the tapered neck of the large end flange is δ 1 is set to 102 mm. At the same time, the thickness of the flange ring becomes δ F is reduced to 200 mm (assuming the allowable stresses of the thickness of the forged material under the material) to make the load-bearing capacity of each part of the flange relatively close to that of each part of the flange. The optimized size of the flange structure is listed in Table 1. This shows that the optimized flange stresses meet the corresponding allowable stress requirements.
For large diameter flanges, there is often the problem of insufficient rigidity of the flange, causing the compression stress of the gasket to drop during operation due to increased pressure, resulting in sealing failure of the flange connection. To ensure the tightness of flange connections, the flange angle calibration method was added to the flange stiffness index J in the 2007 edition of ASME Ⅷ Div.1. GB/T 150.3-2011 also contains the requirements for flange stiffness calibration for the entire flange. Based on the above provisions, the optimized flange stiffness index J = 0.613 <1 is used to meet the requirements.
3. Conclusion
The gasket is an important element to ensure the sealing of the flange, and the selection of a suitable gasket is the basis of flange design. For flanges of devices with a high pressure level (at least class 900 (PN 150)), it is recommended to mainly use an annular connecting surface. When selecting and arranging bolt specifications, when using larger bolt specifications, both the flange torque force arm and the thickness dimension of the large end of the flange tapered neck must be considered.
By analyzing the factors influencing the flange tension, the original flange size is adjusted according to the recommended frame size adjustment method. After increasing the thickness of the large end of the flange tapered neck and decreasing the thickness of the flange ring, the flange tension calibration is qualified. After the improvement, the outer diameter of the flange was reduced by 25mm, the thickness of the flange washer was reduced by 33.4mm, and the quality of the flange was reduced by 130kg. The optimized flange structure is more reasonable, the sealing performance is more reliable, and at the same time the objective of material saving is achieved.


