In the process of carburizing and quenching, thin-walled gears often exhibit flat warping and elliptical deformation.
During grinding, the uneven distribution of the tooth surface results in black skin and grinding steps on the tooth surface;
The hardening layer on the surfaces of the left and right teeth is uneven and the surface hardness decreases, and the gear is scrapped in serious cases.
To solve this problem, horizontal loading and suspended loading were designed.
The carburizing and quenching process and deformation data are described in detail below.
1. Technical method and process
(1) Gear parameters
The parameters of a gear product are shown in Table 1, and the schematic diagram is shown in Fig.
Table 1 gear parameters
| Mn | 4 |
| Z | 138 |
| α | 20° |
| β | 23°4′26″ |
| Addendum circle/mm | 608 |
| Tooth width / mm | 80 |
| Layer depth/mm | 0.9~1.2 |
| Hardness (HRC) | 58~62 |
| Gear Accuracy/Class | 6 |
| Material texture | 20CrMnMo |
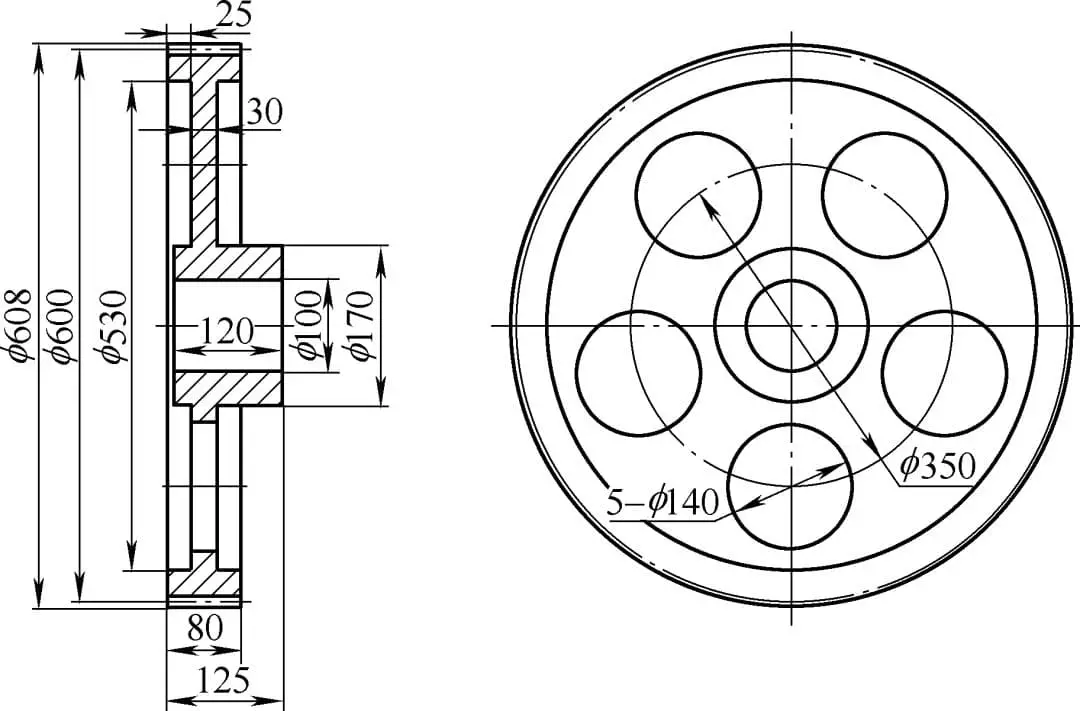
Figure 1 Gear Diagram
(2) Heat treatment charging mode
Loading method I: horizontal placement, as shown in Fig.
Fig.2 Schematic diagram of horizontal positioning
Loading mode 2: vertical suspension, as shown in Fig.
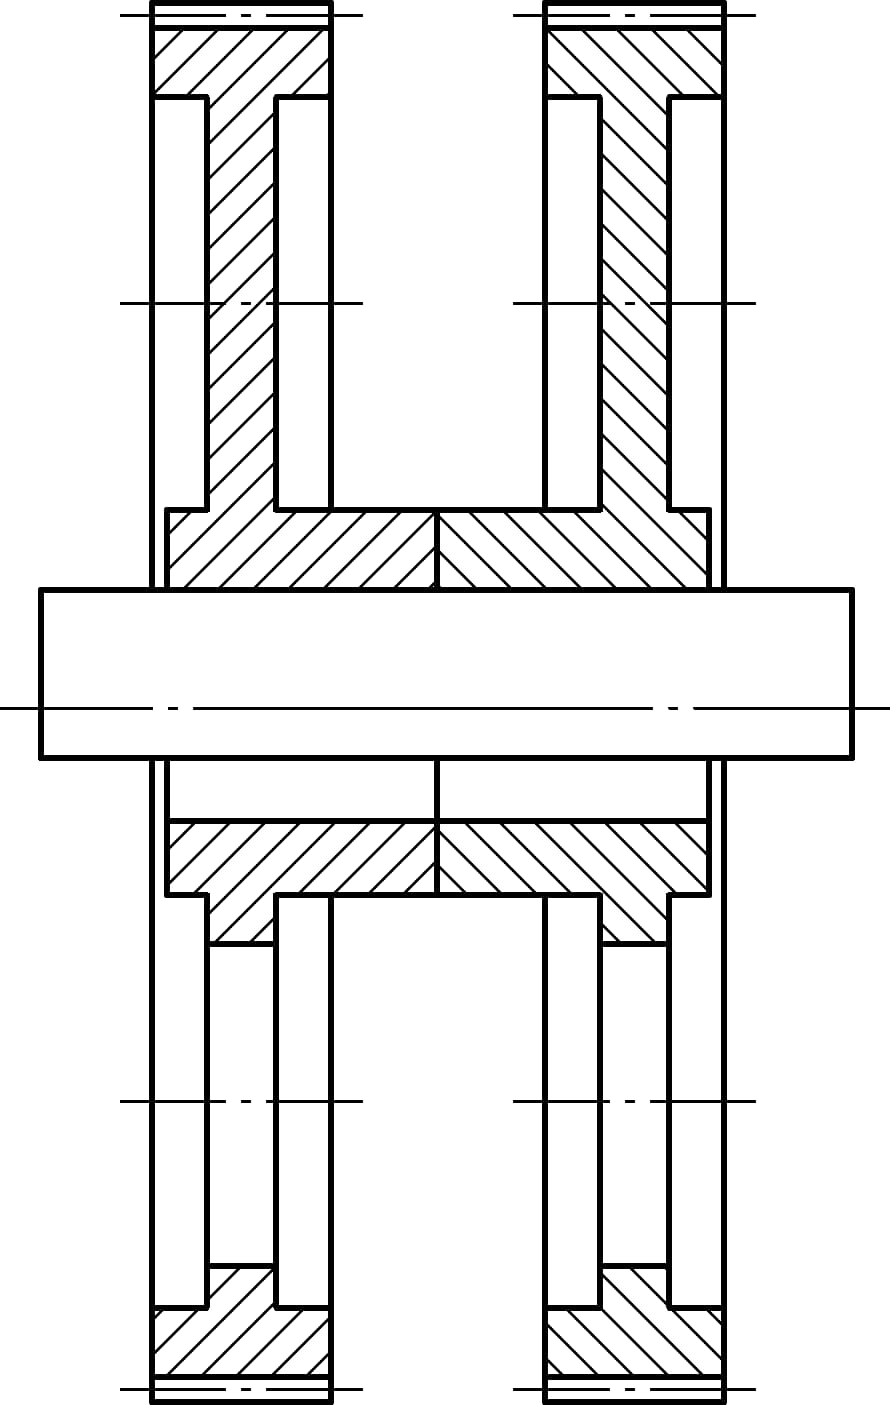
Fig.3 Schematic diagram of vertical suspension
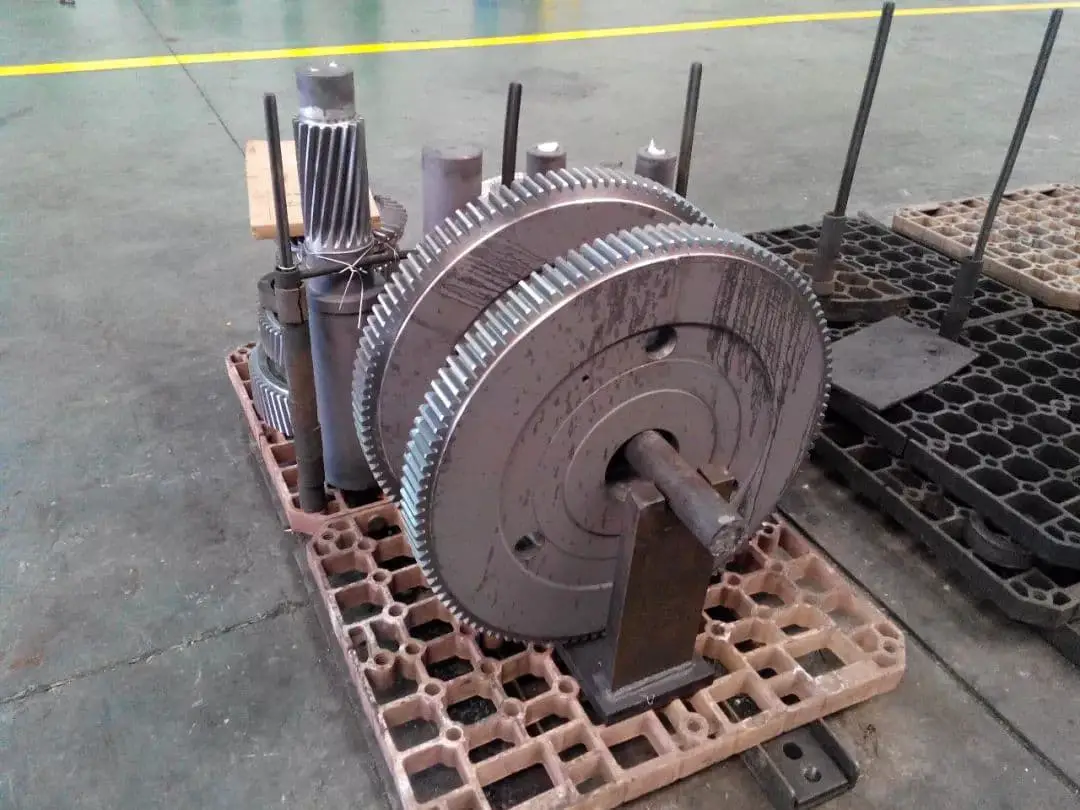
Fig. 4 Vertical suspended objects from other heats
(3) Heat treatment process curve
As shown in Figure 5, the equipment uses an AICHELIN 5/2A box oven.
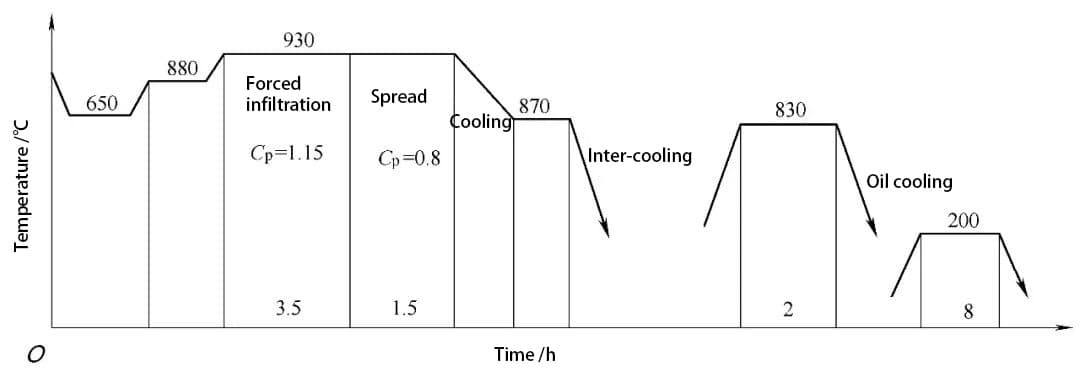
Fig. 5 heat treatment process curve
3. Results and analysis
(1) Metallography, hardness gradient and surface hardness are all qualified
The metallographic structure is evaluated according to JB/T6141.3 and GB/T3480.5, as shown in Table 2.
Table 2 Metallographic structure
| K/grade | Air(%) | M/level | IGO/μm | F/level |
| two | 15~20 | two | 18 | 3 |
(2) Hardness gradient
As shown in Fig. 6, the layer depth DC = 1.219mm/HV550.
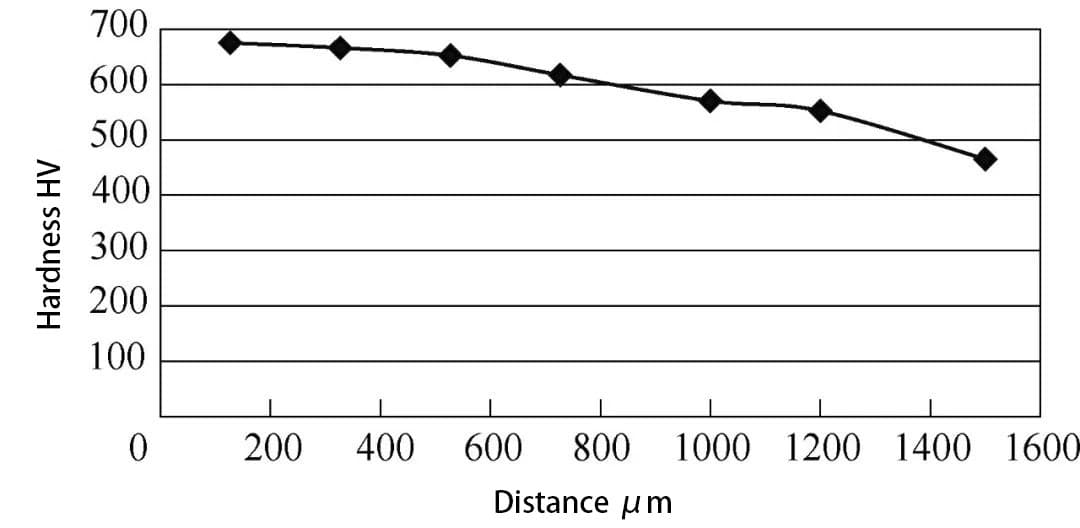
Fig. 6 hardness gradient
(3) Gear deformation and grinding data
The gear deformation data is shown in Table 3.
Table 3 Comparison of pitch circle and end face deviation after carburizing and quenching between horizontal and suspended placement
| piece number | location | 0° | 90° | 180° | 270° | Total disaster | |
| Horizontal positioning | Part 1 | Pitch circle / mm | 0.74 | 0.61 | 0.61 | 0.43 | 0.31 |
| End face / mm | 0 | 1.15 | 0.47 | 1.3 | 1.3 | ||
| Part 2 | Pitch circle / mm | 0.86 | 0.55 | 0.86 | 0.92 | 0.37 | |
| End face / mm | 1 | 1.35 | 1.82 | 1.36 | 0.82 | ||
| Suspension placement | Part 1 | Pitch circle / mm | 0 | 0.01 | 0 | 0.02 | 0.02 |
| End face / mm | 0 | 0.03 | 0.03 | 0.07 | 0.07 | ||
| Part 2 | Pitch circle / mm | 0 | -0.01 | -0.01 | 0.05 | 0.06 | |
| End face / mm | 0.01 | -0.04 | -0.04 | 0.18 | 0.22 |
Due to the warping and deformation of horizontally placed parts, the tooth shape, tooth direction and pitch circle deviation are too large, resulting in a negative value of the grinding margin distribution.
After grinding, some tooth surfaces have black skin, and some tooth surfaces have obvious grinding steps, which are finally discarded;
The suspended equipment has small deformation, evenly distributed grinding margin, and no black skin and step after grinding.
(4) Analysis of results
When the gear is placed horizontally, because the gear edge is suspended, the creep is caused by the self-weight of the rim during the carburizing process, the quenching is instantaneous, the oil contact cross-sectional area is large, and the oil first enters the lower end face than the upper end face;
Due to the imbalance of thermal stress and phase change voltage at both ends, the upper end face is convex and the gear deforms greatly;
On the contrary, there is creep at high temperature in the carburizing process, but the gear rim cannot withstand large bending moment.
At the same time, the two end faces are parallel to each other during quenching, the oil inlet section is small, the phase change voltage and thermal stress are balanced and symmetrical, and the end face deviation and the deviation of the gear pitch circle are smaller than horizontal placement.
4. App Extension
According to the above analysis of the causes of gear deformation, suspension loading was also carried out for the gear with a diameter of 1140 mm, and very good results were obtained.
The gear parameters are shown in Table 4, the load is shown in Fig. 7, and the deformation data is shown in Table 5.
Table 4 gear parameters
| Mn | 8 |
| Z | 137 |
| α | 20° |
| β | 12° |
| Addendum circle/mm | 1140 |
| Tooth width / mm | 120 |
| Layer depth/mm | 1.6~2.0 |
| Hardness (HRC) | 58~62 |
| Gear Accuracy/Class | 6 |
| Material texture | 20CrMnMo |
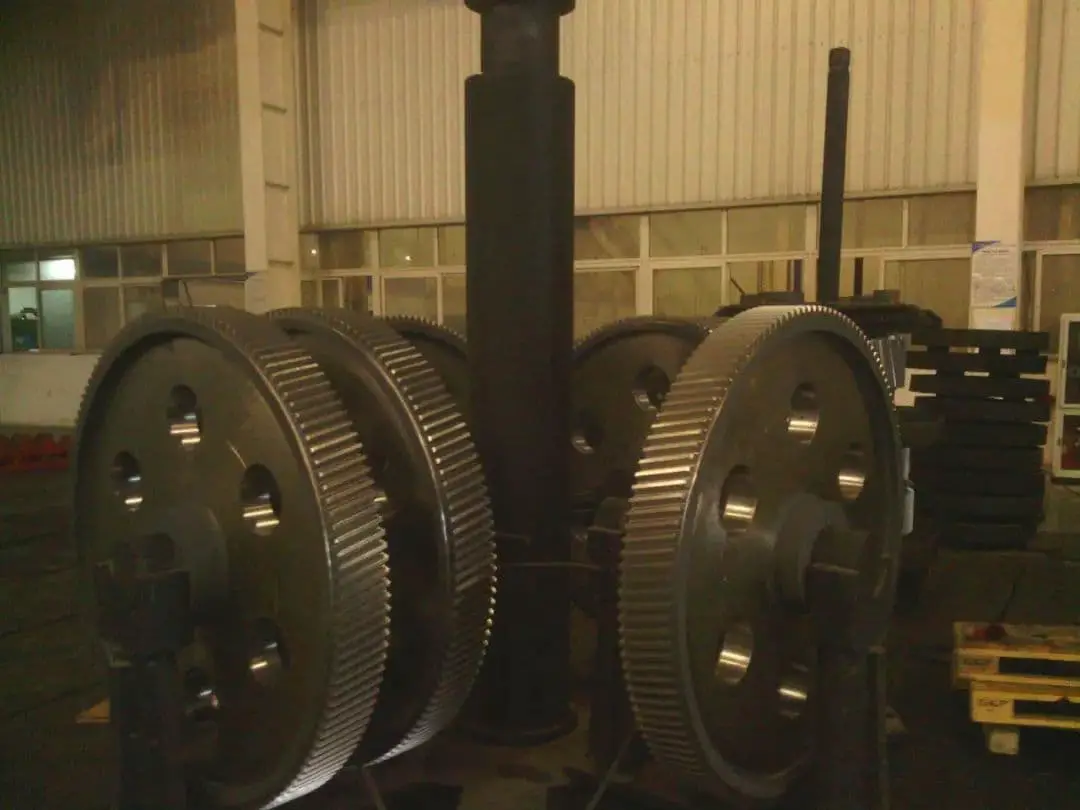
Fig. 7 image of furnace loading
Table 5 Eccentricity data of the end face and pitch circle of 4 gears
| piece number | Location | 0° | 90° | 180° | 270° | Total disaster |
| Part 1 | Pitch circle / mm | 0.53 | 0.51 | 0.55 | 0.5 | 0.05 |
| End face / mm | 0.45 | 0.3 | 0.6 | 0.5 | 0.3 | |
| Part 2 | Pitch circle / mm | 1 | 1 | 1.07 | 1 | 0.07 |
| End face / mm | – | – | – | – | 0.4 | |
| Part 1 | Pitch circle / mm | 0.9 | 0.92 | 0.97 | 0.92 | 0.07 |
| End face / mm | 0.58 | 0.8 | 0.7 | 0.9 | 0.32 | |
| Part 2 | Pitch circle / mm | 0.25 | 0.22 | 0.23 | 0.28 | 0.06 |
| End face / mm | 0.7 | 0.6 | 0.35 | 0.4 | 0.35 |
5. Conclusion
(1) For Φ600mm × 80mm thin-walled gears, the pitch circle deviation of the carburized and hardened gear is reduced from 0.34mm to 0.04mm by the hanging furnace;
The average deviation of the end face is reduced from 1.06 mm to 0.15 mm.
(2) For the Φ1140mm × 120mm thin-walled gear, the pitch circle deviation of the carburized and hardened gear is controlled within 0.07mm through suspended loading;
The eccentricity of the end face should be controlled below 0.40 mm.


