In this tutorial we will learn how to build a device that works as a virtual doctor. The device inputs patient data, which can then be emailed remotely to a registered physician using Simple Mail Transfer Protocol (SMTP) — the Internet's standard communications protocol for electronic transmissions.
The purpose of this device is to support doctors who cannot visit patients in person. This may be due to distance, location (such as for those in remote areas), patent immobility (due to illness or access to transportation) and/or cost. Sometimes a virtual doctor visit can also be more cost-effective, allowing more people access to healthcare.
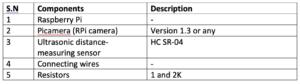
For this project, we will use Raspberry Pi (RPi), Picamera (a portable camera that supports RPi) and an ultrasonic sensor. These devices will be processed using Raspbian OS and Python. Overall, the cost of this project is quite affordable and can be implemented in rural areas with Internet access.
Required components

Required tools and libraries:
- Python Interpreter
- Python libraries: picamera – can be installed by the following commands in the terminal…
$ sudo apt-get install python-picamera python3-picamera
- Putty terminal to access the terminal for input
Technical information
When the device detects the patient's presence, it requests the necessary information and documents it. Upon completion, this data is emailed to the registered physician.
This project works on SMTP. The system script runs in Python 2.7.
The device receives inputs from the camera module, which includes a keyboard. Data is saved using RPi and emailed to the doctor using SMTP.
Block diagram

Circuit Diagram


To read correctly, we will use a voltage divider because the RPi GPIO does not directly support 5V.
Detecting the patient
An ultrasonic sensor is used to detect the presence of a patient. The sensor sends out ultrasonic waves for about 20 milliseconds. When these waves are reflected back to the sensor, it detects the distance by calculating the time the wave was sent and then returned.
How the system works
- The system only works when a person is in front of the device. The ultrasonic distance measurement sensor (HC SR-04) detects the change in distance around the device (because of the patient in front of it).
- The device then requests the programmed details on the screen. For example, it asks the patient to open their mouth and eyes and takes photos using the camera module, saving the images locally.
- The device also requests patient identification.
- Once all the data has been documented, it sends an email to the registered doctor with the images attached, using the “multipart content type”. This is a data type that specifies that the email contains media content.
- This email is sent using the SMTP protocol. The doctor downloads the email using Standard Internet Message Access Protocol (IMAP).
- The doctor reviews the information and images and contacts the patient.
Understanding the source code
The code can be understood from its functions. For example, there is a call to one of the functions of the main function that is an “intrusion”. This function then calls two others, “Capture_image” and “SendEmail”.
The functions are as follows…
1. Definition Intrusion: This function ensures that the HC SR-04 sensor continuously sends an ultrasonic wave and then calculates the distance.
GPIO.output(TRIG, True)
time.sleep(0.00001)
GPIO.output(TRIG, False)
This function also has a range. Thus, if the distance in front of the sensor is less than this defined range, it triggers another function to take a photo: “image_capture(name)”. An input parameter for the image name is also required.
if(object_stay > 1 and object_present_again == False):
object_present_again = True
name = raw_input(“Enter your visit number:”)
print “Open your mouth in front of the camera!”
sleeptime(3)
print “Taking photo…”
capture_image(name,”Mouth”)
The function also provides instructions on the screen that ask for the patient's name. Then, activate the camera to take the photo(s).
2. Def capture_image(name_,part): This function inserts the patient's name and body part (eyes or mouth) into the photo.
camera.capture (file path)
After taking the photo(s), this function calls another function that sends an email to the doctor with the attached images.
download(name_ + part, file path)
sendEmail(self.jobid, self.jobid, (self.filepath))
3. Class sendEmail(threading.Thread): This function writes the email and identifies whether any media content is attached. It then sends it using SMTP to the appropriate doctor.
mailServer.sendmail(gmail_user, gmail_user, msg.as_string )
This project is an example of how it is possible to implement a simple SMTP protocol in applications that can solve important problems, such as access to a family doctor.


