The required software downloads are:
1. Phoenix/Live Suite, Live suite is for MAC and LINUX and Phoenix is for Windows
2. An operating system/firmware to boot on the CubieBoard, preferably Ubuntu flavored
The. Cubieez (I'm using this for this project) around 550 MB (pre-built X11VNC)
B. Cube
w. Lubuntu and much more..
3. A Putty SSH client for SSH on the CubieBoard.
4. Use a serial terminal emulator or any other client
5. Advanced IP Scanner or Angry IP Scanner
We need an operating system based on Linux and preferably Ubuntu, on which we can run python and use serial and socket connection to constitute a TweeterBie.
There are two things we can do right now: 1. We can replace NAND Flash with a Linux operating system. 2. We can use a MicroSD card to write the operating system to it and boot the CubieBoard into Linux.The step-by-step procedure for the above task is available on the CUBIEEZ websites or other operating system-related websites.
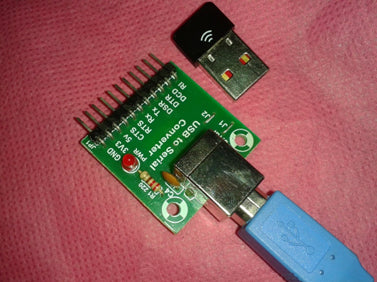
In my setup I had No spare mouse or keyboard, no Ethernet connectivity, just a Wi-Fi dongle and a USB to RX-TX converter with connecting wires

Figure 1: Image showing Wi-Fi Dongle and USB to RX-TX Converter
To do this, I first installed the Termite Serial terminal emulator, connected my TTL to USB converter to the PC, installed all the necessary drivers for it and kept it ready to initiate communication. Then, at the TTL to USB converter end, I took three wires – one from each Rx, Tx and Gnd pin and connected them to the corresponding pins on the hardware debug serial interface provided on the top of the CubieBoard. . Also note that connecting 5v will damage the CubieBoard.

Figure 2: Image showing USB to RX-TX converter connections with Cubieboard A20
Now open Termite on your PC and choose settings. Select the appropriate COM port (in my case it is COM4). Set the following parameters: Baud rate: 115200 Data bits: 8 Stop bits: 2 Parity: None Transmitted text: Append CR + LF as shown in the figure above. Note: You can also use just SE or CR but this depends on the operating system you are using. Press Enter on your keyboard while keeping the cursor in the text box at the bottom of TERMITE. Now the screen presents the login shell: Type “cubie” as the username and press enter (or click submit), when asked for the password type “cubieboard” and press enter (or click submit). This will take us to the Cubie Shell to program and run all our future programs. Type “ sudoifconfig ” and press Enter. When asked for the password, from now on use “ cubicle ”. Or give “ SU ” First, enter the password as “ cubicle ” this gives you root access so you don't need to use sudo anymore. And you can run all shell commands under the root user in this terminal window. Assuming you have a monitor that supports HDMI or DVI input, a USB mouse, and a USB keyboard, you don't need to have SSH on the board. Just plug them in and start programming.
Schedule
Arduino
It is assumed that the reader has gone through how to get started with Arduino and LCD Interface with Arduino .
It is common knowledge to choose Arduino for most embedded systems due to its simplicity of programming and large amount of features to get the most in a short amount of time.
So, connect the Arduino board to your desktop/laptop (hereafter referred to as PC) and launch the Arduino software. Now open the Examples > Liquid Crystal > Hello World program as shown below.
Figure 3: Screenshot of the Arduino IDE showing navigation to sample code for liquid crystal display
Make all pin connections as described in the program comments at the beginning. I have represented it in Circuit Diagram for reference. Now the LCD module is working in 4-bit mode instead of 8-bit mode. Given that data transfer takes twice as long, but it is enough for TweeterBie. The Arduino code has been redesigned. Changing the attached code introduces the scrolling effect to the text to be displayed. Note: The attached code has been attached as INO file After dumping the code and running with “ENGINEERING GARAGE” on the serial port

Figure 4: Image of Cubieboard A20 and Arduino-based TweeterBie showing initial messages
Now we will need a way to communicate with the Arduino and send data.
I chose python for scripting. Cubieez has a pre-installed version of PYTHON to test, open the terminal and type the followingPhyton
Once the terminal switches to the python port like >>>
This means PYTHON is installed now to exit the use prompt
>>> exit
There is a tool called pySerial which can be used for serial communication purposes. More documentation can be found here
Now, before we install pySerial we need PIP to be installed. This makes it easier to install python libraries in repositories.
To install PIP, follow the instructions
After installing pySerial, you can use the accompanying miniterm.
To run the miniterm, type the following command in the terminal. Let's look at the ports available on the CubieBoardØ python -m serial.tools.list_ports
this will list the available ports
This introductory tutorial gives a good idea on how to use pySerial.
My Arduino is connected via USB.

Figure 5: Arduino-based Cubieboard A20 and TweeterBie prototype
So the output of the previous command will now be:

Figure 6: Screenshot of the Mini Term application showing python commands
Ok, let's connect mini run with port ttyUSB0 and baud rate 9600. Make sure you run it under root.
The command for this is Phyton -m serial.tools.miniterm
sudopython -m serial.tools.miniterm /dev/ttyUSB0
or
sudopython -m serial.tools.miniterm–p /dev/ttyUSB0 –b 9600

Figure 7: Screenshot of the Mini Term application showing the execution of python commands
Everything you type will be displayed on the LCD. (It’s “HELLO”, the O is right behind…)

Figure 8: Image of Cubieboard A20 and Arduino-based TweeterBie showing an incoming tweet
Settings
Ok, now that the Display part is up and running, let's configure the TWEETER part of TweeterBie.
The following can be done directly on CubieBoard, but I'm doing this on my PC.
To access the tweets we need to establish a connection with the Twitter servers, authenticate as a user and also as a CubieBoard device and use API calls to get the latest tweets. The tutorial mentioned below just covers this from the basics.
To create access to TweeterBie go to https://dev.twitter.com/ and log in with your Twitter credentials.
As we are using Python for coding and there is a well-built API library for accessing Twitter in python, it is called TweePy, for more information on TweePy use this documentation and this Auth tutorial.
The first thing we need here is to install TweePy on the CubieBoard. As we already have PIP installed, it is very easy to install TweePy. Use the following command in the terminal. sudopip install tweepy cd tweepy This changes the directory to tweepy sudopython setup.py installation Now we install tweepy. Let’s create the “TweeterBie” working directory mkdirTweeterBie And let's change the command prompt to point inside the directory cd TweeterBie Now we will create a file to store our python code. nano TweeterBie.py In the NANO Editor, insert the following code referred to on this website http://stackoverflow.com/questions/7714282/return-actual-tweets-in-tweepy , weeterBie.py importtweepy# imports the TweePy library importserial # imports the pySerial library importtime # use of delay instruction needs this library ser = serial.Serial('/dev/ttyUSB0', 9600, timeout = 1) # Consumer keys and access tokens, used for OAuth > Tweeter User Dependent consumer_key = 'MfRPzXL7gsfxsB1T1Tdab42lY' # API KEY consumer_secret = 'O9k5dVSbIxYM4GCQj0IKnRdGkFTKGwaLLEunz2v9jwZriFh2qQ' access_token = '2526693469-raqqlVcj6jMV36AshYVAX48jvt8Q3BvSuEkrjOM' access_token_secret = 'CbvbGGxTl50dTishhxjfDklNATHkKaiaedv5zWpVzH86p' # Consumer keys and access tokens used for OAuth end here # OAuth process, using keys and tokens authentication = tweepy.OAuthHandler(consumer_key, consumer_secret) auth.set_access_token(access_token, access_token_secret) # Creation of the real interface, using authentication api=tweepy.API(auth) time.sleep(3); # sleep 3 seconds to start the arduino public_tweets = api.home_timeline # access all tweets in the timeline to tweet in public_tweets: printtweet.text # prints all Tweets in the terminal ser.write(tweet.text.encode('utf-8')) # print text on LCD time.sleep(8); # Sleep for 8 seconds between tweets ser.close # close door Now save and exit .save = ctrl^oe Exit= ctrl^X If you need regular update then use the code given below. # File editor: GNU nano 2.2.6 file: SuperLoop_TweeterBie.py importtweepy# imports the TweePy library importserial # imports the pySerial library importtime # use of delay instruction needs this library ser = serial.Serial('/dev/ttyUSB0', 9600, timeout = 1) # Consumer keys and access tokens, used for OAuth > Tweeter User Dependent consumer_key = 'MfRPzXL7gsfxsB1T1Tdab42lY' # API KEY consumer_secret = 'O9k5dVSbIxYM4GCQj0IKnRdGkFTKGwaLLEunz2v9jwZriFh2qQ' access_token = '2526693469-raqqlVcj6jMV36AshYVAX48jvt8Q3BvSuEkrjOM' access_token_secret = 'CbvbGGxTl50dTishhxjfDklNATHkKaiaedv5zWpVzH86p' # Consumer keys and access tokens used for OAuth end here # OAuth process, using keys and tokens authentication = tweepy.OAuthHandler(consumer_key, consumer_secret) auth.set_access_token(access_token, access_token_secret) # Creation of the real interface, using authentication api=tweepy.API(auth) time.sleep(3); # sleep 3 seconds to start Arduino while True: public_tweets = api.home_timeline # access all tweets in the timeline to tweet in public_tweets: printtweet.text # prints all Tweets in the terminal ser.write(tweet.text.encode('utf-8')) # print text on LCD time.sleep(8); # Sleep for 8 seconds between tweets hour.sleep(30); # sleep 30 seconds before accessing the API again ser.close # close door Now let's update Twitter Tweets and make sure it's working!!! Warning: Please do not provide tweets longer than 22 characters…!! This results in the line changing at this point, as shown below. New Tweets:- but displayed in reverse order 1. Welcome to Twitter 2. You are awesome haha 3. Hi@engineersGarage 4. This is the fourth tweet The result of the above tweets from TweeterBie is given below.Project source code
###
#include// already there in the sketch for LCD display // initialize the library with the numbers of the interface pins LiquidCrystallcd(12, 11, 5, 4, 3, 2); charinData(141); // Allocate some space for the string max of 140 characters in Tweets charinChar; // Where to store the character read from serial port byte index = 0; // Index into array to point the memory location bytebytesrecvd = 0; // counter to check the incoming bytes void setup { Serial.begin(9600); // Serial Port to send the characters to be displayed Serial.write("Power On"); // Power up Signaling on the Debug port after establishing connection lcd.begin(16, 2); // set up the LCD's number of columns and rows lcd.print("hello, world!"); // Print a message to the LCD Sample from old sketch delay(1000); // Time lag until message is read out of the LCD lcd.setCursor(0, 0); // Set LCD cursor to Home Position. index = 0; // Set character Indexing position to nil (zero) lcd.setCursor(0, 0); // bring back cursor to home lcd.print("Latest Tweet: "); // Display the Header on First Line lcd.setCursor(16, 1); // Go to last column of the Second line and wait for Characters to appear. } // This ends the Setup of the Arduino, Now to create the Super Loop void loop { index = 0; // always reset to zero at the beginning of data reception while(Serial.available > 0) // Don't enter the section unless data is available to read { if(index < 140) // One less than the size of the array get only 140 characters { inChar = Serial.read; // Read a character inData(index) = inChar; // Store it in “inData” array index++; // Increment where to write next increment the index inData(index) = ''; // Add terminating character (Null character) for the next position delay(5); // give 5 milliseconds gap to avoid data corruption bytesrecvd = index; // get the total count of bytes received } } // keep loping until data is available lcd.clear; // now clear the LCD of previous Data lcd.setCursor(0, 0); // Go to Home Position lcd.print("Latest Tweet: "); // write the latest tweet header on first line lcd.setCursor(16, 1); // go to end of line on second row lcd.autoscroll; // start auto scroll (the problem is it will rotate both rows) for (intthisChar = 0; thisChar
###
Circuit diagrams
| Circuit Diagram-Cubieboard-A20-Arduino-Based-TweeterBie |  |
| Block Diagram-Cubieboard-A20-Arduino-Based-TweeterBie |  |


