Nowadays, most hotels and restaurants accept online food ordering. Many hotels and restaurants make it easy to pre-order or even provide delivery services to local areas. In this project, a hotel order management system is designed where a customer can pre-order food using a mobile application and a Raspberry Pi based server manages the fulfillment of menu items and reservation orders. With each reservation, the customer is informed of the time their order will be ready, so they can arrive at the specified time and collect their order.
This Hotel Order Management System is based on the Internet of Things and uses the MQTT protocol for communication between the mobile application and the Raspberry Pi server. The Raspberry Pi as a server is installed in the Hotel and remains connected to the internet via a Wi-Fi access point. For this purpose, the Raspberry Pi 3 is used, which is equipped with an integrated Wi-Fi modem. The Raspberry Pi is connected to a display monitor where hotel staff can view incoming orders.
The Raspberry Pi and the mobile app communicate via an MQTT broker. The MQTT broker used in this project is HiveMQ. The mobile app subscribes to a 'FromServer' topic while publishing to a 'ToServer' topic. The Raspberry Pi server as another MQTT client subscribes to the 'ToServer' topic and publishes to the 'FromServer' topic. The payload in the 'ToServer' topic is the menu item selected by the user in the mobile application. When the Raspberry Pi server receives an order for a mobile app menu item in the topic – 'ToServer', it sends the order number and pickup time as payload in the topic – 'FromServer'.
On Raspberry Pi, IoT communication with the HiveMQ broker is managed by a python script, while the mobile app uses the paho-MQTT client library to manage IoT communication with the HiveMQ broker. The mobile application is developed in Android Studio. The application has a single activity where the customer can select an item from the menu to place the order.
Required components –
1) Raspberry Pi 3
2) Any smartphone
Required software –
1) Raspbian OS
2) Leafpad/GNU Nano/Python 3 IDLE (for writing python script)
3) Android Studio (for Android app development)
4) Paho MQTT client library – Android service (for import into the Android application)
Block diagram –

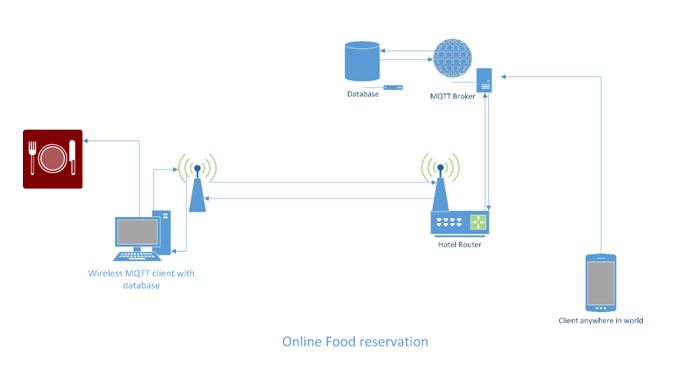
Figure 1: Overview of Raspberry Pi server and MQTT-based IoT hotel order management system
Circuit Connections –
In this project, a Raspberry Pi and a Smartphone are used as IoT devices. Both act as MQTT clients in the IoT network, while HiveMQ serves as the MQTT broker. The Raspberry Pi is connected to a display monitor where it shows orders received through the mobile app. The Raspberry Pi is configured to run a python script on startup. This python script can receive orders as an MQTT subscriber, display orders received along with customer number, order pickup time and order id in the display monitor and send back order number and time to order ready as MQTT publisher for the mobile application. The python script was developed in Python 2.7.

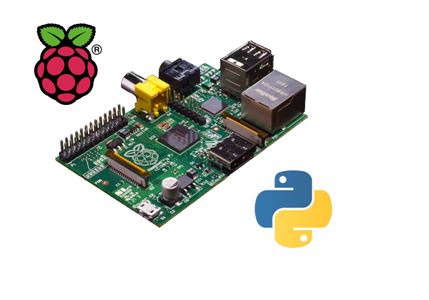
Figure 2: Raspberry Pi and MQTT logo and image
The smartphone is installed with an app from which an order can be placed. The application was developed using Android Studio. The mobile application is using the paho-MQTT client library for IoT communication, like python on the management side.
How the circuit works –
The Raspberry pi server is connected to the MQTT broker through the hotel's wireless router. The App is then connected to the same broker via the cell phone's internet connection.
The Raspberry pi server is running a python script that connects to the MQTT broker using the paho-MQTT library. The script contains the menu item. Now when the mobile app is connected to the broker it sends a signal string on a “ToServer” topic, the Raspberry pi server is subscribed to the same topic and receives this signal. Now the server responds with the menu items from the “FromServer” topic that is subscribed to the App. From these menu items when a customer orders something it goes to the Server and if the data is valid it sends the user the time in which your order will be ready.
Programming guide –
In this project, a mobile application for a smartphone and a python script to run on the Raspberry Pi are developed. The mobile application developed here is an Android application. To develop mobile apps, first download and install Android Studio. Open Android Studio and create a new project. Name the project – Hotel Order System and provide the name of any company. The company name can also be the developer name. Click next. On the Target Android Devices screen, keep the default values and click Next. Select the minimum SDK supported by the smartphone in this case. On the Add an Activity to Mobile screen, select Empty Activity and click Next. On the Configure Activity screen, keep the default values and click Finish. Open the project window by navigating to View > Tool Windows > Project, if it is not already open, select Android View. Here it can be seen that the project contains the following main files –
app > java > com.example.themenu > MainActivity : This is the main activity (the application entry point). When the application is compiled and run, the system launches an instance of this activity and loads its layout.
app > res > layout > Activity_main.xml: This XML file defines the UI layout of the activity.
app > manifests > AndroidManifest.xml: The manifest file describes the fundamental characteristics of the application and defines each of its components.
Gradle Scripts > build.gradle: There will be two files with this name: one for the project and the other for the “app” module. Each module has its own build.gradle file, but this project currently only has one module.
Navigate to the Activity_main.xml tab if it is not already open. Make sure the Design tab is open in the Activity_main.xml view. In res -> layout -> activity_main.xml, add the layout elements that include two textview widgets, one scrollview, one listview, two edittext and one button. There is a single activity in this app.
Download the Paho-MQTT client library – Android Services. Then open app > manifests > AndroidManifest.xml and add permissions and Paho-MQTT client as an Android service.
Then open MainActivity.java and note down the java code of the application. The java code has the following main highlights –
1. The library and its functions are used for subscribing to the “FromServer” topic and publishing to the “ToServer” topic.
Static string MQTTHOST = “tcp://broker.hivemq.com:1883”;
String topicStr = “ToServer”;
String topicSub = “FromServer”;
2. The application receives the menu items from the server
3. Then these menu items are displayed on the application screen
menuArray.add(new String(message.getPayload ));
ArrayAdapter adapter = new ArrayAdapter (MainActivity.this, android.R.layout.simple_list_item_1, menuArray);
4. Now in the application there are two fields that receive text input and these inputs are being sent to the server.
msgToserver = (EditText)findViewById(R.id.orderno);
message = “ooo”+ msgToserver.getText .toString ;
client.publish(topic, message.getBytes, 0, false);
5. The server responds according to the query
For more details on how to use MQTT client library – Paho Android Service for communicating with HiveMQ broker, check out the following tutorial –
MQTT Client Library Encyclopedia – Paho Android Service
The Raspberry Pi works like another MQTT client. It runs a python script that works as a hotel order management utility. First of all, the Raspberry Pi needs to be loaded with an operating system. The official Raspberry Pi operating system – Linux Raspbian – is installed here. During operating system installation, the Raspberry Pi must be connected to a monitor using an HDMI cable and a keyboard and mouse via USB ports.
To install Raspbian OS on MicroSD card, first download the latest Raspbian OS image from the Raspberry Pi website at the following link –
Raspbian Operating System
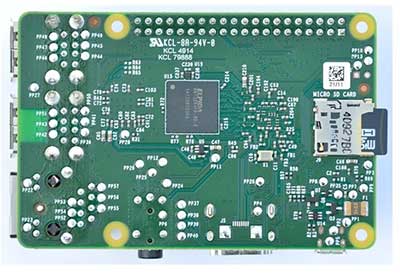
Copy the latest Raspbian operating system image to the MicroSD card. If the MicroSD card used is 32 GB or less, it must be formatted to FAT32 (file system) before copying the image, or if the MicroSD card is more than 32 GB, it must be formatted to exFAT before copying the image. Extract the operating system Zip and copy it to the MicroSD card. The image can be written to the card by connecting it to a laptop or PC using a MicroSD card reader. After copying the extracted image, insert the card into the MicroSD slot as shown below –

Fig. 3: Typical Raspberry Pi 3 MicroSD card slot image
Connect the Raspberry Pi to a monitor using an HDMI cable, a keyboard, and a mouse. Power the card by connecting it to a power adapter. The red LED on the board will begin blinking and the operating system will begin booting from the MicroSD card. The boot process will be displayed on the monitor and once the boot is complete, the green LED will light up on the Raspberry Pi. After successfully installing Raspbian OS on Raspberry Pi, it is recommended to perform a software update. This can be done by running the following Linux commands in the Linux Terminal –
$ sudo apt-get update
$ sudo apt-get upgrade
After installing Raspbian, it's time to write and run python scripts on Raspbian. A python script can be written in Raspbian using a text editor like Leafpad or GNU Nano. Python script can also be written using standard python IDE such as Python 2 IDLE or Python 3 IDLE. Open Python 3 IDLE by navigating through Menu -> Programming -> Python 3 IDLE. A window called Python 3.4.2 Shell will open. Write the python scripts and save them in a directory.
The python script written for this project must be run at startup when the Pi 3 is turned on. The script runs an infinite loop so it never ends. There are a few methods by which the Raspberry Pi can be configured to run a python script at startup. Any of the following methods can be used –
1) Editing rc.local –
Commands can be added to the /etc/rc.local file to run a program or command when the Raspberry Pi boots. This is especially useful if the Pi needs to be plugged into headless power and run a program without manual configuration or initialization. The file must be edited with root by running the following commands in the Linux Terminal –
sudo nano /etc/rc.local
Now add commands to run the python script using the full file path and add an ampersand at the end of the command so that the script runs in a separate process and initialization can continue. The following command must be added where the python script is saved as menu.py –
sudo python /home/pi/menu.py &
output 0
The command must be added just before the exit 0 line in the rc.local file.
2) Editing .bashrc –
.bashrc is a hidden file in the home folder that contains user configuration options. Open the .bshrc file by running the following commands in the Linux terminal –
sudo nano /home/pi/.bashrc
Add the following lines after the last line of the file –
echo Running at startup
sudo python /home/pi/menu.py
3) Adding script to init.d directory –
The init.d directory contains the scripts that are launched during the boot process (additionally, all programs here run when the Pi is turned off or rebooted). Add the script to be run at startup to the init.d directory using the following commands –
sudo cp /home/pi/securitysystem.py /etc/init.d/
Go to the init directory and open the python script by running the following commands –
cd /etc/init.d
sudo nano menu.py
Add the following lines to the python script to make it a Linux Standard Base (LSB) –
# /etc/init.d/sample.py
### STARTING INFORMATION
# Provide: sample.py
# Mandatory start: $remote_fs $syslog
# Mandatory stop: $remote_fs $syslog
# Default start: 2 3 4 5
# Default stop: 0 1 6
# Short description: Start daemon at boot time
# Description: Enables the service provided by the daemon.
### END START INFORMATION
Make the python script in the init directory executable by changing its permission by running the following command –
sudo chmod +x menu.py
Then run the following command –
defaults sudo update-rc.d menu.py
Then restart the Pi by running the following command –
sudo restart
Any of the above methods can be used to run the python script at startup. Now the Pi 3 can be connected to the monitor where customer orders are to be displayed. The python script has the following main highlights –
1. Import libraries for MQTT and GPIO
import paho.mqtt.client as mqtt
import paho.mqtt.publish how to publish
import RPi.GPIO as GPIO
2. Create an array called menu, add menu items into it and send it
menu_items=(“Coffee”,
"Tea",
“Maxixano Rice”,
“Grilled Veggie Que”,
"Cheese pizza",
“Aloo Tikki Burger”,
"Chips",
)
item_price=(200,130,100,400,200,55,90)
Sending the matrix
setting menu:
for i in range(0,len(menu_items)):
#print str(i+1) +”:”+ menu_items(i)+ “:” +str(item_price(i))
menu_send = (str(i+1) +”.”+ menu_items(i)+ “:” +str(item_price(i)) + “$”)
publish.single(“FromServer”, menu_send, hostname=broker_ip)
3. Send response to server according to received data
elif ('m' in message):
count = (count + 1)
oldstr = message
#print oldstr
tim1 = oldstr.replace(“m”, “0”)
#print tim1
tim1 = int(tim1)
time1 = time1 +30
m = ”minutes”
if(tim1>60):
tim1 = (tim1/60)
m = ”hour”
abc =str(tim1)
#print abc
order = (“The order will be ready in:”+abc+m)
if(tim2>len(menu_items)):
publish.single(“FromServer”, “Wrong order! Please select a valid menu item”, hostname=broker_ip)
4. At the end of the script, these lines take care of connections with the broker
client = mqtt.Cliente
client.on_connect=on_connect
client.on_message=on_message
client.connect(broker_ip, broker_port, 60)
client.loop_forever
Download and check the application code in Android Studio. Then try out the python code on the Raspberry Pi. This is a simple hotel order management system that uses the MQTT protocol to receive and manage food orders.
In the next tutorial, learn about the IMAP protocol.
Project source code
### //Program to import paho.mqtt.client as mqtt import paho.mqtt.publish as publish import random import thread import time import time import RPi.GPIO as GPIO ## Import GPIO library import them os.system('clear') ############################ Raspberry Pi GPIO ################## ########## GPIO.setwarnings(False) GPIO.setmode(GPIO.BOARD) ## Use board pin numbering GPIO.setup(8, GPIO.OUT) ## Setup GPIO Pin 8 to OUT GPIO.setup(10, GPIO.OUT) ## Setup GPIO Pin 10 to OUT GPIO.setup(12, GPIO.OUT) ## Setup GPIO Pin 12 to OUT GPIO.setup(16, GPIO.OUT) ## Setup GPIO Pin 16 to OUT #declarations broker_ip = "broker.hivemq.com" broker_port = 1883 oldstr="0" tim1 = '0' abc="0" cba="0" order="0" m = '0' a = "ad" b = "cb" #Main Satrt menu_items=("Coffee", "Tea", "Maxixan Rice", "Grilled Veggie Wich", "Cheese Pizza", "Aloo Tikki Burger", "French Fries", ) item_price=(200,130,100,400,200,55,90) count = 0 count2 = 0 count3 = 0 # The callback for when the client receives a CONNACK response from the server. print(""" __ __ _______ _______ _______ ___ ___ _______ _______ _ _ _ _ ___ _ _ _ ___ _ ___ ___ _ _ ___ __ __ _______ ___ _______ _______ ___ _______ ___ """) def on_connect(client, userdata, flags, rc): #print("Connected with result code "+str(rc)) print("Connected!") # Subscribing in on_connect means that if we lose the connection and # reconnect then subscriptions will be renewed. client.subscribe("ToServer") GPIO.output(16,True) #GPIO pin will be on on the connection GPIO.output(8,False) GPIO.output(10,False) GPIO.output(12,False) # The callback for when a PUBLISH message is received from the server. def on_message(client, userdata, msg): global count global count2 global count3 global order global abc global m message = str(msg.payload) #print(msg.topic+" "+str(msg.payload)) if ('19932' in message.lower ): #rand1 = random.randint(0, 4) #publish.single("FromServer", reasponse_on_name(rand1), hostname="192.168.1.106") menu elif ('m' in message): count = (count + 1) oldstr = message #print oldstr tim1 = oldstr.replace("m", "0") #print tim1 tim1 = int(tim1) tim1 = tim1 +30 m = "minutes" if(tim1>60): tim1 = (tim1/60) m = "hour" abc = str(tim1) #printabc order = ("Order will be ready in:"+abc+m) elif ('ooo' in message): count2 = count2 + 1 count3 = count3 + 1 oldstr1 = message #print message tim2 = oldstr1.replace("ooo", "0") #print tim2 tim2 = int(tim2) #print tim2 if(tim2>len(menu_items)): publish.single("FromServer", "Wrong Order! Please Select a valid menu Item", hostname=broker_ip) #print (" Invalid order:"+" with id:"+str(count2)) else: publish.single("FromServer", order, hostname=broker_ip) print ("Custmor No."+ str(count) + " wil be here in "+ abc +" "+m), print ("With the order of:"+menu_items((tim2-1))+" with id:"+str(count2)) print " " if(count3==1): GPIO.output(8,True) GPIO.output(12,False) if(count3==2): GPIO.output(10,True) if(count3==3): GPIO.output(12,True) GPIO.output(8,False) GPIO.output(10,False) count3 = 0 defmenu: for i in range(0,len(menu_items)): #print str(i+1) +":"+ menu_items(i)+ ":" +str(item_price(i)) menu_send = (str(i+1) +"."+ menu_items(i)+ ":" +str(item_price(i)) + "$") publish.single("FromServer", menu_send, hostname=broker_ip) client = mqtt.Client client.on_connect = on_connect client.on_message = on_message client.connect(broker_ip, broker_port, 60) client.loop_forever ###

