This is a simple tutorial on how to interface the ultrasonic sensor with the nodemcu WiFi module and measure the distance. I recently did an internet of things project that involves an ultrasonic sensor and a nodemcu WiFi module. The ultrasonic sensor used in the project is the most popular among the DIY circuit community, the hcsr04 ultrasonic sensor. You can find many tutorials on the internet on how to interface the HCSR04 ultrasonic sensor with Arduino and other different microcontrollers. But interfacing the HCSR04 ultrasonic sensor with the Nodemcu requires a little more effort to understand the power requirements of the two modules. Several tutorials are present on the Internet about interfacing the popular hcsr04 ultrasonic sensor with nodemcu, but none of them worked for me, and many people in the comments complain about the power restrictions of the circuit. Therefore, in this tutorial I will elaborate on the power requirements of the two modules and how to interconnect them correctly.

HCSR04 Ultrasonic Sensor Measuring Distance
Ultrasonic Sensor HC-SR04
The Hcsr04 ultrasonic sensor is composed of an ultrasonic transmitter, an ultrasonic receiver and a control circuit. The Hscr04 ultrasonic transmitter transmits ultrasound waves at 40,000 Hz. The transmitted waves bounce back if they hit any flat surface/object in their path. The returned waves reach the ultrasonic receiver. The ultrasonic receiver receives the returned waves and notifies the control circuit about it. Control circuit that calculates the time it takes for waves to return after transmission. Is time then manipulated to approximate the distance traveled by the waves or what is the distance between the sensor and the object? from which the ultrasound waves returned. Hcsr04 can measure distances between an active range of 2 cm to 4 meters. Hcsr04 requires 5 volts and 15 mA of power for operation. Hcsr04 has four pins. Two are power pins. Vcc is the +ve pin, apply 5v to this pin and Gnd is the ground pin, connect -ve from 5v power supply to it. The other two pins are
Trigger and
Eco .
- Trigger pin is triggered by an external controller to burst an ultrasound wave.
- Echo pin notifies the external controller when the receiver receives the returned wave back.
The price of the module varies between US$1.5 from China and US$3.95 from sparkfun.
Nodemcu esp8266 and Hcsr04 Ultrasonic Sensor Power Constraints
Nodemcu esp8266 12e works on 3.3 volts and its pins are also 3.3V TTL compatible. Where the Hcsr04 ultrasonic sensor works at 5 volts. We cannot power Hcsr04 directly with nodemcu 3.3v power output pins . Many tutorials available online on this topic have made this mistake and engineers  are complaining about them . There are some new Hcsr04 ultrasonic sensor modules coming from China that can work at 3.3 volts. If you have one, you can interface it directly with nodemcu.
Project circuit diagram
I used a cheap power supply that can output 5 volts and also 3.3 volts. I bought it online in China. The 5 volt side of the power supply supplies power to HCSR04 and the 3.3 volt side is used to power the nodemcu. Note that 3.3V and 5V grounds are common.
The trigger and echo pins of the HCSR04 ultrasonic sensor are directly connected to the GPIO-2 and GPIO-0 or D4 and D3 pins of the Nodemcu. You may have a question here: why are the pins directly connected if the voltage levels of both devices are different? The answer is simple: the output of the trigger and echo pins can be easily read by 3.3 volt devices. It worked for me without any problems and the DIY project has been running continuously for 72 hours. If it didn't work for you, you can insert a logic converter between the two modules. Rest of the connections can be seen in the circuit diagram given below.
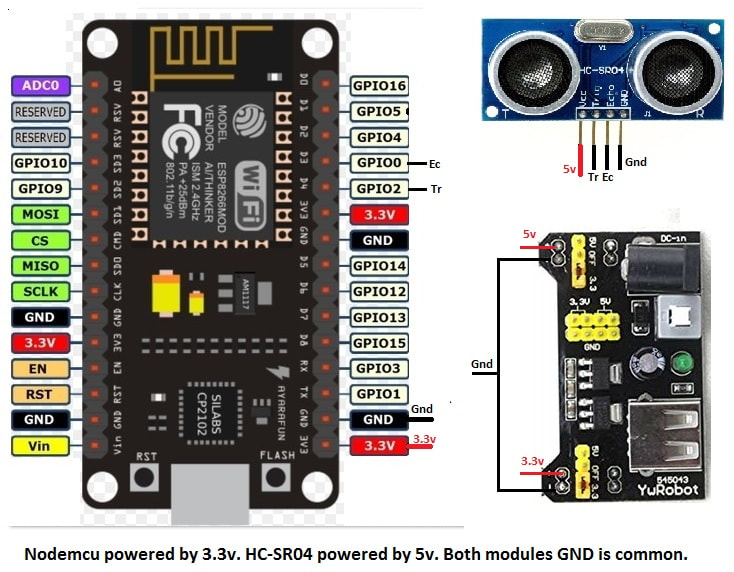
HC-SR04 ultrasonic sensor with nodemcu esp8266 WiFi module
Coming to the project code. The code is written in Arduino IDE. It is open source and you can use and modify it as per your needs. Before using the code, first make sure you have installed the nodemcu esp8266 support package for arduino IDE. If you haven't already, install it first. Let's move on to calculating the ultrasonic distance before starting with the code instructions. The ultrasonic sensor did not calculate the distance on its own. Instead, it just captures the time it takes for waves to leave the transmitter and return to the receiver. Time is converted to distance using the speed of sound in air formula. According to the formula for the universal speed of sound in air
Time = Distance / Speed
Where Velocity = speed of sound in air. Which is 340m/s Therefore, rearranging the formula
Distance= Time * 340(speed of sound in air).
The above formula is used in the code below to measure distance in time. At the beginning of the code I defined the nodemcu pins ( trigP,ecoP ) interacting with the hcsr04 ultrasonic sensor. Further two variables ( distance, duration ) are defined to store the values of time and distance. In the configure function, the trigger pin is declared as output and the echo pin is declared as input. Nodemcu serial communication is also initialized in the configuration function at a baud rate of 9600.
In the loop function, the trigger pin remains low for 2 seconds, after 2 seconds it becomes high for 10 knots. 10us is the time the trigger pin sends an output ultrasound signal in 8 cycles. Then the pulse function reads the return waves and approximates the time. After the declaration
distance= duration*0.034/2 calculates the actual distance between the ultrasonic sensor and the object . If you can't understand the 10 nodes and other parameters like pulse function, I advise you to follow this tutorial, it will explain each parameter graphically and mathematically with real world examples.
Build the circuit on the breadboard and load the code into nodemcu. After uploading the code to nodemcu, open the arduino IDE serial monitor. Make sure your nodemcu is connected to your PC and the correct port and board are selected on the Arduino IDE. As soon as you open the serial monitor, you will see the distance readings appearing in the Arduino serial monitor window. Place some object in front of the ultrasonic sensor and measure the distance manually with a scale. Then observe the readings on the Arduino serial monitor, both should be the same. Otherwise, it should be within 3mm (Hcsr04 error rate) beyond the actual/manual reading. The results window is shown below.
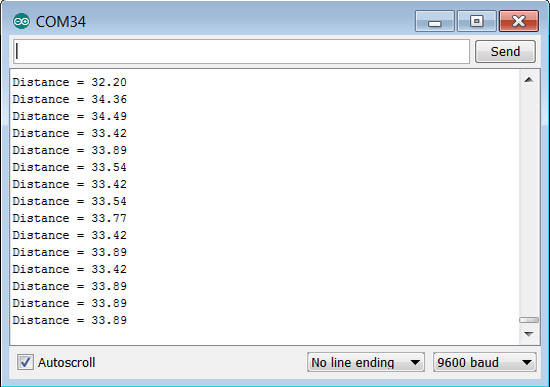
HC-SR04 Ultrasonic Output on Arduino Serial Monitor with Nodemcu ESP8266 12E
Attention The Pulse in function used in the code is an old function used to measure distances with the hcsr04 ultrasonic sensor. This function works poorly with some ultrasonic modules, especially old ones or ones whose control circuit is out of date. This function is also slow in measuring time. A new and fast library is released by Arduino to work with ultrasonic sensors. The NewPing Library. This library uses Arduino's internal timers and has not been compiled into the Arduino IDE when used for nodemcu. So
we can't use NewPing library with nodemcu .
Future work
I just showed how to interface the hcsr04 ultrasonic sensor with the nodemcu esp8266. Practical functionality can be brought to the top design by making it an automatic and intelligent parking shed control system. The shed goes up when the car arrives at the house and goes down when the car enters and vice versa. GSM can be part of the project to send an SMS alert to a household individual about the arrival of the car. The Nodemcu can be connected to WiFi and the received car alert can be sent to an online server that maintains a parking record.
Download the project code. The folder contains the .ino file of the arduino ide project. Please provide us with your feedback on the project. If you have any questions, write them below in the comments section.
Code/Files