This project will show how we can use IoT to create cheap and smart remote classrooms for rural areas using Raspberry Pi and its camera module. If a teacher teaches in a distant city, this session can be broadcast live to rural areas. Through these applications, children in rural areas can get quality education in a remote location for a small fee.
Such applications are already available on the market, but they are expensive, so we need a cheap solution that the families of these children can afford.
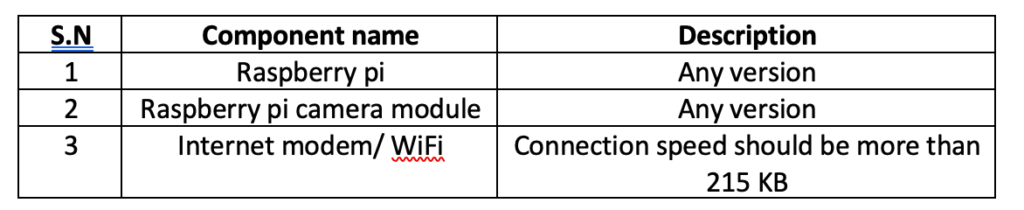
Required components 
Required tools and libraries
Tools
- PythonIDE 3.0
- VNC Viewer
- Any client web browser
Python Libraries
- Socket Server – link
- Picamera – can be installed by following commands in the terminal
$ sudo apt-get install python-picamera python3-picamera
Technical information
Our device can be deployed anywhere and will record and stream live at your address. This application works on the client-server model using TCP/HTTP as the communication protocol. Therefore, the stream can be accessed from anywhere (if the firewall allows it) in a web browser.
We will use the Raspberry Pi for processing and as a server that will transmit the media data received from the camera on a specific IP address of the Raspberry Pi. For Internet connectivity we can use Wi-Fi or any Internet modem.
We will write a Python script that will take care of all the technical processes like enabling the network and configuring the Raspberry Pi as a media streaming server.
Block diagram/algorithm

Figure 1 Client-Server Communication
The Raspberry Pi is directly connected to the camera model using its cable connector, and the modem provides the Raspberry Pi with a valid IP address with Internet connectivity. A TCP/HTTP connection shares all media data between the Raspberry Pi and the modem.
Clients access the Raspberry Pi (streaming server) using internet-enabled devices such as cell phones and laptops. Raspberry Pi has a good browser because the stream is HTTP.
How it works
Once all connections are up and running, we launch our script that will stream on the Raspberry Pi's IP address. To understand this, follow the points below.
- The camera starts recording and saving photos to an “mjpg” file when the script is activated.
- The camera continuously replaces the stream within just one file.
- A server is created within the system using a function, and this image file is passed within that function. The server also opens a port on the system so that clients can access the server over the network.
- An HTML code/page is written to handle the image file in the web pages. This HTML page displays this image and continues to update to show that changes to images can be viewed as videos.
- Now, if a client manages to connect to the server, it will be greeted with that HTML page, and thus, the client will be able to see the image in video form.
- If multiple clients are connected, multithreading is used and a new page is opened for each client.
- When a client is disconnected, the flow for that specific client is interrupted.
- The server always listens to the client on the port it opened.
Understanding the source code
Let's understand the source code and its essential functions.
There are three handler functions, a primary function and an HTML page template in our code.
HTML page template
The title tag shows the main title of the page when a customer is logged in.
The tag
is a header on our main page.
PiCamera MJPEG Streaming Demo
The line “
StreamingOutput(object)
This function creates enough data buffer to save the stream file. It also provides a new framework on client connection.
return self.buffer.write(buf)
StreamingHandler(server.BaseHTTPRequestHandler)
This function handles clients on HTTP requests. It writes the main header with the following information.
If a client is trying to access the server just by its address, it shows the full page to the client.
self.send_header('Local', '/index.html')
If the index.html page is accessed, it writes the page with the content and displays what was written on the part of the page.
It also specifies the type of content on the main page so that clients (browsers) can understand the type of content and act accordingly.
self.send_header('Content Type', 'multipart/x-mixed-replace; limit=FRAME')
This stream is a frame-type stream with multipart (multimedia) content.
StreamingServer(socketserver.ThreadingMixIn, server.HTTPServer)
This server role handles the networking part and creates a new socket for each client. It also allows multiple client connections using multithreading.
Main function
The main function script is the code to record the stream and pass it to the above functions.
camera.start_recording(output,format='mjpeg')
The camera starts recording and writes to the file in mjpeg format.
The address is the object that passes the server port and IP address, which means it will support server availability on each IP address the system is assigned to.
address = (”, 8000)
The server is binding to the object address and content, which is the “StreamingHandler” function
server = StreamingServer(address, StreamingHandler)
This line tells the server to continue serving the service until the script is finished.
server.serve_forever
So this is how we can find a cheap and easy solution for smart remote classrooms in rural areas.