
LED scrolling message boards are widely used in:
- Bulletin board displays
- Public advertising panels
- Passenger information display panels on BUS/TRAIN/TRAM/MATRO, etc.
- Store name or signs
Most of these rolling message boards are made up of a single RED LED. However, currently, there are multi-color LED boards and RGB LED boards are also available. In all types of boards, LEDs are connected in a LINE-COLUMN structure, which is called MATRIX LED rolling message boards.
On a simple scrolling MATRIX LED message board, there is only one animation effect – so the message scrolls from right to left. But there are many such panels that have several different animation effects from which a message can appear:
- The top or bottom
- Appears and then disappears
- Provides dissolving effects
- Jump from left to right and more
Here we present a simple project in which a user can input the informational message to be scrolled on a board using a laptop or computer. This message will be displayed and scrolled continuously. Whenever the user wants to display new information (i.e. a new message), he needs to connect the system to a computer, using a USB, and then enter the new message – that's all!
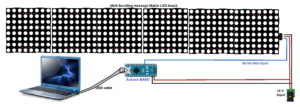
For this project, we used the ready-to-use Matrix LED scrolling message board, built from six units of an 8×8 LED block. There are a total of 6x8x8 = 384 LEDs.
It will receive a message as serial input from any digital device such as a microcontroller or microprocessor. It will accept serial data in 8-N-1 format with 9600 BPS. The circuit also uses the Arduino NANO board which receives a message from a laptop or computer and sends this message to the MATRIX LED board to be displayed and scrolled.
Here is the circuit diagram with its description and operation…
Circuit Diagram
Circuit Description
As shown in this figure, there are only three building blocks in the circuit:
1. The MATRIX LED board scrolling message
2. The Arduino NANO board
3. The laptop (or PC)
Observation:
- The scrolling message MATRIX LED board requires three wires to interface between Vcc, Gnd, and the serial input. As Vcc, it requires 12V @ 1A power supply. Therefore, an external 12V supply from an adapter is provided. Its serial data input is connected to digital pin D3 on the Arduino board.
- The Arduino board also receives a 12V input from the adapter for its Vin pin. It communicates with the laptop via a USB cable and also receives data (messages) from the laptop.
Circuit operation
The operation of the circuit is simple. When 12V power is supplied to the circuit, it will start operating. The Arduino receives the string (message) from the laptop and will give the same message to the MATRIX LED board scrolling message. This scrolling message will be displayed in this frame.
- Initially, the default “Hello” message is displayed and scrolls continuously on the board.
- The Arduino will continuously wait for any message from the computer. The user can send a message (string) to the Arduino IDE's serial monitor.
- When the user sends a message from this serial monitor, it is received and stored by the Arduino board in its internal RAM.
- When a complete message is received, the Arduino will send the same message serially to the scrolling message MATRIX LED board. The Arduino digital pin D3 works as a serial data Tx pin that sends the message serially to the MATRIX LED board.
- The format for sending a message to the MATRIX LED board is: “!_____________________message________________\r”
- This means that the text message to be scrolled must start with '!' and end with '\r'
- The Arduino inserts the start and end characters into the message received from the computer and then sends it to the MATRIX LED board.
- The MATRIX LED board will begin displaying and scrolling this message continuously until it receives a new message.
- This means that every time a user wants to display a new message, they will need to send it from a computer and the message will be displayed and scrolled continuously on the MATRIX LED board.
Software program
#include
SoftwareSerial matrix_LED_serial(2,3);
char message(100);
int i=0;
null configuration
{
// put your configuration code here, to run once:
Serial.begin(9600);
matrix_LED_serial.begin(9600);
matrix_LED_serial.print(“!Hello\r”);
matrix_LED_serial.print(249, HEX);
delay(5000);
}
empty loop
{
while(Serial.available)
{
message(i) = Serial.read ;
me++;
}
if(msg(i-1)=='\r')
{
matrix_LED_serial.print('!');
matrix_LED_serial.print(msg);
matrix_LED_serial.print('\r');
l=0;
}
}
(tagsToTranslate)Arduino