
In this tutorial I will teach you how to interface the dht-11 temperature and humidity sensor with the nodemcu esp8266-12e WiFi module and monitor the temperature of an area. You can see the temperature and humidity level of a room or a specific location on your desktop or mobile browser by doing this DIY project. There are also other members of the DHT-11 temperature and humidity sensor family available on the market, such as DHT-21 and DHT-22. The same code from this tutorial can be used to interface other members of the dht family with the nodemcu WiFi module with minor modifications to the dht library.
DHT-11 Temperature and Humidity Sensor
Like the old temperature measurement methods, DHT-11 also uses thermistor with high precision to measure the room temperature. To measure humidity, a capacitive humidity sensor is used. It is a low-cost temperature and humidity sensor. Sensor power requirements are between 3 volts and 5 volts and need a continuous 25 mA of direct current. It produces data in digital format. It can measure temperatures between 0 degrees and 50 degrees Celsius with a 2% margin of error. The humidity level that can be measured is between 20% and 80% with a margin of error of 5%. The DHT-11 can update its data every 2 seconds, so it is a fairly low speed sensor. DHT-11 generates the default temperature in Celsius.
The DHT-11 sensor has 3 or 4 pins depending on the manufacturer. It normally has four pins. Two pins per power pins. Gnd and Vcc respectively. The third is the data_out pin. On this pin, the sensor outputs temperature and humidity values. The fourth pin is empty. The Data_out pin requires a pull up resistor. The sensor I'm using has a built-in pull up resistor.
The DHT-11 sensor has 3 or 4 pins depending on the manufacturer. It normally has four pins. Two pins per power pins. Gnd and Vcc respectively. The third is the data_out pin. On this pin, the sensor outputs temperature and humidity values. The fourth pin is empty. The Data_out pin requires a pull up resistor. The sensor I'm using has a built-in pull up resistor.
Project circuit diagram
The Nodemcu esp8266-12e runs on 3.3 volts and the dht-11 can also run on 3 volts. So I will power the dht-11 with nodemcu output power pins. For data entry into nodemcu I am using D3 or GPIO-0 from nodemcu. The circuit diagram of the project is given below.
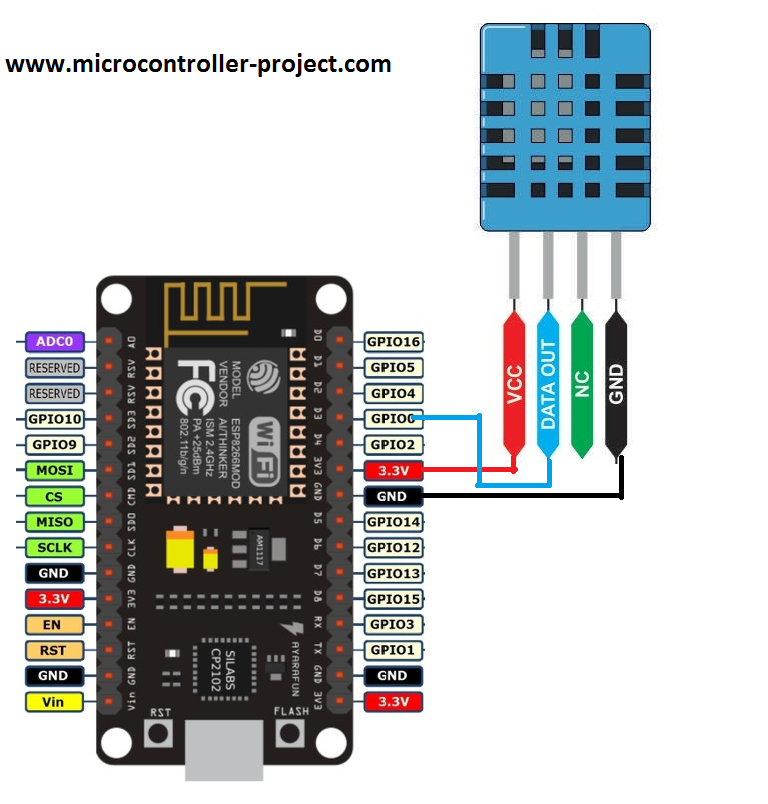
DHT-11 Temperature and Humidity Sensor Interface with Nodemcu WiFi Module
Coming to the code part. First I included the libraries necessary for nodemcu and dht-11 to work. The ESP8266WiFi header file deals with the nodemcu module and the DHT header is for initializing and working with the DHT sensor. After the libraries I defined the macros for the dht sensor and the pin to which it will be connected with the nodemcu. Then enter the SSID and password of the WiFi network you want to connect your nodemcu to.
const char* ssid = “Your SSID”;
const char* password = “Your Wifi password”;
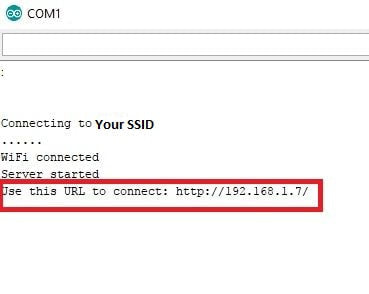
In the configuration loop, nodemcu requests an IP from the router. After assigning the IP, it starts your server. In the loop function, nodemcu is checking any request from the client. If a request comes in, nodemcu fetches data from dht-11 and sends back a response in the form of an HTML page to the client.
Nodemcu is working as a server. It is serving a web page. The web page contains the temperature and humidity values for a room or location. Your customer's desktop, cell phone, laptop or notebook must be on the same WiFi network that the nodemcu is connected to. If one of them, the client/mobile or server/nodemcu, is connected to another network, you will not be able to load and see the web page where the temperature and humidity data is served.
The final page displayed in the browser will look something like below. It contains the temperature and humidity values. The temperature will be displayed in Celsius and Fahrenheit scales. A button with the text “Update temperature and humidity” is present on the page. Whenever the user needs an updated value, they must press this button. Pressing this button notifies nodemcu that the client needs an updated temperature value.
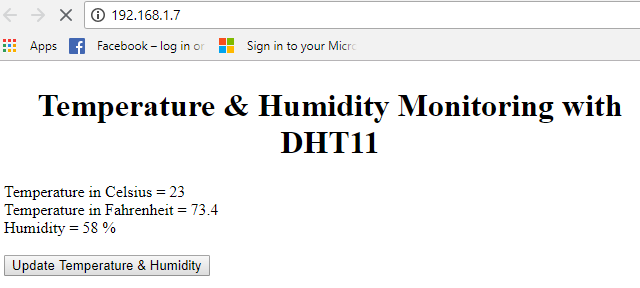
Nodemcu measuring temperature and humidity using dht11 sensor over WiFi
Download the project code. The folder contains the arduino ide .ino file. Please provide us with your feedback on the project. For comments and queries, use the comments section below.
Code/Files