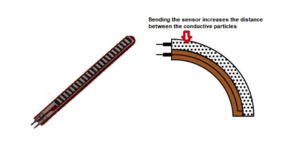
A flexible sensor is a variable resistor, which measures the amount of deflection or bending it undergoes. The bending or molding of the sensor is what affects its resistance and this is what differentiates it from a standard variable resistor.
The resistance of a flexible sensor is directly proportional to the amount of bending that occurs. Its resistance can be determined by connecting an ohmmeter across its two terminals, which is similar to a resistor resistance measurement.
The flexible sensor is composed of two materials:
1. A conductive material – it is engraved on the most flexible part
2. A flexible pad – this is similar to hard rubber
When the sensor is in “normal mode” and stopped, its resistance remains unchanged. When the sensor is bent, the particles of the conductive material move away from each other, increasing the distance between them. This distance also results in an increase in resistance.
When the sensor is released, it will return to its original shape. This results in a decrease in resistance. Flex sensors are used in a variety of industries, including robots, mining, security, healthcare and others.
In this tutorial, we will learn how to interface a flexible sensor using Arduino, which is similar to a potentiometer or variable resistor with Arduino.
See how it works:
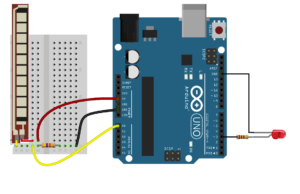
- The output of the flexible sensor is connected to the analog pin input of the Arduino.
- An LED is connected to the pulse width modulation (PWM) pin #3 of the Arduino Uno.
- The sensor is powered by the Arduino's 5V regulator output.
- The “bending” or flexing of the sensor is monitored by the Arduino and the brightness.
- The LED is controlled by the sensor input.
Circuit Diagram
In the code, two variables are declared for the assignment of the LED and analog pins. In the configuration function, the LED pin is declared as output and the Arduino serial port is activated.
The code
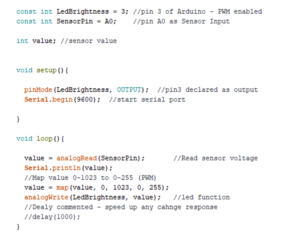
In the loop function, the sensor output is read by the Arduino analog pin. This output is converted into a digital number and displayed on the serial monitor.
The Arduino ADC (analog to digital) converter is 10 bits wide. The maximum value it can read is 1023. However, the Arduino's digital and PMW pins are 8-bit wide (maximum range 255). Therefore, to generate the ADC data for the PWM pin, you need to clip it and bring it to the 0-255 range. This is where the map statement comes in. At the end, the signal is written to the PWM pin.
Disadvantages of the flexible sensor
Flexible sensors are not easy to design or manufacture. Over time, they are unable to maintain their original shape and parameters. Once stretched, for example, they return to their previous state, but lose constants including resistance and the angle that corresponds to tension.
Use cases
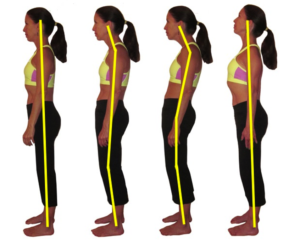
Despite their disadvantages, flexible sensors are used in various sectors. An example is fitness devices that aim to correct body posture. They are also commonly used in electric chairs for better sitting posture.
Flexible sensors are also often used in applications that monitor activities. Combined with other technologies, such as an oximeter, these sensors can be used in medical devices. For example, flexible sensors can monitor a person's movement (e.g., knee or foot movement), tracking orthopedic recovery. 
Where to buy the parts?
- Arduino: mouse
- Flexible sensor: mouse
(tagsToTranslate)Arduino