ESP8266 and ESP32 are popular WiFi development boards. These single-board microcontrollers are supported by the MicroPython framework and are often used for the Internet of Things (IoT). Using MicroPython, ESP8266 and ESP32 can connect to the Internet via WiFi and Ethernet. MicroPython ports use Ethernet or wireless local area network (WLAN).
In this article, we will discuss MicroPython networking, which is useful for managing Internet connections through ports supported by MicroPython. We will also discuss how the MicroPython network module can be used to set up an Internet connection on the ESP8266 and ESP32 via WiFi.
Network module
The MicroPython network module is written to configure WiFi connections. The module provides two WiFi interfaces: station and access point. The access point interface is active by default.
- In the hotspot interface, the ESP8266/ESP32 or any other MicroPython port acts as a WiFi hotspot for other devices to connect to the Internet.
- On the station interface, the ESP8266/ESP32 or any other MicroPython port connects to the router for internet access.
The network module can be imported into a MicroPython script with this instruction:
import network, time
The network module only provides network drivers and router settings and is used to configure hardware network interfaces. A socket module is required to obtain network services from respective network interfaces. This means that we can only use the network module to connect to the Internet, manage the Internet connection by configuring router settings, and create an access point.
The network module does not provide any abstract network interface card (NIC) classes. Instead, it offers different network interface classes implemented through MicroPython ports for different hardware.
These network interface classes include:
- WLAN – for WiFi interfaces
- WLANWiPy – for WiPy-specific WiFi controls
- LAN – for Ethernet
- CC3K – for CC3000 WiFi modules
- WIZNET5K – for WIZnet5x00 WiFi modules.
Network interface classes are all designed for specific network hardware. A specific network interface class has this constructor method: class network.AbstractNIC(id=None,…)
The constructor represents a network interface object. The parameters passed depend on the specific class of the network interface. If more than one interface of the same class is instantiated, the first parameter must be an “id”.
For example, the following constructor creates an object for the WiFi network interface:
nic = network.WLAN(network.STA_IF)
Regardless of the network interface class, the network module provides the following methods…
SummaryNIC.active : Used to activate or deactivate a network interface. A Boolean argument is required. If passed as True as argument, the respective network interface will be activated. If passed false as an argument, the respective network interface will be disabled. If the method is called without arguments, it returns the current state of the given network interface.
Note: All other methods only work on the network interface if this method is enabled.
SummaryNIC.connect : Connects the interface to a network. This method should only be called for interfaces that are not always connected. The parameters passed depend on the network interface class and/or the specific MicroPython port.
For example, the WiFi interface object requires the SSID to be passed as a parameter to connect to a network. If a single parameter is passed to this method, it will always be the network services identifier. Other parameters are keyword specific. They are passed to specify alternative service identifier types or to provide additional connection parameters. For example, the WiFi interface object may require a network password as an additional parameter.
SummaryNIC.disconnect : disconnects the interface from the network.
SummaryNIC.isconnected : Checks whether the interface is connected to a network. If it returns True, the interface is connected to the network. Otherwise, it returns False.
SummaryNIC.scan : Looks for available network services or connections. It returns a list of tuples that match any of the found service parameters. The tuple format depends on the specific class of the network interface. A tuple for a WiFi network object is as follows: (ssid, bssid, channel, RSSI, security, hidden). This method allows a filter to check the results. It can be called to search for a specific service, channel, or services from a specific set. Parameters set for scan duration and other network parameters can also be passed as arguments.
SummaryNIC.status : Used to query the dynamic status information of a network. If the method is called without arguments, it returns the network link status. Otherwise, the parameter-specific network interface class can be passed to retrieve specific information. For example, passing “stations” as an argument to a WiFi access point interface object returns a list of all stations connected to that access point. Similarly, passing “RSSI” as an argument to a WiFi station interface returns RSSI (which is the received signal strength indicator) of the connected access point or router.
SummaryNIC.ifconfig : Used to set or get network interface parameters at the IP level. These parameters include IP address, subnet mask, gateway, and DNS server. If called without arguments, it returns the above parameters as a 4-tuple. To set the network interface parameters at the IP level, a 4-tuple with the above-mentioned parameters must be passed.
SummaryNIC.config : Used to set or query specific network or hardware parameters. When called to set parameters, the parameters must be specified with keyword arguments. It is possible to set multiple network or hardware specific parameters in a single method call, where all parameters are passed as keyword-specific arguments. Only a single parameter can be queried in a method call.
Some valid examples of this method are:
ap_if.config(ssid='My AP')
ap_if.config(ssid='My AP', channel=11)
print(ap_if.config('channel'))
print(ap_if.config('ssid'))
These methods are available for all network interface classes which include WLAN, WLANWiPy, LAN, CC3K and WIZNET5K.
The network module also provides a method to set or obtain WiFi mode. This method is network.phy_mode . However, it is only available for ESP8266. It can be passed as the MODE_11B, MODE_11G or MODE_11N arguments to set the WiFi mode to IEEE 802.11b, IEEE 802.11g or IEEE 802.11n respectively. If called without arguments, returns the current WiFi mode.
WLAN Class
The WLAN class network module provides a driver for WiFi network processors. The class is part of the network module. The constructor method is as follows:
class network.WLAN (interface_id)
The method creates a WiFi network interface object. As mentioned, there are two types of WiFi interfaces supported in MicroPython: station and access point. This is a valid example for creating a WiFi station object:
import network
sta_if = network.WLAN(rede.STA_IF)
Here is a valid example for creating a WiFi hotspot object:
import network
ap_if = rede.WLAN(rede.AP_IF)
The WiFi class of the network module provides these methods…
WLAN.active : used to activate or deactivate the WiFi network interface object. If passed as a True argument, the WiFi interface identified by the WLAN object is activated. If passed false as an argument, the WiFi interface will be disabled. If called without arguments, the method returns the current status of the WiFi network object.
WLAN.connect(ssid=None, key=None, *, bssid=None) : used to connect to a WiFi router or access point. Takes SSID or BSSID of the available network service as an argument. The network key may be required to pass as an additional argument. If the BSSID is passed, the network connection will be restricted to the access point with the given MAC address. In this case, the SSID must also be passed.
WLAN.disconnect : Disconnects the interface with the current WIFI connection.
WLAN.scan : Available only for WiFi station objects. The method searches for available WiFi and hidden networks, as long as the WLAN interface allows this. It returns a list of tuples with information about available WiFi access points. The values used for security are “0” for open WiFi network, “1” for WEP, “2” for WPA=PSK, “3” for WPA2-PSK, and “4” for WPA/WPA2-PSK. Values “0” and “1” indicate visible and hidden WiFi access points, respectively.
WLAN.status : Returns the status of the network link.
The status can be:
- STAT_IDLE – there is no connection or activity.
- STAT_CONNECTING – the connection is in progress.
- STAT_WRONG_PASSWORD – Network connection failed due to an incorrect network key.
- STAT_NO_AP_FOUND – Network connection failed because no access point responded to the connection request.
- STAT_CONNECT_FAIL – Network connection failed due to another reason.
- STAT_GOT_IP – the network was successfully connected and the IP was obtained.
For the station object, the method can be called with the “RSSI” argument, which returns the received signal strength indicator for a given access point.
WLAN.isconnected : For a WiFi station object, this method returns True if the port is connected to a WiFi access point, indicating that a valid IP address was obtained. For the hotspot WiFi object, the method returns True if at least one station is connected to the port that is functioning as a WiFi hotspot.
WLAN.ifconfig : Used to set or get network interface parameters at the IP level. These parameters include IP address, subnet mask, gateway, and DNS server. If called without arguments, it returns the above parameters as a 4-tuple. To set the network interface parameters at the IP level, a 4-tuple with the above-mentioned parameters must be passed.
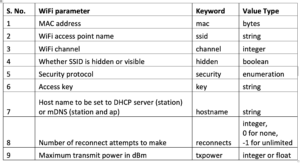
WLAN.config : Used to set or get specific WiFi network parameters. This is done by passing keyword arguments. These parameters are listed below…
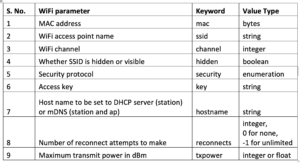
Manually connecting to a WiFi network
You can manually connect the ESP8266/ESP32 to a WiFi network using the Python command prompt. A manual connection can be made using the Python prompt of the uPyCraft IDE or Thonny IDE. It can also work with a serial connection to a Python command prompt via a terminal program (such as Putty).
We set up a manual connection to a WiFi network for this project using the uPyCraft IDE command console. To import the network module, use this command:
import network
Next, create a WiFi station object to connect the ESP8266/ESP32 board with a WiFi connection. Run the following command in the uPyCraft console to create a station WiFi interface:
station = network.WLAN(network.STA_IF)
Activate the station's WiFi interface by calling the WLAN.active method. Run the following command in the UPyCraft console to activate the station's WiFi interface:
station.active(True)
Once the WiFi interface is active, it can be connected to WiFi with the known SSID and network key. The network key is not required if the WiFi connection is open. Run this command in the UPyCraft console to connect to available WiFi:
station.connect(
To check whether the network interface is successfully connected to a WiFi network, call the isconnected method. Use this command in the UPyCraft console to verify the connection:
station.isconnected
If the method returns True, the network interface has been successfully connected to WiFi. Check the IP level parameters by calling the ifconfig method. Run the following command in the UPyCraft console to view the IP-level network parameters, which include the IP address, subnet mask, gateway, and DNS server:
station.ifconfig
The network interface can be disabled if necessary by calling the active method. Use this command in the UPyCraft console to disable the WiFi network interface:
station.active(False)
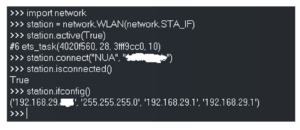
Screenshot of a manual connection to a WiFi network using ESP8266.
Connecting with a function call
A WiFi connection can be configured by a function call using a MicroPython script. The same commands used for manual WiFi connection are also used for a function call — except the commands are encapsulated in a function body with validation at different points.
Below is a typical example function for configuring a WiFi connection using ports supported by MicroPython, including ESP8266 and ESP32.
import network
station = network.WLAN(network.STA_IF)
def connect(id, pswd):
ssid=id
password=pswd
if station.isconnected == True:
print(“Already connected”)
turn back
station.active(True)
station.connect(ssid, password)
while station.isconnected == False:
to spend
print(“Connection successful”)
print(station.ifconfig)
You will notice that we declared the station object as a global variable. This will help us create a function to disconnect the WiFi network whenever necessary.
Here is an example function to disable a WiFi connection:
def disconnect:
if station.active == True:
station.active(False)
if station.isconnected == False:
print(“Disconnected”)
This MicroPython script is a valid example for connecting and disconnecting ESP8266/ESP32 to a WiFi connection:
import network
station = network.WLAN(network.STA_IF)
def connect(id, pswd):
ssid=id
password=pswd
if station.isconnected == True:
print(“Already connected”)
turn back
station.active(True)
station.connect(ssid, password)
while station.isconnected == False:
to spend
print(“Connection successful”)
print(station.ifconfig)
def disconnect:
if station.active == True:
station.active(False)
if station.isconnected == False:
print(“Disconnected”)
connect(“NAKED”, “***********”)
disconnect
“NUA” is the name/SSID of the WiFi network in the script above. Next to the SSID is your network password or network key. You must pass the SSID and network key of the WiFi connection in the script to connect the ESP8266/ESP32 to the internet.
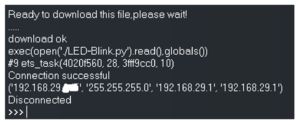
A screenshot of the result after loading and running the above script in UPyCraft for ESP8266.
Automatically connecting to a WiFi network
ESP8266/ESP32 can be configured to automatically connect to WiFi. This can be done by adding the commands to connect to a WiFi network in the boot.py file. The boot.py file is always executed first when the ESP8266/ESP32 or any MicroPython port is initialized.
Add the code below at the end of the boot.py file and re-upload the boot.py for ESP8266/ESP32:
import network
station = network.WLAN(network.STA_IF)
if station.isconnected == True:
print(“Already connected”)
station.active(True)
station.connect(“NUA”, “**********”)
while station.isconnected == False:
to spend
print(“Connection successful”)
print(station.ifconfig)
Again, “NUA” is the WiFi network name/SSID. Next to the SSID is your network password or network key. You must pass the SSID and network key of the WiFi connection in the script to connect the ESP8266/ESP32 to the internet.
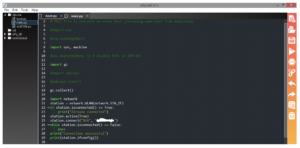
The modified boot.py file.
The WiFi connection can be checked in the main run script using this code snippet…
import network
station = network.WLAN(network.STA_IF)
if station.isconnected == True:
print(“Connected to WiFi!”)
print(station.ifconfig)
In the main script, the WiFi connection can be disabled using this code snippet…
if station.active == True:
station.active(False)
if station.isconnected == False:
print(“Disconnected”)

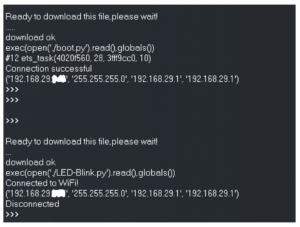
The main execution script, which checks the default WiFi connection configuration at startup and disables it if it is active.
Here is a screenshot of the result when loading and running the modified boot.py file.
Conclusion
MicroPython provides a network module for connecting to different media. A commonly used network interface is WiFi. MicroPython ports – including ESP32 and ESP8266 – can be configured as a WiFi station and WiFi access points when using MicroPython firmware.
Normally, ESP32/ESP8266 must be configured as a WiFi station for the Internet of Things to properly connect to WiFi and communicate with an IoT/Cloud platform or service. Subsequently, the socket module can be used to run various Internet protocols and access network services.
You can manually connect the ESP32/ESP8266 or any MicroPython port to a WiFi network using the main run script. Connecting to a WiFi network can also be automated by modifying the boot.py file.

