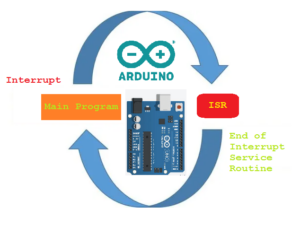
Microcontrollers are designed to run concise firmware dedicated to a specific application. Firmware is embedded software, which is written to the program memory. Firmware codes are typically short and designed to manage and execute various microtasks down to the hardware level.
As microcontrollers are dedicated to a single application, these devices do not have parallel computing and, by default, the code is executed sequentially. This means that any external (hardware) changes or software conditions are polled in linear order through the programming loop.
In the Arduino ecosystem, this programming loop is written and executed inside the loop function.
Polling is the pattern by which a microcontroller works. Polling is the process where the controller waits for its status or next task from the external device. This can be problematic when the controller needs to respond to a situation within a short time — or immediately.
This can occur when there is a sudden change in programming conditions or hardware state. Fortunately, microcontrollers have a function to deal with these challenges, called interrupts.
What is an interrupt?
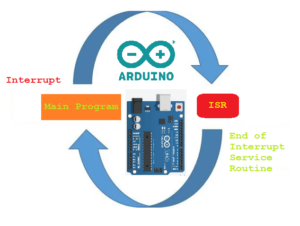
An interrupt in relation to microcontrollers is a mechanism that temporarily suspends the main program, passing control to temporary code.
In Arduino terms, this means that the typical code defined in the programming loop (i.e. loop function) is suspended and a response code is executed, related to the specific software condition or hardware change. This response is defined in a well-structured block of code called Interrupt Service Routine (ISR).
Suppose a microcontroller in a robotic rover is programmed to navigate rough terrain, overcoming various obstacles. The rover tracks its state by monitoring data, using ultrasonic sensors and accelerometers. At one point, a dark hole is detected along the path.
However, the well is only noticed when the rover is about 30 centimeters away from it, which is a problem. Sensor data is monitored on a regularly scheduled loop, meaning this message about the well would normally be retransmitted too late for the controller to respond in time.
Fortunately, an outage saves the day for this rover. The accelerometer sensor, in this case, generates an interruption whenever there is a sudden change in the orientation of the robotic rover, signaling it to stop. The kill code saved the rover from falling into the hole at the last minute.
Understanding ISR
An interrupt service routine (ISR) is a block of code executed in response to an interrupt. Of course, there are different types of interruptions.
The key is that a microcontroller's interrupts must always be well-defined and correspond to a specific software condition or hardware state.
In Arduino, interrupts are identified by interrupt vectors.
Arduino Interrupts
There are several different boards in the Arduino portfolio, each with different microcontrollers. This table summarizes several of these platforms…
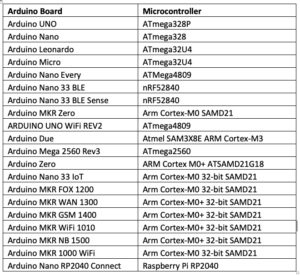
Note: This table does not include retired Arduino boards such as Arduino Esplora, Arduino Industrial 101, Arduino 101, Arduino Ethernet Rev3, LilyPad Arduino, LilyPad Arduino Simple, LilyPad Arduino USB, LilyPad Arduino SimpleSnap, Arduino Gemma, Arduino Yún Mini, Arduino Yún, Arduino Leonardo ETH, Arduino Tian, Arduino M0, Arduino M0 Pro, Arduino Mega ADK Rev3, Arduino Robot, Arduino Pro, Arduino Mini and Arduino Pro Mini.
Since each microcontroller has a set of integrated peripherals and input/output interfaces, it makes sense that interrupts are different for each microcontroller platform.
The central controller of the Arduino Uno and Arduino Nano – ATmega328 – supports these interrupts…
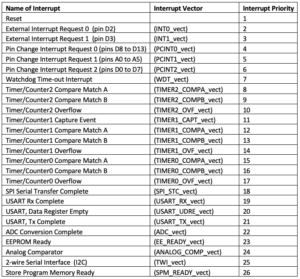
All interrupts are generated by the integrated peripherals or I/O interfaces of the ATmega328, which are different in other microcontrollers.
The interrupt priority indicated in the table above is important when more than one interrupt is generated at the same time. When this happens, the higher priority interrupt is executed while the lower priority interrupt is suppressed.
“Reset” is the highest priority interrupt and has no interrupt vector. This means that on reboot/reboot, no user-defined routines can be executed.
Broadly speaking, outages are classified into two categories.
1. Hardware Interrupts:
generated by the microcontroller input/output pins. An external hardware/component triggers a change in the voltage signal to the Arduino's input/output pin.
In Arduino, there are two types of hardware interrupts: external interrupts and pin change interrupts.
2. Software Interruptions:
generated by user-defined program instructions. They are always associated with the integrated peripherals and the microcontroller communication port. These interruptions are
no
driven by an external hardware component, but by changes to the integrated peripherals or software configuration.
Integrated peripherals must be configured to generate interrupts by writing program instructions. Otherwise, the interrupt is generated automatically upon completion of a software instruction associated with a communication port/peripheral.
For example, timer interrupts are software interrupts. Timer interrupts must be configured by user-defined program instructions. Interrupts generated by communication ports are also software interrupts as they are triggered when the data communication process is completed by user-defined program instructions.
Implementing interrupts on Arduino
ISRs are defined as separate blocks of code beyond the main loop function. Interrupts are already enabled by default. All software interrupts require defined programming.
For example, timers can be configured to generate interrupts only when programmed by the user. Hardware interrupts (i.e. external and pin change interrupts) must be configured in the setup function.
It is also possible to enable or disable interrupts in the loop function to avoid interruptions in program execution or reactivate interrupts.
To disable interrupts, call the noInterrupts function inside the loop function as follows…
link {
…
noInterruptions ;
}
When interrupts are disabled, critical and time-sensitive code must follow and execute uninterruptedly. Interrupts can be reactivated in the loop function by calling the interrupts function.
link {
…
noInterrupts ;//disables interrupts
// critical and urgent code..
interrupts //reactivating interrupts
}
Interrupts can be serviced by writing a routine, in which a particular interrupt is identified by passing its interrupt vector as a parameter. Typically, this routine is called ISR.
For example, to serve the timer interrupt, configure it in the loop function and in the ISR. However, the timer interrupt must be set outside the loop.
link {
…
//instructions for configuring and activating the Timer/Counter0 Overflow interrupt
…
}
ISR(TIMER0_OVF_vect){
//Code serving Timer/Counter0 overflow interrupt
}
Both software and hardware interrupts can be serviced using their interrupt vectors. To configure and activate software interrupts, the built-in registers associated with the Arduino must be modified or programmed by the user.
External interrupts are configured by calling the attachmentInterrupt function in the setup function. External interrupts are disabled in the loop function, using the detachInterrupt function. Pin change interrupts are set or activated by modifying or programming the onboard registers associated with the Arduino.
External interrupts
There are two types of hardware interrupts: external interrupts and pin change interrupts. External interrupts are available on the Arduino selective pins.
Here is a list of the usable pins for external interrupts on different Arduino boards.
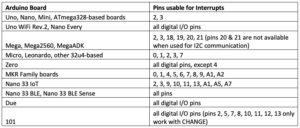
External interrupts must be configured using the attachmentInterrupt function in setup.
to set up {
…
attachmentInterrupt(digitalPinToInterrupt(pin), ISR, mode);
}
The attachmentInterrupt accepts three parameters.
1. The first parameter specifies the pin number on which the external interrupt is activated. This pin number must be passed as a parameter to the digitalPinToInterrupt function.
2. The second parameter is the name of the interrupt service routine that services the external interrupt on a given pin.
3. The third parameter is the interrupt mode or signal transition in which the interrupt should be generated.
Here are the possible ways of an external interruption…
- LOW : Interrupt is generated when the digital signal at the pin is low.
- CHANGE : Interrupt is generated when pin values change.
- UP : The interrupt is generated when the digital signal on the pin moves from low to high.
- FALLING: The interrupt is generated when the digital signal on the pin moves from high to low.
The Due, Zero and MKR1000 cards also support a fifth mode.
- HIGH : The interrupt is generated when the digital signal on the pin is high.
An external interrupt defined for pin 2 of the Arduino Uno is as follows…
volatile int interruptPin = 2;
to set up {
…
pinMode(interruptPin, INPUT_PULLUP);
attachmentInterrupt(digitalPinToInterrupt(interruptPin), ISR, mode);
}
link {
…
}
ISR {
//Code to handle external interrupt on pin 2
…
}
If necessary, external interrupts can also be disabled in the loop function by calling the detachInterrupt function.
link {
…
detachInterrupt(digitalPinToInterrupt(interruptPin))
}
Writing ISRs
There are several important considerations when writing interrupt service routines.
-
Make them short and sweet.
ISRs are intended for sudden and emergency responses. They are not meant to run long blocks of code. Therefore, ISRs must be short, precise and relevant.
-
Avoid timing functions.
Timing functions — such as millis , micros , delayMicroseconds , or delay — should never be used in an ISR. This is because they use timer interrupts. You cannot call or use an interrupt within another interrupt. Therefore, it makes no sense to use timing functions with ISRs.
-
Avoid serial communication protocols
. Communication interfaces generate their own interrupts, which are of lower priority and cannot replace hardware or timer interrupts. Additionally, any data exchanged during the execution of an ISR will be lost. If it is important to store the date while running an ISR, this can only be done by changing global variables. In the loop function, the state of these variables can be used to print or communicate messages.
-
Remember: ISRs have no parameters.
Interrupt service routines cannot accept any parameters except the interrupt vector. Additional arguments can only be passed to an ISR through global variables.
-
ISRs return nothing.
ISRs have a null data type. They cannot return any values. If a value needs to be passed from the ISR to the main loop, it can only be passed by modifying global variables. (Although it is possible to read and write digital input/output pins within an ISR.)
-
Use volatile variables.
Variables used inside and outside ISRs must be global variables and defined as volatile. Volatile variables are not optimized by the compiler and are not at risk of removal during source code compilation. However, it is important to avoid defining all variables in an ISR as volatile because they slow down the code. Therefore, only define variables inside and outside the ISR as volatile.
Conclusion
Interrupts provide an important function in the world of microcontrollers. They are the only resource when dealing with critical or challenging situations.
There are hardware and software interrupts. Hardware interrupts are generated by external components on the controller's input/output pins. Arduino has two types, external interrupts and pin change interrupts.
Software interrupts are related to the integrated peripherals and communication ports of the microcontroller. These interrupts must be activated and configured by user-defined program instructions.

