
Looking forward to a ready-made cup of morning (or afternoon) coffee? You can ensure that the ideal cup at the ideal time is ready and waiting for you. This is due to an automated system that uses the Internet of Things (IoT).
In this tutorial, we will develop an IoT-based coffee machine that operates on a set schedule without human interaction. It will also send notifications – like when the cup is ready for you – via a desktop panel.
The Network Time Protocol (NTP) server will track real time, using “hours:minutes:seconds”, which it relays to the system. The system will also be pre-programmed for a set (desired) time. When the actual and desired time coincide, the system sends an “ON” command to the coffee machine via a WiFi chip.
This alerts the coffee machine to work its magic, which will automatically “TURN OFF” after a preset time to save energy. A notification will be sent to your desktop informing you that “ Your coffee has been made ” when it is ready.
It covers the basics of how you can enjoy a ready-made coffee, with the ability to change the desired time according to your preference. Now, let's review the necessary components and technology behind the system.
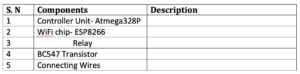
Components
Here's what you need to get started...
Dependencies:
- Operating system: Windows/Linux/MacOSx
- Programming languages: Python 2.7
- Communication method: Wi-Fi
Technology:
- MQTT Protocol: Message Queue Telemetry Transport or MQTT is a lightweight protocol for transmitting messages over the Internet. It works as a client-server architecture. The server is called the “broker” and the clients are “clients”.
- NTP Server: Used to synchronize the system clocks of Internet-connected devices with Coordinated Universal Time (UTC).
- Wi-Fi Module – ESP8266: The size of a small chip, this module can connect to any WiFi router and provide Internet to devices that are not otherwise connected. We will use this to connect the IoT card to a broker on the Internet.
Block diagram

– The coffee machine is connected to a relay circuit that turns it on/off.
– The relay is controlled by the IoT board (the Atmega 328P controller)
– The board is connected to the Internet via the integrated ESP module.
– The board “talks” to the online MQTT (HiveMQ) broker and receives and sends MQTT-based messages.
– A computer desktop uses Python script to send and receive messages in MQTT to the broker, which is connected to the coffee machine.
How it works?
A Linux/Windows based machine runs the Python script. The script runs in a main loop where it compares the actual time, which is stored in a string, with a desired time. The desired time is written into the script and stored in a string using an “If” condition.
When the real time matches the desired time sequence, a function call sends an “ON” signal to the coffee machine – which is connected to the Internet – via MQTT. Upon receiving the “ON” command, it automatically turns the “ON” relay on to make coffee.
A period of time is also set in the system, after which the coffee machine will be “OFF”.
The circuit

The code
This project is divided into two parts:
1. The controlled device (the coffee machine)
2. The main computer system, which stores the desired coffee time and signals the machine to turn on/off.
The IoT board code
This code is written and compiled in the Arduino IDE. It also has two parts. One is to control the device and uses an ATmega328 microcontroller. The other is for communication via the Internet and uses the ESP8266 module.
Microcontroller control code
The microcontroller is programmed to receive strings on the universal asynchronous receiver/transmitter (UART) port of the ESP module. If the string command is “ON” or “OFF”, it changes the GPIO to HIGH or LOW respectively.
if(command == “machine/connected”){
digitalWrite(coffee_machine_connected_pin,HIGH);
Serial.print(“the coffee machine is on”);
}
The board also sends the response through the UART to the ESP. Both are programmed so that any message sent on the serial is published on the MQTT broker.
ESP module code
The ESP is programmed to connect to WiFi using a WiFi manager library, which creates an access point when needed. Then, using an HTML page, it is possible to configure the ESP with SSID and PASS.
wifiManager.autoConnect(“AutoConnectAP”);
Any message received by ESP on serial will be published to the MQTT broker. Additionally, whatever the ESP receives from the MQTT broker will be sent to the serial port.
The code is like a network adapter framework.
if (Serial.available) {
String recivedData = Serial.readString ;
temp_str = data received;
char temp(temp_str.length + 2);
temp_str.toCharArray(temp, temp_str.length + 1);
client.publish(topicPublish, temp);
}
The code to send data received from the broker to the serial.
for (int i = 0; i < length; i++) {
data_r_in_string = String(data_r_in_string + (char)payload(i));
//Serial.print((char)payload(i));
}
Serial.print(data_r_in_string);
The Python script
Firstly, you need to create a file called “timings.py” in which all variables are declared so that it is easy to change the desired coffee time.
#times = hh:mm:ss
breakfast_date = “08:00:00”
afternoon_cafe = “12:00:00”
café_da-noite = “17:06:10”
The script called “system.py” imports all timings from the “timing.py” file.
of time import *
Then, it is important to import the libraries necessary for communicating with the MQTT broker.
import paho.mqtt.client as mqtt
import paho.mqtt.publish how to publish
Then assign two variables with MQTT topics — one for sending messages and one for receiving messages.
subscription_topic = “ts/café/report”
publish_topic = “ts/café/máquina”
Now, declare a variable called “client” with “mqtt client”.
client = mqtt.Cliente
Make two function callbacks:
1. To receive messages
2. To do something based on a successful connection
client.on_connect=on_connect
client.on_message=on_message
Finally, connect the MQTT broker to a port and start the “client” within a non-blocking loop.
client.connect(“corretor.hivemq.com”, 1883, 60)
client.loop_start
After the connection is successful, we can send messages using this:
publish.single(topic, message_data, hostname=”broker.hivemq.com”)
It is now possible to create the loop, which will include the current time in a string variable.
current_time = time.strftime(“%H:%M:%S”)
Inside the loop, compare the current system time with all previous variables.
if(breakfast_time == current_time):
print breakfast
send_signals(“machine/connected”)
Machine = “ON”
When the condition is met, a signal is sent that “ON” the machine. After the coffee machine is turned on, it must be turned off after a specific time. To do this, another loop is needed that only starts after the machine is turned on.
while(Machine==”ON”):
if(second > time_for_which_machine_will_be_on_s):
send_signals(“machine/off”)
Machine = “OFF”
second = 0
print “Machine is off”
This is how the system for programming an IoT-based coffee machine works.


