
ChatGPT, a language model-based chatbot, has been popular since its launch in November 2021 by OpenAI. It currently has more than 100 million users. The platform generated 1.6 billion visits in June 2023 alone.
The AI chatbot offers various applications such as language translation, summarization, and content generation. However, it is not a perfect substitute for information or content. ChatGPT has shortcomings and users should be wary of inaccurate, irrelevant, misleading or false responses.
It is important to remember that your information is derived from the Internet and is only as accurate as that content. ChatGPT uses web scraping to extract data from websites using automated tools. This means that the chatbot scans the web for relevant information and stores it in its database.
An example of potentially misleading information is the ideal waist-to-weight ratio for men. ChatGPT suggested that the waist circumference for a 180-pound man should be less than 16 inches. It is unreasonable (and unhealthy) to suggest an ideal measurement for every man weighing 80 kg or less without knowledge of other characteristics.

Of course, ChatGPT is an AI model that is continually being trained. So check all the facts. Some answers are so well articulated that they may seem correct, but they may not be. Always check answers.
Automation
One cool feature that ChatGPT offers is that it is a decent tool for automation. For example, what if you could use the platform to automate tasks on a Raspberry Pi?
Several APIs and other tools use ChatGPT to support AI-powered software applications. Auto-GPT is one such API. Auto-GPT is easy to install Auto-GPT on Raspberry Pi and can be used to automate tasks including programming.
Again, this comes with a caveat: ChatGPT lacks a thorough understanding of troubleshooting and programming. It is simply a generative model based on natural language processing (NLP) that produces text based on probability. Therefore, it is unable to distinguish facts from other content that is online, including programming language.
However, it's worth testing your automation capabilities. Auto-GPT can be used for a variety of tasks. In this article, we will discuss Auto-GPT and explain how to install it on Raspberry Pi and use it.
What is Auto-GPT?
Auto-GPT is an open-source, autonomous AI agent that uses OpenAI's GPT-4 or GPT-3.5 to achieve predefined goals. The experimental project aims to make GPT-4 fully autonomous. The program is driven by GPT-4 and chains large language model (LLM) thoughts to automatically achieve user-defined goals.
When a user assigns a task to Auto-GPT, the program breaks the task into smaller subtasks. Subtasks are ordered appropriately and executed one by one. The program uses the Internet to collect information and other resources to complete tasks.
Why use Auto-GPT?
Auto-GPT can be used for many different tasks, such as:
- Read the code and make suggestions for improvements
- Debug code
- Write emails
- Summarizing documents
- Create presentation slides
- Translating language
- Searching for information
Required components
To use Auto-GPT on Raspberry Pi, configure your Raspberry Pi board as a desktop computer. To do this, you will need the following…
1. Raspberry Pi 3/4
2. Micro SD Card
3. Power Adapter for Raspberry Pi
4. WiFi or Ethernet cable
5. USB Keyboard and Mouse
6. Display Monitor and HDMI Cable
Prerequisites
Before installing Auto-GPT on Raspberry Pi (RPi), copy the latest Raspbian image to a MicroSD card. Insert the Micro-SD into the card slot on the RPi board. Then install the latest version of Raspberry Pi OS. Now it's time for Auto-GPT.
Get an API key for OpenAI
You will need an OpenAI API key to use Auto-GPT on the RPi. For a small fee, the API allows interaction with ChatGPT.
Follow the steps below to receive an API key…
1. Sign up for an account on OpenAI.com. Registration can be done with any email ID. Then, log in to your account by entering your email and registered credentials.
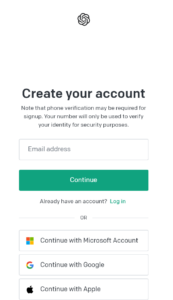
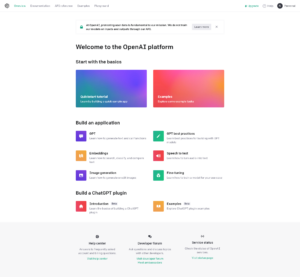
After logging in, you will see the following…
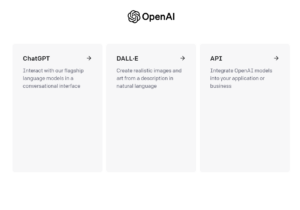
2. Click on the API tab and the page below will appear.
3. Click on the profile icon in the top right corner of the screen. A drop-down menu will appear. In the menu, look for the 'View API Keys' option and click on it.
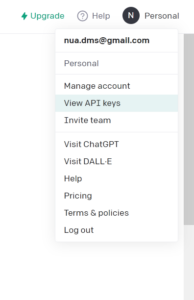
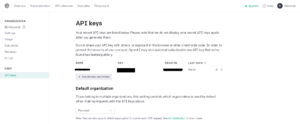
You will see this page next…

4. To generate a new API key for Auto-GPT, click on the 'Create new secret key' button. A pop-up window will appear.
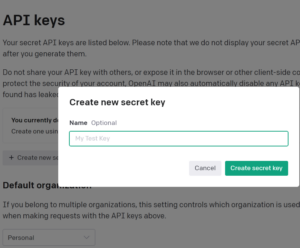
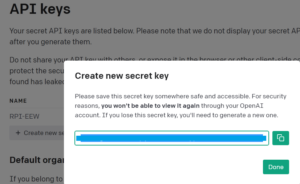
5. Enter a suitable name for your new API key. The name will help differentiate this API key from others generated by your account. Then click 'Create secret key' to generate the API key. A pop-up window will appear with the key. Copy this API key and save it. You will need this later. Then click 'Done'.
6. You can view your API key usage data in the dashboard. Just click on the 'Usage' option, which is located on the left sidebar of the screen. A graph will show the key consumption in USD.
Configuring Raspberry Pi for Auto-GPT
Once you have an OpenAI API key, you can prepare your Raspberry Pi for Auto-GPT. It is important to first make sure that all RPi packages and package lists are up to date. To do this, open the RPi Terminal and run the following commands to update and update your packages.
sudo apt update
sudo apt update
Then install the necessary packages to install and run Auto-GPT on the RPi. Two packages are required: Python and Git. Git is used to get the latest version of Auto_GPT and Python runs it.
To install 'git', run the following command in Terminal:
sudo apt-get install git
To install 'python', run the following command in Terminal:
sudo apt-get install python3 python3-pip
Now we are ready to get the latest version of Auto-GPT using the 'git' package. To do this, run the command below in Terminal.
clone
Installing Auto-GPT
To install Auto-GPT, go to the directory where you cloned the Auto-GPT code on the Raspberry Pi. The directory can be changed by running this command:
CD Auto-GPT
Once complete, you can download and install the Python packages required by Auto-GPT. All of them can be installed through a requirements file that can be run through Pip. Once they have been moved to the Auto-GPT directory, run the command below in Terminal to install the packages required by Auto-GPT.
pip install -r requirements.txt
Configuring the OpenAI key for Auto-GPT
After installing Auto-GPT on Raspberry Pi, you must configure Auto-GPT with your API key. Copy the '.env' template file so it can be edited later. Run the following command in Terminal to copy the template file.
cp .env.template .env
Open the copied '.env' file in NANO text editor by running the below command in Terminal.
nano.env
In the environment configuration file (i.e. '.env' file), look for the parameter 'OPEN_API_KEY.' Replace the text 'your-openai-api-key' with your own API key.
OPEN_API_KEY=
After entering the key, save and close the file by pressing Ctrl+X followed by Y and then the Enter key.
Now, create an empty file called 'auto-gpt.json', in the same directory where Auto-GPT is installed. To create this file, run the following command in Terminal.
tap auto-gpt.json
Using Auto-GPT
To use Auto-GPT on Raspberry Pi, go to the directory where Auto-GPT is installed. Run the command below in Terminal to launch Auto-GPT.
python -m autogpt
When you start Auto-GPT for the first time, it automatically generates a set of goals and creates a project name. This is overridden by entering '—manual', so you can set goals manually. Then you will have to enter a prompt to perform a user-defined task.

When you run the task, Auto-GPT may prompt you to run a command. To do this, press 'Y' and the Enter key. Otherwise, type 'N' to abort the execution of the said command.
Conclusion
With Auto-GPT, you can automate various tasks on Raspberry Pi through ChatGPT. You can use this tool to automatically respond to emails, summarize documents from the Internet, collect information, host presentations, or translate languages. You can also automate these tasks in a Python script.


