Imagine sending SMS alerts from a microcontroller without interfacing with a GSM/GPRS module. Now it's possible, thanks to the Internet of Things and IoT-compatible microcontroller boards. IoT development boards can access the internet and send SMS to a registered number through web services. One such web service is Twilio.
Twilio is a communications API for SMS, voice calls, video messages, Whatsapp, email and authentication. Owning this API will cost you, but there is a free trial.
For this project, we will program the ESP32 — a popular IoT development board — to send SMS alerts through the Twilio app. No GSM or GPRS module or SIM card is required. However, you must purchase a Twilio phone number to send SMS alerts.
Now, let's get started.
Components
- ESP32 DEVKIT V1 x1
- microUSB cable to charge sketch for ESP32 x1
Software
- Arduino IDE
Circuit Connections
No circuit connections are required for this project. Simply program the ESP32 to access the Twilio API to send SMS alerts to a registered number.
What is Twilio?
Twilio is a global cloud-based web service that enables digital communication across multiple platforms, including SMS, voice calls, Whatsapp, email and video.
Twilio offers an application programming interface (API) that easily integrates with any mobile app or software. Libraries and modules are available to integrate the API with microcontrollers and embedded platforms. This is particularly useful for IoT development boards as they can access the service to send SMS or Whatsapp message alerts without interfacing with a GSM/GPRS module or additional hardware.
Creating a test account on Twilio
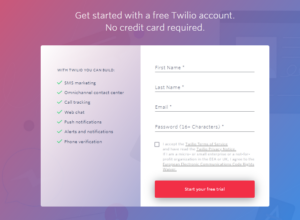
Although Twilio is not free, a trial version is available to test its functionalities. Create a test account on Twilio here .
You will need to enter your name and email and create a password. Then accept the Terms of Service and click the submit button to start your free trial.
You will be asked to verify your email before using Twilio.


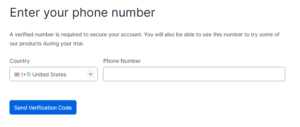
You will later be asked to enter a phone number for double verification. Enter a valid phone number and click the 'Send verification code' button.
Twilio will ask you to fill out a short survey to customize your settings and will open the Twilio console.

Adding caller IDs
After you set up a Twilio account, you can view and add verified caller IDs.
In the Twilio console, navigate to: Phone Numbers -> Manage -> Verified Caller IDs. You will see that the phone number you provided to create the test account is already listed.

You can edit the “Friendly name” to replace the phone number with a human-readable name.

Click on the 'Add a new caller ID' button to add more phone numbers. As before, you need to confirm the numbers using a verification code received via SMS or voice.
Only verified caller IDs can receive an SMS alert. The SMS will be sent via a Twilio phone number that must be purchased.
Sending SMS
To send SMS alerts, you must first purchase a Twilio phone number.
To get started with messaging, navigate to Messaging -> Try it -> Get Ready.
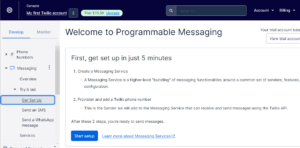
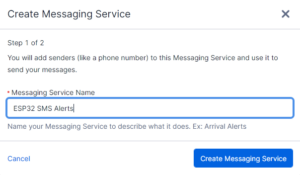
Click the 'Start Setup' button and enter a name for the messaging service. We are calling it 'ESP32 SMS Alerts'. After entering the name of the messaging service, click on the 'Create messaging service' button.
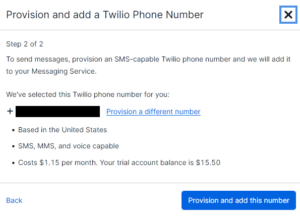
Twilio will automatically provide a phone number, deducting $1.15 from the $15.50 balance sheet. You will have the option to choose a different phone number. Once the phone number is confirmed, click the 'Provision this number' button.
After you successfully configure the messaging service, you will be redirected to a page that shows the messaging service SID, account SID, and authentication token. They are required when programming the ESP32 to access the Twilio API.

To try the SMS messaging service, click on the 'Try SMS' button.

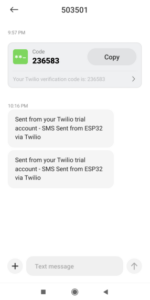
You will then be asked to enter the phone number you want to send SMS to. This can be any verified caller ID already added to your account. Select the sender number from Twilio's provisioned options and create an SMS message. Once complete, click on the 'Send Test SMS' button.
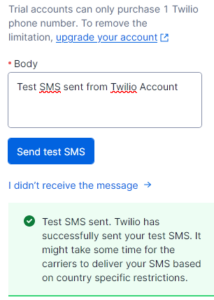
If everything is entered correctly, the SMS will be delivered to the selected caller ID.
 SMS alerts to a registered ESP32 number
An Arduino-compatible microcontroller or microcomputer can access the Twilio API if it is running JavaScript or Python code. Since the ESP32 has WiFi capabilities and can connect to any available network, it can easily access the Twilio web service.
There is an ESP32 client library for Twilio API that simplifies this task.
Arduino Library
First, install the ESP32 add-on on the Arduino IDE (learn more here).
To access the ESP32's Twilio API, you will need to add the ESP32 Twilio Client to the Arduino IDE. This is another Arduino library that allows the ESP32 to access the Twilio web service.
Navigate to Tools -> Manage Libraries and search for 'Twilio ESP32 Client'.
Then go to the 'Twilio-ESP32-Client' library written by Adam Demuri and click the 'Install' button to install the library.

Arduino Sketch
After installing the library, upload the following sketch to ESP32. Remember to enter your WiFi network's SSID and network key, account SID, authentication token, Twilio sender's phone number, and your test account recipient's phone number.
#include “twilio.hpp”
static const char *ssid = “”;
static const char *password = “”;
static const char *account_sid = “”;
static const char *auth_token = “”;
static const char *from_number = “”;
static const char *to_number = “”;
static const char *message = “SMS sent from ESP32 via Twilio”;
Twilio *twilio;
empty configuration {
Serial.begin(115200);
Serial.print(“Connecting to WiFi network;”);
Serial.print(ssid);
Serial.println(“'…”);
WiFi.begin(ssid, password);
while (WiFi.status != WL_CONNECTED) {
Serial.println(“Connecting…”);
delay(500);
}
Serial.println(“Connected!”);
twilio = new Twilio(account_sid, auth_token);
delay(1000);
Sequence response;
bool success = twilio->send_message(to_number, from_number, message, response);
if (success) {
Serial.println(“Message sent successfully!”);
} other {
Serial.println(response);
}
}
empty loop {
}
The code
The sketch starts by importing the 'twilio.hpp' library. The library provides access to the functions required to send SMS messages or HTTP requests.
Variables are defined to store the SSID and network key of the WiFi connection, account SID, authentication token, sender number (with country code) and recipient number (with country code). The 'message' variable stores the text content of the SMS message. A Twilio pointer variable is then instantiated.
In the setup function, the baud rate for serial communication is set to 115200 bps. Connection to the WiFi network is initialized by calling the WiFi.begin method. WiFi connectivity status is monitored until the ESP32 connects to the network using the provided SSID and network key.
An object of the Twilio class is instantiated. A variable of type string is defined to capture the HTTP response. The SMS message is sent by calling the send_message method of the Twilio class. The method returns the delivery status of the message, which is stored in a boolean 'status'. If the status is true, a message indicating successful delivery of the SMS message will be printed on the console.
The loop function is empty. All code is in the setup function as the SMS should only be sent once.
How it works
ESP32 connects to WiFi network using WiFi library. It uses Twilio ESP32 client library to access Twilio web service to send SMS. The SMS is sent to a verified caller ID via the HTTP request.
Results
After sending the sketch to the ESP32, click on the 'Activate' button on the microboard and open the Arduino serial monitor – with the baud rate set to 115200 bps.
The code in the setup function will be executed and a relevant response will be printed on the serial monitor.
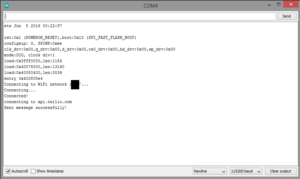
The SMS message will be delivered to the selected recipient's number.