A security alarm detects unauthorized entry into a home or building. In the past, these security devices simply sounded a loud siren when an intrusion was detected. As technology advanced, systems were equipped with GSM modems to send an SMS alert to the home or building owner whenever an intrusion was detected.
A disadvantage of the GSM-based alarm system is that there is no guarantee that the message has been delivered or received. For example, the GSM modem may not be able to connect to a cellular network and send the alert. Therefore, users may not be notified that their home or building's alarm system is activated.
Fortunately, WiFi networks have become more widespread and reliable. It is more than likely that a home or office microcontroller can access the Internet and web services to correctly send a security alert message via SMS, email, WhatsApp, Telegram or other communication application.
In this project, we will design an ESP32 based security alarm that will send notifications to a WhatsApp number upon detection of an intrusion. The system does not require additional hardware to do this. Instead, it uses the Whatabot API to send alert messages to the Whatsapp number.
As a sophisticated WiFi development board, the ESP32 easily connects to a WiFi network. The circuit of this project is so compact that it can be installed as a secret alarm, hidden anywhere in a home or office building. Or, if not used covertly, it can be integrated with a siren to activate an alarm when an intrusion is detected.
Required components
1. ESP32 x1
2. PIR sensor x1
3. LEDx1
4. 330Ω resistor
5. Connecting wires/jumper wires
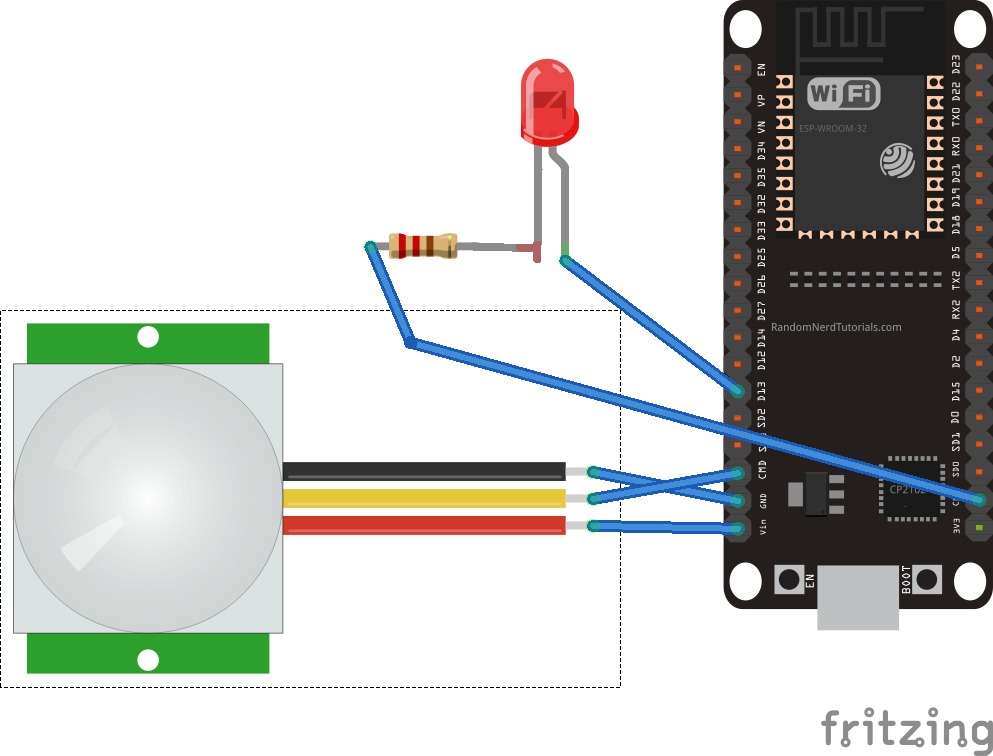
Circuit Connections
It is necessary to interface a PIR sensor with ESP32 to build this security system. The PIR sensor has three terminals: VDD, output and ground.
- Connect the VDD and GND terminals of the PIR sensor to the Vin and GND pins of the ESP32, respectively.
- Connect the PIR sensor output terminal to D13 pin of ESP32.
- Connect an LED to pin D14 of the ESP32 to visually indicate the alarm triggering. Or, instead of the LED, the ESP32 pin can also be connected to an electronic siren.
Whatabot API
We will use the Whatabot API to send a security message to WhatsApp from the ESP32 (learn how to do this here). Before proceeding, you must have a Whatabot API-activated account, a mobile number registered with the web service, and an API key for the account.
Arduino Sketch
Once the circuit connections are complete, connect the ESP32 to your computer and open the Arduino IDE. you must have the ESP32 addon installed on the Arduino IDE or it will not recognize the ESP32 board. (To learn how to install the ESP32 add-on, here).
After the ESP32 is successfully detected in the Arduino IDE, select the port that the ESP32 is connected to on your computer. Copy and paste the sketch below into the code editor. Save the code with a suitable file name.
Remember, you must replace the SSID and NETWORK_KEY with the SSID and network key of your WiFi network in the code. Similarly, you will need to replace MOBILE_NUMBER and API_KEY with your Whatabot registered mobile number and API key in the code.
Lastly, compile and upload the code to the ESP32.
How it works
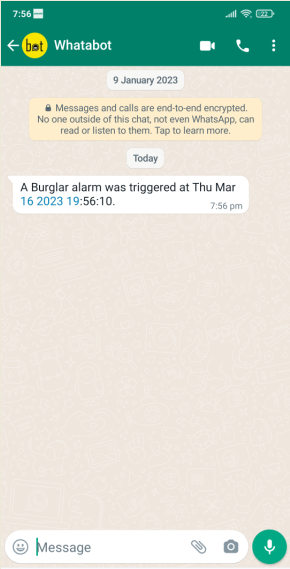
The PIR sensor interfaces with the ESP32 to detect movement in a defined area. If unauthorized movement is detected, the ESP32 signals an alarm. It also connects to an NTP server to get the current timestamp.
It then sends a WhatsApp message to the registered mobile number using the Whatabot API. The WhatsApp alert contains the timestamp of the intrusion. Once the message is delivered, the alarm system rests for five minutes so that continuous notifications are not sent to the registered number.
The code
The outline begins by importing the WiFi.h, HTTPClient.h, UrlEncode.h, and time.h libraries. WiFi.h connects to the WiFi network. The HTTPClient library makes the API call via an HTTP request. The UrlEncode library encodes the link to the API call. The time library processes the timestamp retrieved from the NTP server.
Variables are declared to store the NTP server URL, GMT (offset in seconds), daylight saving time (offset in seconds), and the current date (including hour, hour, minutes, and seconds).
Variables are then declared to store the SSID and network key of the WiFi network. Then variables are declared to store the registered mobile number and API key of the Whatabot web service. Variables are declared for the PIR sensor and LED pin assignments.
The user-defined function, sendWhatsappMessage , is defined to deliver a text message that is passed as an argument to the registered mobile number. This function stores the API URL as a variable.
An object of the HTTPClient class is instantiated. The HTTPClient object makes the API call using the API URL. The http.addheader function is called to add a header to the HTTP request.
The response code is monitored by calling the http.GET method. If the API call is successful, the WhatsApp message will be delivered to the registered mobile number. If the call is unsuccessful, error messages will be printed on the console (i.e. on the Arduino serial monitor). The HTTP request is terminated by calling the http.end method.
The user-defined function, currentLocalTime , is defined to retrieve the current timestamp from the NTP server. This function instantiates a timestamp structure, retrieving the timestamp by calling the getLocalTime method. Members of the timestamp structure are accessed and aggregated into a formatted string. The function updates the current_time variable with the formatted string containing the current timestamp.
In the setup function, the baud rate for serial communication is set to 115200 bps to log console messages. The pin connected to the PIR sensor output terminal is defined as digital input. The pin connected to the LED is defined as digital output zn and is set LOW by default.
The WiFi network connection is initiated by calling the WiFi.begin method. Local time settings with the NTP server are configured by calling the configTime function.
In the loop function, the state of the PIR sensor output pin is polled. If the PIR sensor output is HIGH, the alarm is activated by pressing the LED pin to HIGH.
The current timestamp is retrieved from the NTP server by calling the user-defined currentLocalTime function. A WhatsApp message is sent to the registered mobile number, signaling an intrusion (with timestamp) by calling the user-defined WhatsappMessage send function. Otherwise, the alarm will be silent.
Results