Organic light-emitting diodes or OLED displays have become essential for many embedded devices. OLEDs are considered one of the highest quality displays for displaying device information.
Typically, embedded devices use single-screen graphics, but complex interfaces are required when there are multiple user interactions. For example, such interfaces may use menus or other graphical navigation. Adding a multi-page menu or GUI to embedded displays is a complicated task. Microcontrollers have limited flash memory and RAM, so they cannot host rich graphical interfaces.
The only alternative is animated text. Text can be animated to display menus and submenus, show multiple navigation screens, and host multiscreen user interfaces.
In this project, we will host a multi-screen interface on an SSD1306 OLED controlled by ESP8266 microcontroller. MicroPython is the built-in firmware, so we will use an on-board MicroPython script to host the front end of the SSD1306. The user interface will display a collection of screens with horizontal and vertical animated text.
Required components
1. ESP8266x1
2. SSD1306 OLEDx1
3. Dupont threads
4. Micro USB cable (to connect the ESP8266 to the computer)
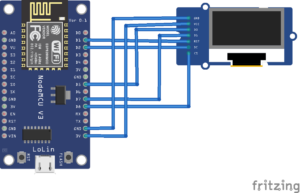
Circuit Connections
Connect SSD1306 OLED with ESP8266 using SPI software.
- The DC, RST and CS pins of the OLED connect with GPIO4, GPIO5 and GPIO15.
- OLED pins D0 and D1 connect to GPIO14 and GPIO13.
- The VCC and GND pins of the OLED connect to the 3V and GND output of the ESP8266.
 Preparing the ESP8266
The MicroPython IDE must be ready to write, edit, and upload code before continuing with this project. You can use uPyCraft IDE or Thonny IDE for software development. Make sure the MicroPython firmware has been loaded correctly into the ESP8266. Learn how here .
Extending the ssd1306.py library for text animation
The MicroPython firmware contains the library for the SSD1306 OLED. To work with SSD1306 OLED using MicroPython, first learn how to interface SSD1306 with ESP32 and ESP8266 . You will notice that the Github link to the MicroPython source code has changed. The source code on Github also excludes the SSD1306 library. Fortunately, the library is still available in source code on the official website .
This library is sufficient to interface the SSD1306 OLED with MicroPython ports, especially through the SPI port. The interface via the I2C port is no longer working correctly.
The library must be extended to create text animations. The following methods must be added to the library's SSD1306 class.
def fill(self, col):
self.framebuf.fill(col)
def pixel(self, x, y, col):
self.framebuf.pixel(x, y, col)
def scroll(self, dx, dy):
self.framebuf.scroll(dx,dy)
def text(self, string, x, y, col=1):
self.framebuf.text(string, x, y, col)
Methods added to the SSD1306 class are called the same as in the MicroPython FrameBuffer class. The FrameBuffer class provides a pixel buffer that represents a pixel, line, shape, or text.
These FrameBuffer methods are used to extend the library….
- FrameBuffer.fill(c) : fills the entire framebuffer with a specified color. The SSD1306 OLED driver uses this method to fill the OLED screen with monochromatic colors.
- FrameBuffer.pixel(x, y(, c)) : used to get or set the color of a specified pixel. The pixel position is passed as 'x' and 'y' arguments. If used to set the pixel color, 'c' is the color passed as argument.
- FrameBuffer.scroll(dx,dy) : used to scroll the contents of the FrameBuffer by a given vector.
- FrameBuffer.text(s, x, y(, c)) : used to write a text string to the OLED display. The text starts to be printed on the screen from the positions of the 'x' and 'y' pixels. Text color can be set to 'c.'
The extended SSD1306 library has this source code:
Loading the OLED driver using uPyCraft IDE
To use uPyCraft IDE to load the OLED driver for ESP8266 or ESP32, connect the board to a computer using a USB cable. MicroPython firmware should already be loaded for ESP8266/ESP32 .
Then select the COM port. ESP8266/ESP32 is connected by navigating to Tools->Serial. Choose your MicroPython board by navigating to Tools->Board. Now connect the board to uPyCraft IDE by clicking the connect button.

Once the board is connected, navigate to boot.py in the device folder. To add the SSD1306 OLED driver, create a new file by navigating to File->New or clicking the New button.

Copy the SSD1306 OLED driver library code and save the file as ssd1306.py. Then click 'Download and Run' button to upload the library file to ESP8266/ESP32.

Creating screens
The user interface should be organized as separate screens to add submenus or a multi-pane layout. This means that different submenus or navigation panels open as separate screens on the display. Each screen can be thought of as a list of rows of pixels where each row contains a text or shape.
The following code defines three different screens. Each screen is a list of lines containing plain text.
screen1_row1 = “Screen 1, row 1”
screen1_row2 = “Screen 1, row 2”
screen1_row3 = “Screen 1, row 3”
screen2_row1 = “Screen 2, row 1”
screen2_row2 = “Screen 2, row 2”
screen3_row1 = “Screen 3, row 1”
screen1 = ((0, 0, screen1_line1), (0, 16, screen1_line2), (0, 32, screen1_line3)) screen2 = ((0, 0, screen2_line1), (0, 16, screen2_line2)) screen3 = (( 0, 40, screen3_row1))
Scrolling text horizontally
To scroll text horizontally from left to right (with the text going across the screen), the 'x' coordinate of each line of text is incremented by four pixels in a nested loop – until the loop variable exceeds the width of the LED .
def scroll_h_in(screen):
for i in range (0, oled_width+1, 4):
for line on screen:
oled.text(line(2), -oled_width+i, line(1))
oled.show
if i != oled_width:
oled.fill(0)
To scroll text horizontally from left to right (with the text running off the screen), the 'x' coordinate of each line is incremented by the user-defined number of pixels – until the text disappears from the screen.
def scroll_h_out(speed):
for i in the range ((oled_width+1)/speed):
for j in range (oled_height):
oled.pixel(i, j, 0)
oled.scroll(speed,0)
oled.show
To scroll text horizontally in and out, the 'x' coordinate of each line is continuously incremented to allow text to move on and off the screen.
def scroll_h_in_out(screen):
for i in the range (0, (oled_width+1)*2, 1):
for line on screen:
oled.text(line(2), -oled_width+i, line(1))
oled.show
if i != oled_width:
oled.fill(0)
Scrolling text vertically
To scroll text vertically from top to bottom (with the text going into the screen), the 'y' coordinate of each line is incremented by four pixels in a nested loop – until the loop variable exceeds the height of the LED.
def scroll_v_in(screen):
for i in the range (0, (oled_height+1), 1):
for line on screen:
oled.text(line(2), line(0), -oled_height+i+line(1))
oled.show
if I! = oled_height:
oled.fill(0)
To scroll text vertically from top to bottom (with the text running off the screen), the 'y' coordinate of each line is incremented by the user-defined number of pixels – until the text disappears from the screen.
def scroll_v_out(speed):
for i in the range ((oled_height+1)/speed):
for j in range (oled_width):
oled.pixel(j, i, 0)
oled.scroll(0,speed)
oled.show
To scroll text vertically in and out, the 'y' coordinate of each line is continually incremented to allow text to move on and off the screen.
def scroll_v_in_out(screen):
for i in the range (0, (oled_height*2+1), 1):
for line on screen:
oled.text(line(2), line(0), -oled_height+i+line(1))
oled.show
if I! = oled_height:
oled.fill(0)
The MicroPython script
Try the following code in main.py. This script creates three different screens made up of plain text and tests horizontal and vertical scrolling on each.
How it works
The script uses the functions added to the SSD1306.py library. It creates screens with simple text and changes the 'x' and 'y' positions of each line to move horizontally and vertically over the screen frame.
Forms
The code demonstrated here can be reused to host a multi-menu user interface on a MicroPython-powered embedded device or a multi-panel graphical interface.
Results


