Requirements:
1. Arduino with Atmega328p
2. LDR
3. Python 2.7 on your machine
4. Python Libraries: Pyserial
Summary:
Ever wondered how useful the auto-brightness feature on phones is? It can quickly change the screen brightness according to the surrounding light intensity.
In this project I tried to create something similar for any PC or Laptop running Linux (preferably Ubuntu 14.04).
My goal was to keep it accessible and simple as much as possible.
So to make its prototype, I used LDR to measure the light intensity and an Arduino to communicate with my machine. On my machine I used a python script to communicate via USB with the Arduino and to edit the file responsible for the screen brightness.
This project costs around Rs 300 just because of the microcontroller being used (needless to say it is a prototype). It has a very high utility, especially for PC users.
For more detailed information on controlling brightness using the terminal, you can check out this link .
And for more detailed references about the atmega328p you can check the Atmega328p documentation.
Description:
How I'm sending the code to Arduino:
f =
avr-gcc -g -mmcu=atmega328p -Wall -Os $(f).c -o $(f).elf
avr-objcopy -j .text -j .data -O ihex $(f).elf $(f).hex
sudo avrdude -F -V -c arduino -p m328p -P /dev/ttyUSB* -b 57600 -e -U flash:w:$(f).hex
Just type these four commands, in the same order, in your terminal and remember to put the name of the source code file in the “f” variable. These commands are for Linux users only.
The first command stores the file name in the variable “f”, the second command is used to convert the source code to an .elf file, the third command is used to convert this .elf file to a .hex file that can be uploaded to atmega328p, and the fourth command is used to upload this .hex file.
A little about the LDR being used
LDR stands for Light Dependent Resistor. Its resistance has an inverse relationship with the light intensity. Generally, it has a very high resistance, somewhere around 1000 Kohms, but when light falls on it, it decreases drastically by a few hundred ohms. The LDR is an inexpensive device that can be used in many of our everyday applications.
Source code explanation
This program is an ADC and serial communication application.
Before reading this article, check out the explanation about ADC here.
I made some changes to the setup_adc function and the ISR block.
In the setup_adc function I set the MUX1 bit in the ADMUX register to start converting the value to PORTC2.
In the ISR block, I first stored the 10-bit value of the ADC in a variable (ldrValue). Then, using conditional statements, I mapped “ldrValue” to three brightness levels:
The. minimum_brightness = 500
B. average_brightness = 2500
w. max_brightness = 4880
*You may need to change them according to your machine.
I used uartLibrary.h to send the brightness value and ldr value to my laptop using serial communication. I built this library by referring to this article. After including this library, I can use the printf function from stdio.h to send strings from atmega328p to my laptop.
I put all the code files in a .zip folder
For detailed information, check the source code, which is very well documented.
Python Script Explanation
I am using pyserial libraries for serial communication, they are freely available.
The Python script needs root permission to run correctly; otherwise it will display an error message and exit.
After getting root permission, it creates a “ser” object of “Serial” class and takes two arguments in it:
The. Serial port: In my case it is '/dev/ttyUSB0'
B. Baud rate: In my case it is 9600
It then defines the file path in a variable (path).
*You may need to edit them according to your machine.
So in an infinite loop I put a try & except block just to take care of the garbage initial values.
In the try block, a variable (value) stores the list of two strings, one is the brightness value and the other is the LDR value.
After that it opens the file provided in the “path” variable in recording mode and writes the brightness value to it. It then saves and closes the file.
And for debugging purposes, it prints the list with brightness and LDR value.
For more information, you can also check this link changing brightness through the terminal.

Fig. 1: Typical Arduino Uno image used for automatic LED display brightness control

Figure 2: Typical Arduino Uno image
Project source code
###
////////////////////////////////////////////////// ////////////////////////////////////////////////// /////////////////////////////////
// Varun13169 //
////////////////////////////////////////////////// ////////////////////////////////////////////////// /////////////////////////////////
#define F_CPU 16000000UL
#include "uartLibrary.h"
#include
#include
#include
#include
/****************** Limits **************/
#define low_min 0
#define low_max 10
#define mid_min 10
#define mid_max 30
#define high_min 30
#define minimum_brightness 500
#define medium_brightness 2500
#define maximum_brightness 4880
/********************************************/
/*
You might need to change these limits
according to your Linux machine and LDR
*/
int ldrValue=0;
void setup_adc;
int main(void)
{
uart_init;
stdout = &uart_output;
stdin = &uart_input;
DDRC = 0x0A; // Set Pin5 and Pin7 on Arduino as output
PORTC = 1<
know ; // Enales global interrupt
setup_adc ; // Setup ADC according to the defined function
while(1)
{
}
}
void setup_adc
{
ADCSRA = 1<
ADCSRA = 1<
ADCSRA = 1<
ADMUX = 1<
//ADLAR=1 for left adjusted result and REFS0=1 with REFS1=0 to use Vcc as reference voltage
//MUX1=1 because we want to start conversion from PORTC2
DIDR0 = 1<
}
/************* varun13169 **************/
/******************************************** ISR Block *** *******************************/
ISR(ADC_vect)
{
uint8_t adcl = ADCL; //This is an 8-bit variable used to store the value of ADLC
uint16_t adc_ten_bit_value = ADCH<<2 adcl>>6; //This is a 16-bit variable use to store the 10-bit value of left adjusted result
ldrValue=adc_ten_bit_value;
if(low_min<=ldrValue && ldrValue
if(mid_min<=ldrValue && ldrValue
if(ldrValue>=high_min){printf("%d %dn", maximum_brightness, ldrValue);} // to my laptop
ADCSRA = 1<
}
/************************************************* ************************************************** /
/************************************************* ********** END *************************************** ****************************/
###
Circuit diagrams
| Circuit Diagram-Arduino-Uno-Based-Automatic-LED-Monitor-Brightness-Controller | 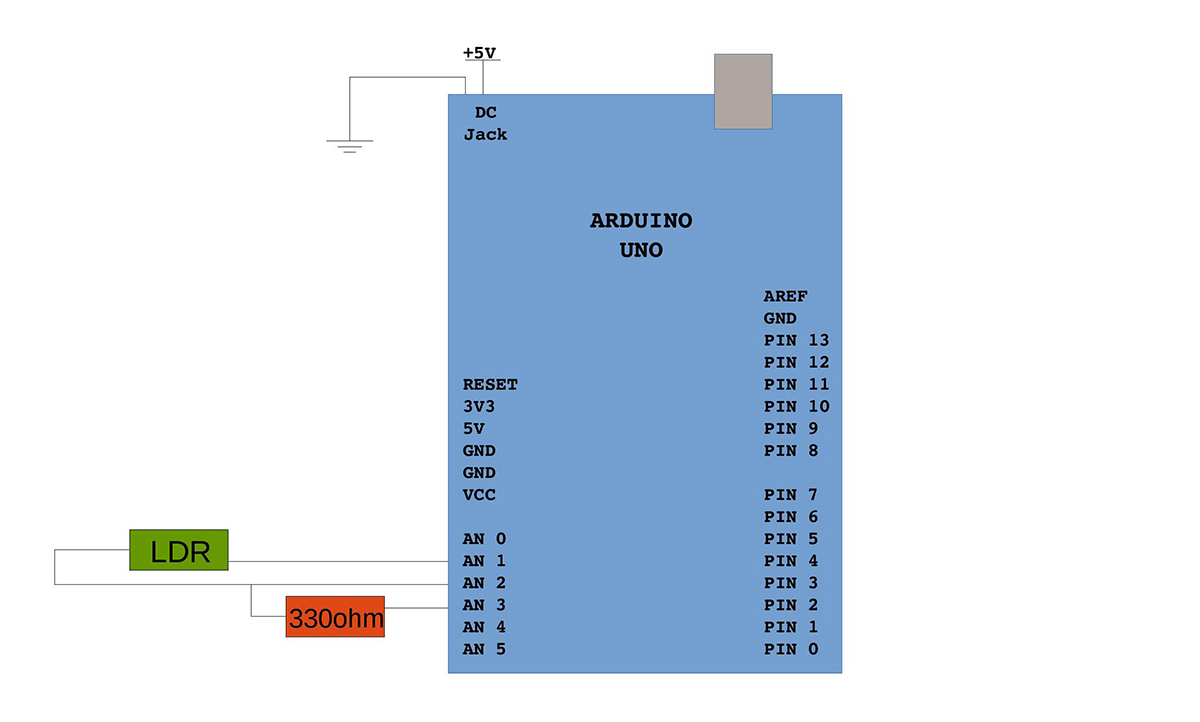 |