1. Scope
This standard describes the method of presenting welding symbols. It is applicable to both metal fusion welding and resistance welding.
2. Normative References
GB/T 5185 designation of metal welding and brazing methods in drawings; Technical Drawings GB/T 12212 – Dimensions, Proportions and Simplified Representation of Welding Symbols.
3. Basic Requirements
3.1 The welding symbol must clearly indicate the type of welding to be made and must not include excessive annotations. Representation of the weld can be through the use of a weld graphic method or a weld symbol annotation method. The welding symbol marking method is generally preferred, but if it is not clear or the graphical method is simpler, it can be used.
3.2 The welding symbol consists of a basic symbol and a leader, and additional symbols such as an auxiliary symbol, a supplementary symbol and a weld size symbol can be added if necessary. The scale, size and method of representation of graphic symbols must comply with GB/T 12212. For commonly used graphic methods in GB/T 12212, see Appendix C (normative appendix).
3.3 When professional standards specify the size and process of the weld, these must be indicated in the welding symbol. The welding method marked on the drawing must be in accordance with Annex B (normative annex). Any post-welding processing such as excavation, grinding or cutting must be indicated in the technical requirements.
I. Basic shapes of weld seam overlap
1. Top joint

two . Overlay

3. Right angle connection


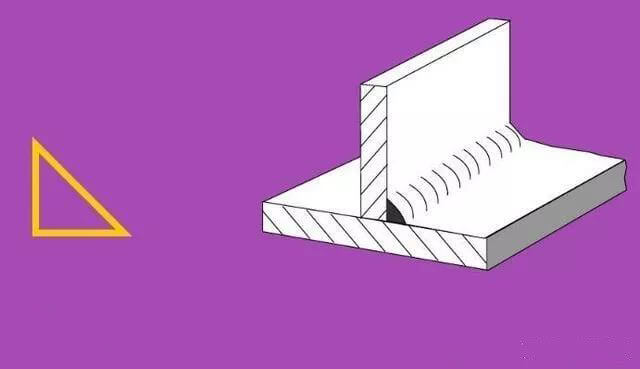
4. T-shaped joint

5 . Chamfered joint:

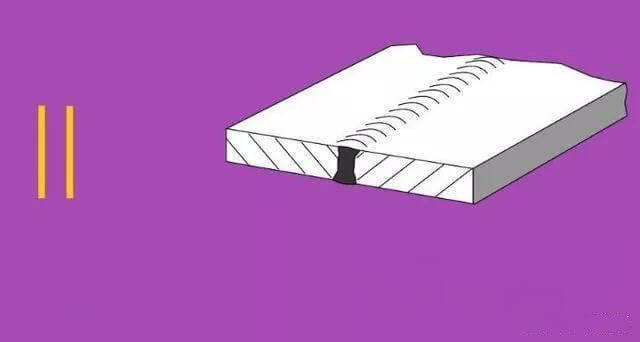
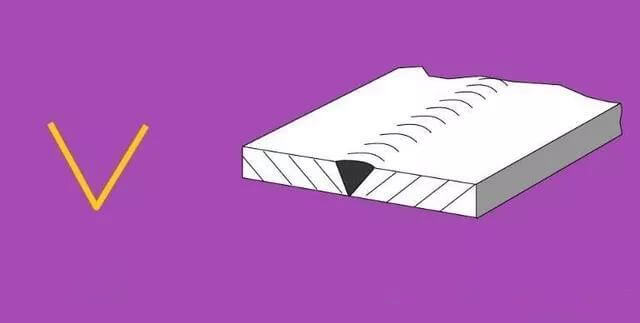
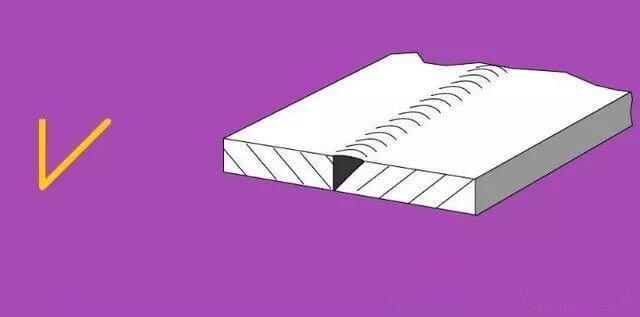
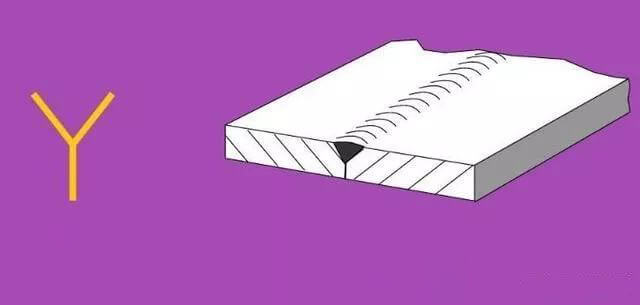
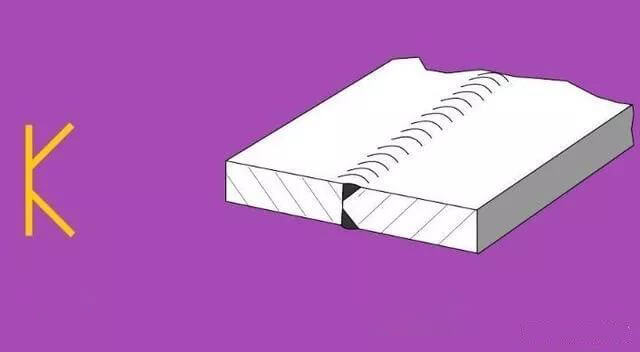
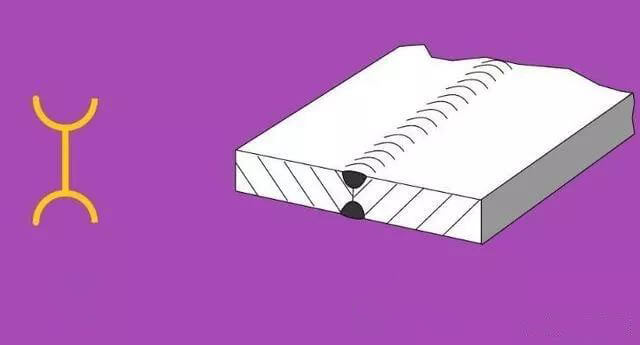
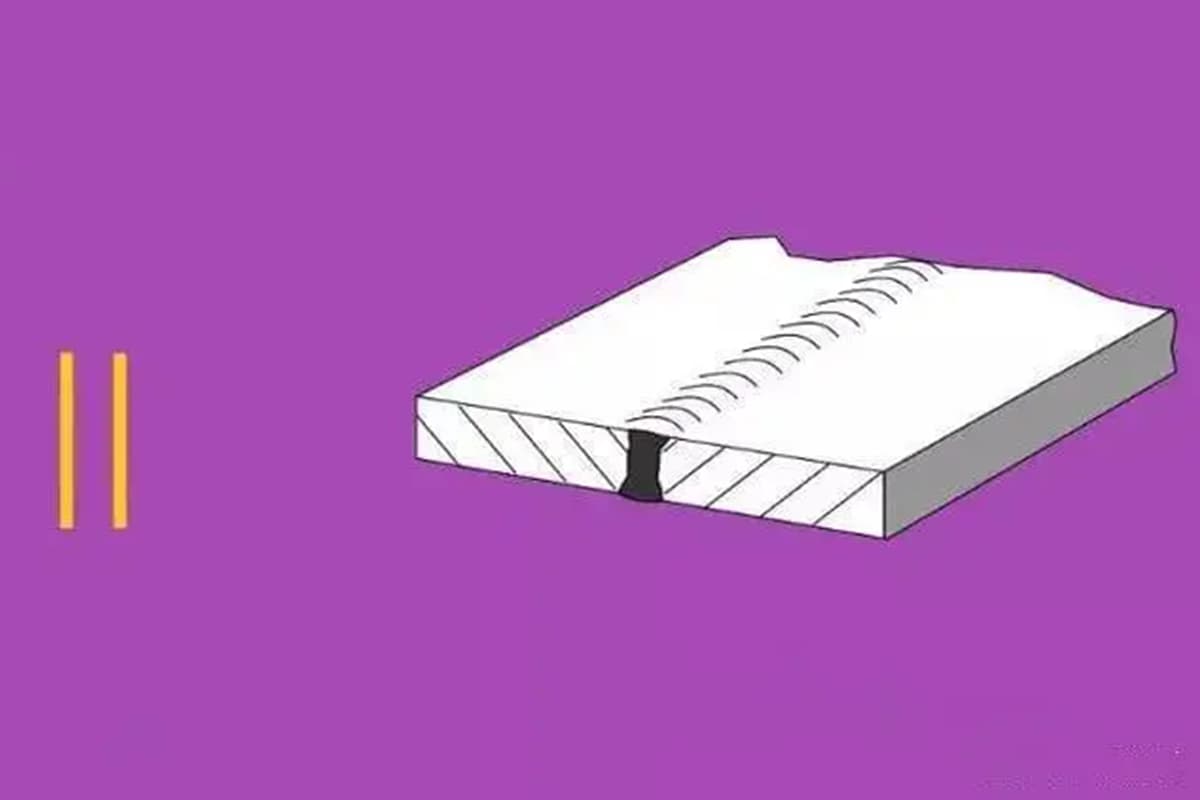
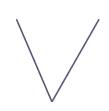
II. Basic forms of weld bead fracture
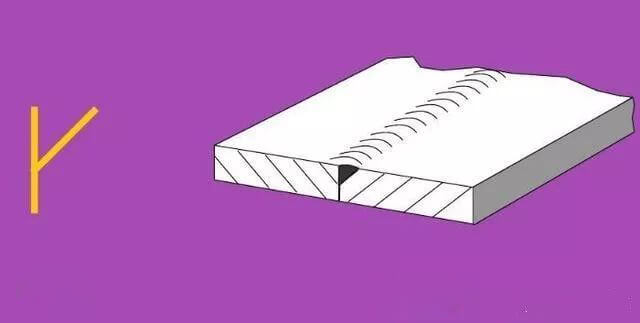
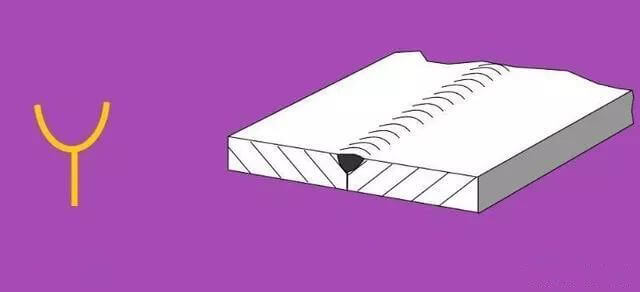
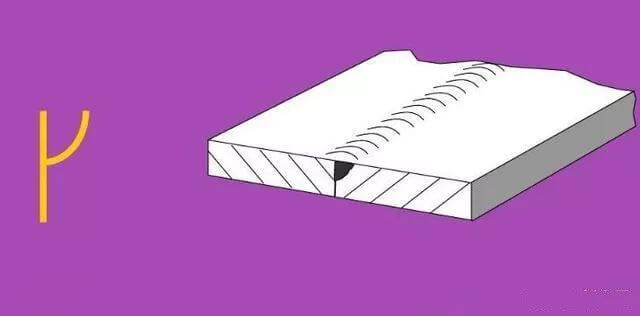
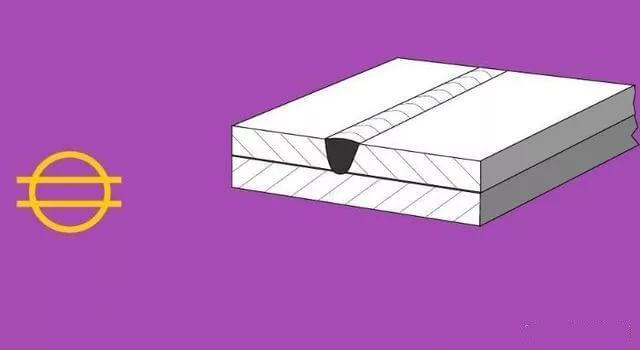
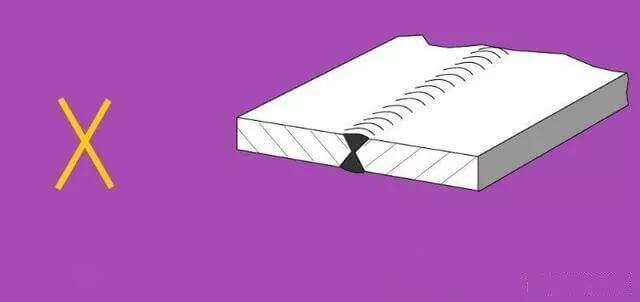
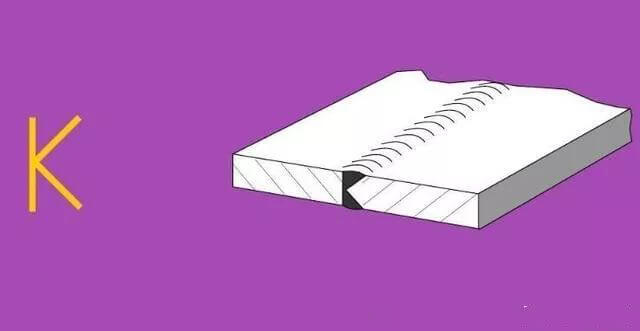
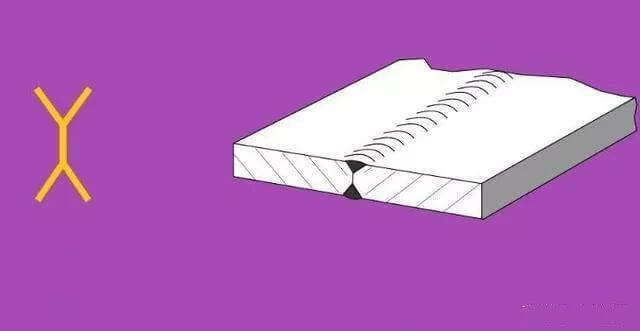
| No. | Schematic diagram | Beveled shape | Welding Symbols |
| 1 | I-shaped groove |

|
|
| two |  |
K-shaped groove |

|
| 3 |  |
V-shaped groove |
|
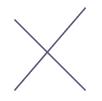
| 4 | X-shaped groove |
|
|
| 5 | Y-shaped gap |

|
|
| 6 | X-shaped (with pure edge) |
|
|
| 7 | V-shaped oblique gap |
|
|
| 8 | Y-shaped oblique gap |
|
|
| 9 |  |
Overlap (three-sided welding) |

|
| 10 | U-shaped gap |
|
|
| 11 | One-sided U-shaped break |
|
|
| 12 | Spot welding |

|
|
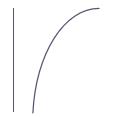
| 13 | Irregular Pause |
|
|
| 14 | Irregular Pause |

|
|
| 15 |  |
Irregular Pause |  |
III. Welding Symbols
1. Definition of Welding Symbols
They are symbols used to indicate welding methods, shape and size of the weld, among other technical content in a drawing.
2. Components of Welding Symbols
(1) Welding symbols:
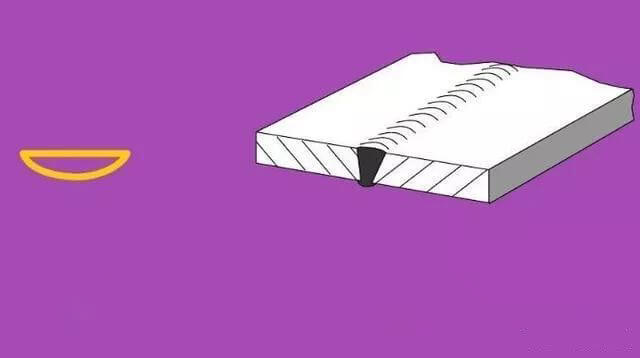
1. Basic Symbols: Symbols that represent the cross-sectional shape of the weld.
2. Supplementary Symbols: Symbols that indicate the shape of the weld surface.
3. Additional Symbols: Symbols used to further explain certain weld characteristics.
(2) Reference Line:
Composed of an arrow line and a reference line.
(3) Weld size symbols:
Symbols that indicate the dimensions of the weld shape.
3. Standard position of welding symbols in drawings
The standards specify clear rules for the placement of weld symbols, dimension symbols and dimension values on the reference line. When creating welding diagrams, these rules must be strictly followed.
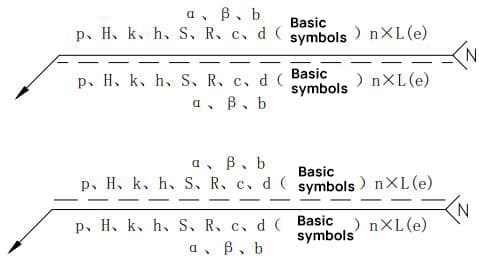
Symbols and numeric values are marked in seven zones, A~G, relative to the reference line. The positions of these zones relative to the reference line are fixed, regardless of changes in the direction of the arrow line, their position relative to the reference line will not change.
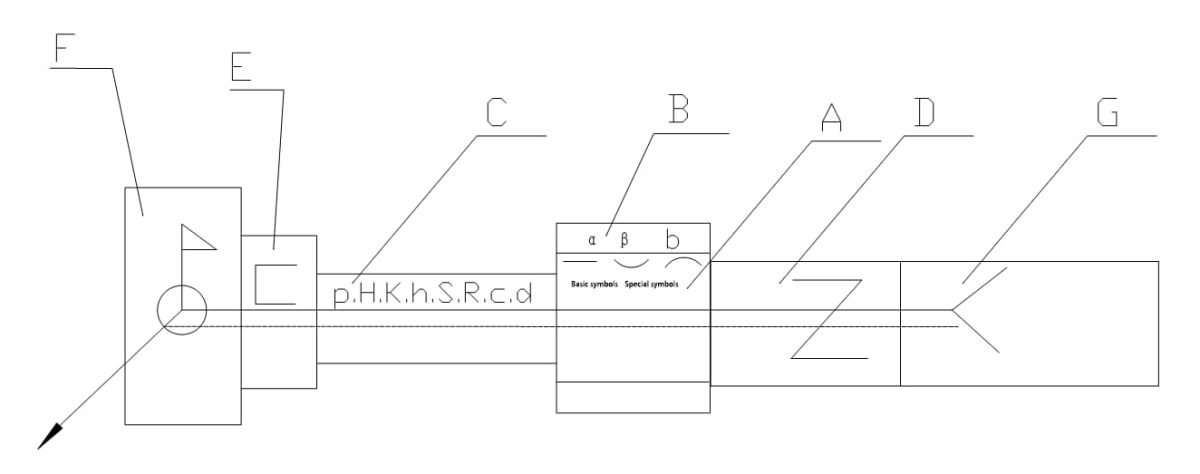
One Zone: Main functional area: Marks basic symbols, special symbols, support strip symbols in supplementary symbols, and flat, convex, and concave symbols in auxiliary symbols.
Zone B: Supplementary functional area: Located above or below Zone A, marking the groove angle α, groove surface angle β and root gap b in the weld size.
Zone C: On the left side of the basic symbol, marking the dimension symbols and values on the weld cross-section, such as blunt edge p, groove depth H, weld angle size K, reinforcement h, effective weld thickness S, radius root R, weld width C and fusion core diameter d.
Zone D: On the right side of the basic symbol, marking stepped weld symbols and marking the longitudinal size (length direction) values of the weld, such as the number of weld sections n, weld length l and weld spacing e.
Zone E: Marks three-sided weld symbols in supplementary symbols.
Zone F: Marks field weld symbols and adjacent weld symbols in supplementary symbols.
Zone G: Marks the tail symbols in supplementary symbols. After the final symbols, the number of identical welds N, the welding method code, the weld quality and the inspection requirements are marked.
4. Codes for Representation of Common Welding Methods in Drawings
See the table below (note: the table is not provided in the query).
| Code name | Welding methods |
| 135 | MAG welding (CO 2 ) |
| 21 | Spot welding |
| 141 | TIG welding |
| 131 | MIG welding |
| 23 | Projection welding |
| 3 | Gas Welding |
| two | Resistance welding |
| 111 | Manual arc welding (covered electrode) |
| 114 | Arc welding with flux cored wire |
| 12 | Submerged Arc Welding |
| 25 | Resistance spot welding |
| 952 | Smooth soldering iron brazing |
| 751 | laser welding |
| 155 | Plasma arc MIG welding |
5. For example
(Example 1)
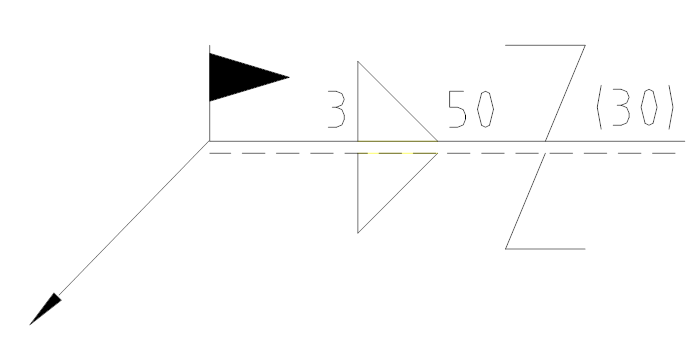
Indication: Weld height is 3, step welding, weld seam length is 50, gap is 30, spot welding is required.
Example 2:
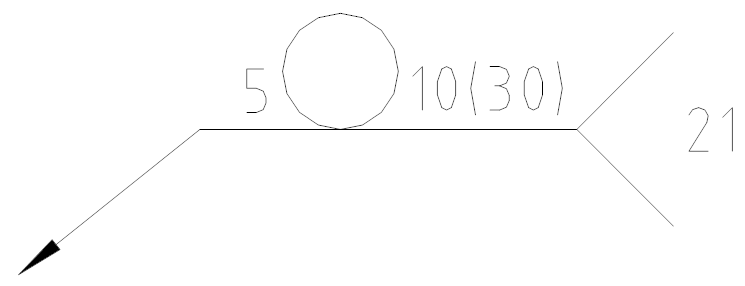
Declaration: The diameter of the spot weld is 5, the number of spot welds is 10, and the range is 30.
Example 3:
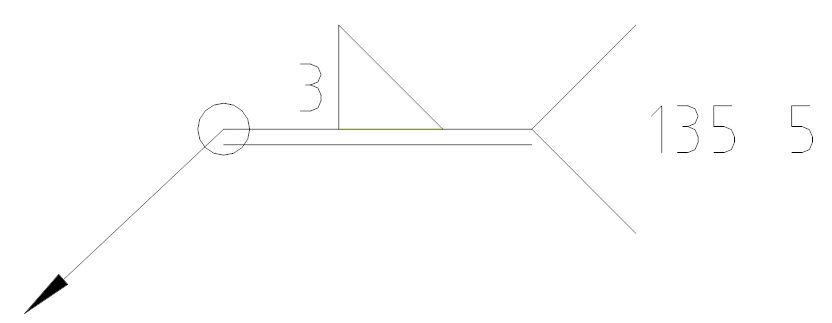
Note: The welding height is 3, with complete welding all around. The joint is made using CO 2 gas shielded welding, with a total of 5 locations.
Example 4:

Indication: The weld height is 3, with chamfered V-groove, the weld surface is ground, the weld length is 30, in total 5 segments, and the welding is carried out with CO 2 gas shielded welding.
6. Basic symbols
The basic symbol represents the cross-sectional shape of the weld, as illustrated in Table 1.
Table 1 Basic Welding Symbols
| Serial number | Symbol name | Cartographic sketch | welding symbol |
| 1 | Rolled edge welding (fully melted rolled edge)
Note: Incompletely melted rolled edge weld is indicated by the I-shaped weld symbol, and the effective weld thickness S is added, as shown in Table 7 |
 |
|
| two | I-shaped weld |  |
|
| 3 | V-shaped weld |  |
|
| 4 | V-shaped one-sided weld |  |
|
| 5 | V-shaped weld with blunt edge |  |
|
| 6 | Simple V weld with blunt edge |  |
|
| 7 | U-shaped weld with blunt edge |  |
|
| 8 | J-shaped weld with blunt edge |  |
|
| 9 | Sealing weld |  |
|
| 10 | Weld bead | 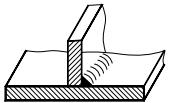 |
|
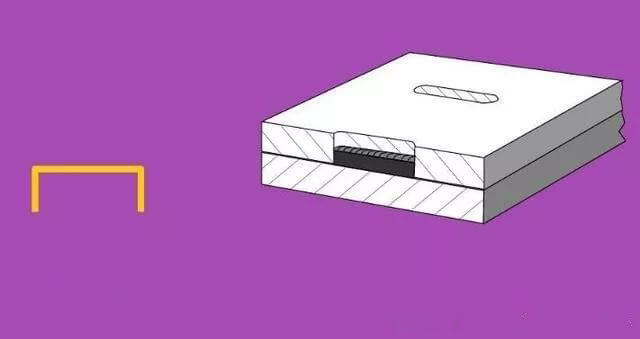
| 11 | Socket welding or slot welding |  |
|
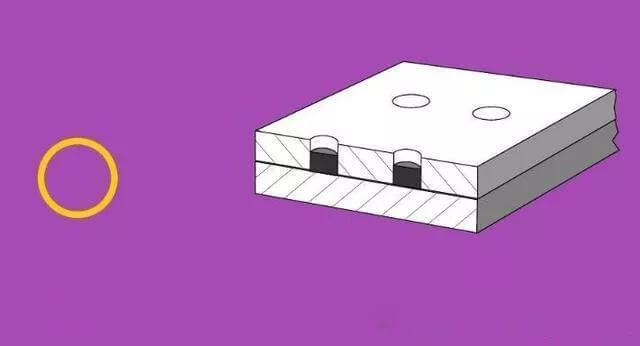
| 12 | Welding point |  |

|
| 13 | seam welding | 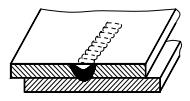 |

|
7. Auxiliary symbols
1. Auxiliary welding symbols represent the shape characteristics of the welding surface and are shown in Table 2.
Table 2 Auxiliary Welding Symbols
| Serial number | Symbol name | Cartographic sketch | Symbol | Explain |
| 1 | Airplane symbol |
|
The welding surface is level | |
| two | Concave symbol |

|
|
Weld surface depression |
| 3 | Convex symbol |  |
|
Raised weld surface |
Note: Auxiliary symbols may be omitted if the shape of the weld surface does not need to be specified.
2. See Table 3 for application examples of auxiliary symbols.
Table 3 Examples of Application of Auxiliary Symbols
| Serial number | Symbol name | Cartographic sketch | Symbol |
| 1 | Flat V Butt Weld |

|
|
| two | X convex butt weld |

|
|
| 3 | Concave Fillet Weld |

|
|
| 4 | Flat back V-shaped weld |

|
|
8. Supplementary symbols
Supplementary symbols are used to add additional information about the characteristics of welds. For examples of supplementary symbols, see Table 4.
See GB/T 5185 for welding process method symbols.
Table 4 Supplementary Symbols
| Serial number | Symbol name | Cartographic sketch | Symbol | Explain |
| 1 | Symbol with backing plate |  |
|
Indicates that there is a backing plate at the bottom of the weld |
| two | Three-Sided Welding |  |
|
Indicates that there are welds on three sides |
| 3 | Peripheral welding |  |
|
Indicates welding around the workpiece |
| 4 | Site Symbols |

|
Indicates welding on site | |
| 5 | Tail symbol |
|
Brand welding process method |
Table 5 Example of supplementary symbol application
| Serial number | Cartographic sketch | Dimension example | Explain |
| 1 |  |
 |
Indicates that there is a backing plate at the bottom of the back of the V-shaped weld |
| two |  |
 |
There are welds on three sides of the workpiece and the welding method is manual arc welding |
| 3 |  |
 |
Means welding around the part in place |
4. Position of welding symbols in drawings
1. Basic requirements
The complete weld representation methods consist of the basic symbol, auxiliary symbol, supplementary symbol, leader, dimension symbol and data. The leader line is composed of an arrow leader line (also known as an arrow line) and a reference line, which can be a solid line or a dotted line, as illustrated in Figure 1.
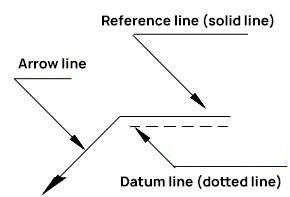
Fig. 1 Leader line
2. Relationship between the arrow line and the welding joint
Two terms are used to describe the relationship between arrow lines and joints:
The. Connector arrow side;
B. Non-arrow side of the connector.
See Figures 2 and 3 for a description of these two terms.
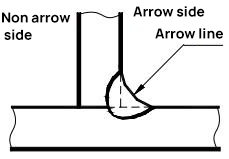
(a) Weld seam on arrow side
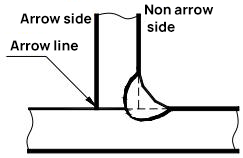
(b) The weld seam is on the opposite side of the arrow
Fig. 2 T-joint with single fillet weld
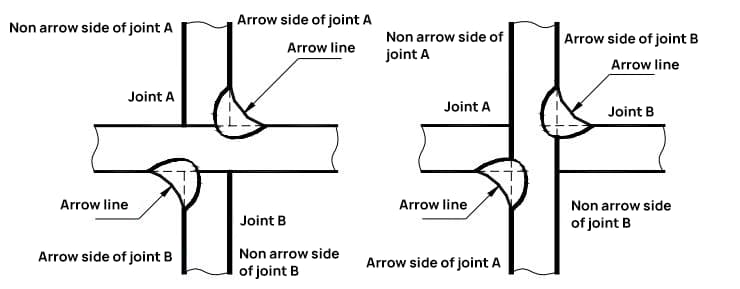
Fig. 3 Double fillet weld cross joint
3. Arrow position
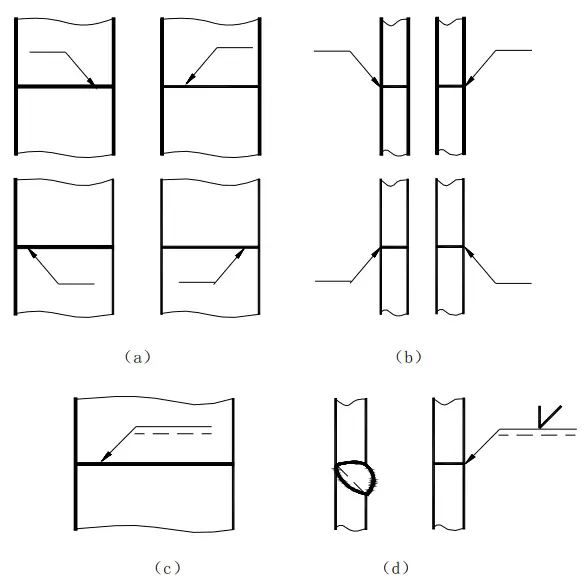
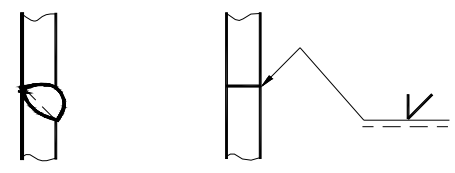
Generally, there is no specific requirement for the position of the arrow line relative to the weld, as shown in Figures 4(a) and (b). However, when marking one-sided V-shaped, one-sided V-shaped with blunt edge, and J-shaped welds, the arrow should point toward the workpiece with the groove, as shown in Figures 4(c) and (d ). If necessary, it is allowed to bend the arrow line once, as shown in Figure 5.
4. Location of the reference line
The dotted reference line can be drawn above or below the solid reference line. The reference line must be parallel to the bottom edge of the drawing.
5. Position of the reference mark in relation to the reference line
The. If the weld is on the arrow side of the joint, the basic symbol should be marked on the solid line side of the reference line, as shown in Fig. 6 (a);
B. If the weld is on the side of the joint without an arrow, the basic symbol should be marked on the dotted line side of the reference line, as shown in Fig. 6 (b);
w. When symmetrical welds and double-sided welds are marked, dotted lines may not be necessary, as shown in Fig. 6 (c) and (d).


Fig. 6 Position of the basic symbol in relation to the reference line
V. Weld size symbol and its marking position
1. Basic Dimensions and Related Welding Concepts
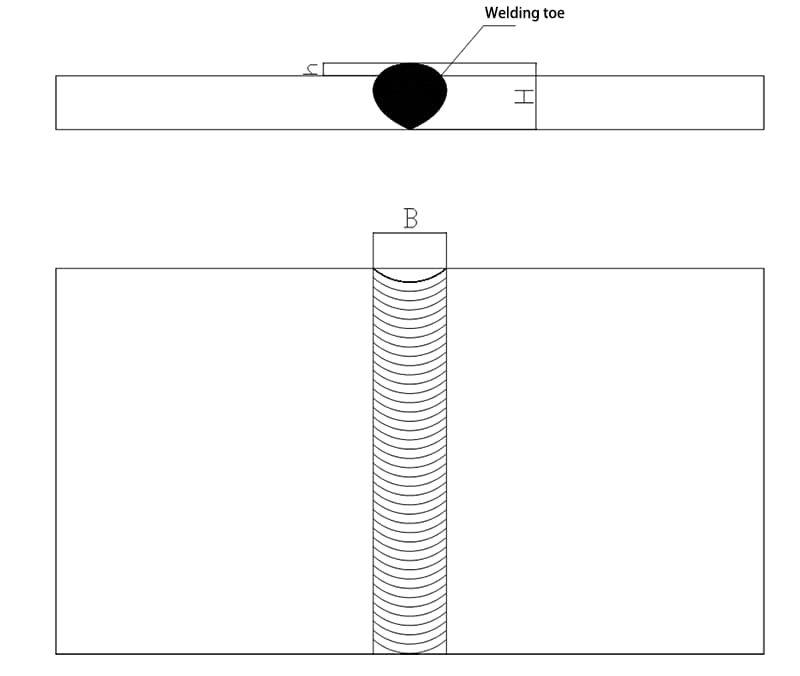
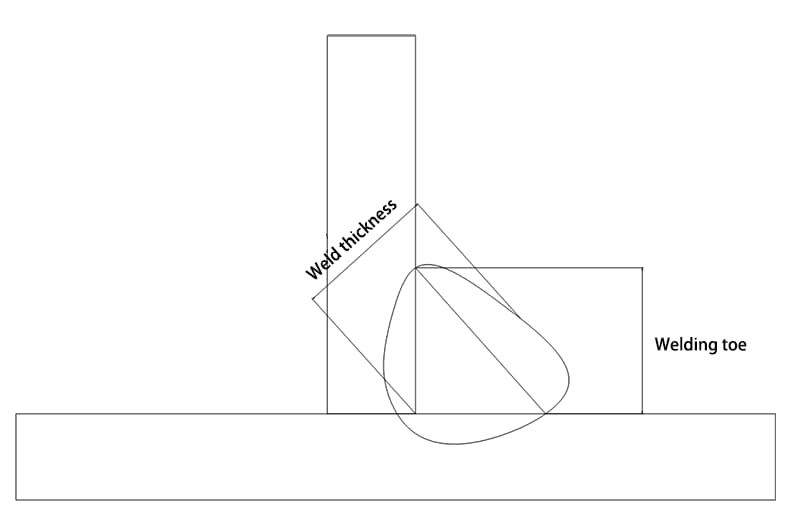
1. Toe welding:
The junction between the weld surface and the base metal.
2. Weld Width (B):
The distance between the two weld fingers on the weld surface.
3. Weld thickness:
In weld cross section, the distance from the front to the back of the weld.
4. Leg Size:
The length of the rectangular side in the largest isosceles right triangle drawn in the cross section of the fillet weld.
5. Welding leg:
In fillet weld cross section, the shortest distance from a weld tip on one right-angled surface to another right-angled surface.
6. Penetration depth:
In the cross section of the weld joint, the fusion depth of the base metal or previous weld seam.
7. Welding form factor:
The relationship between the width of weld B and the calculated depth of weld H in the single-seam cross section during fusion welding.
8. Reinforcement:
The maximum height of weld metal that exceeds the line on the surface of the base metal.
9. Weld Root:
The junction of the back of the weld and the base metal.
10. Crater
During arc welding, a depression forms at the end of the welding path due to inadequate arc breaking or extinguishing.
11. Welding Pool
During fusion welding, under the influence of the welding heat source, the metal part of the workpiece that forms a certain geometric shape and becomes liquid.
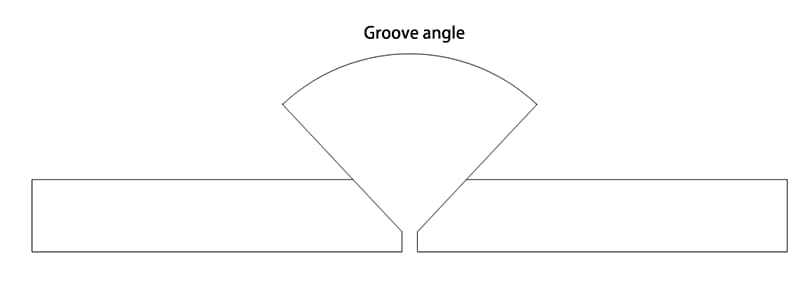
12. Cutting Angle:
The angle between two cuts;
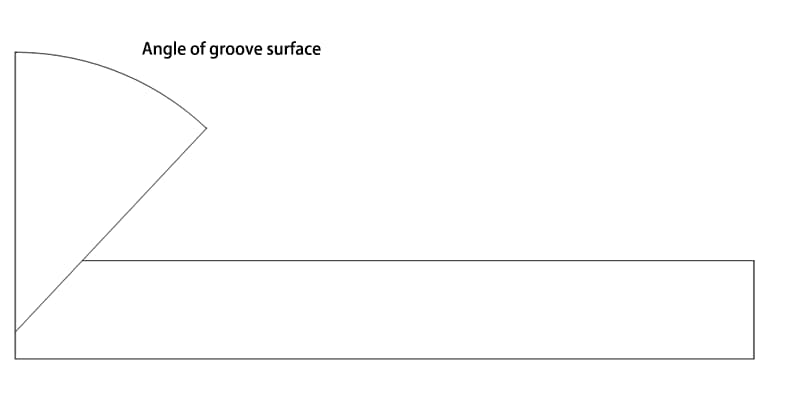
13. Groove surface angle:
The angle between the end face of the groove to be machined and the groove surface:
2. General requirements
2.1 If necessary, reference symbols can be provided with dimension and data symbols. See Table 6 for dimension symbols.
Table 6 Weld Size Symbols
| Symbol | Symbol name | Example diagram | Symbol | Symbol name | Example diagram |
| δ | Part thickness |  |
It is | Weld Spacing |  |
| α | Groove angle |  |
K | Fillet size |  |
| B | Root gap |  |
d | nugget diameter |  |
| P | Blunt edge | s | Effective weld thickness |  |
|
| w | Weld width |  |
N | Symbol for number of identical welds |  |
| R | Root radius |  |
H | Groove depth |  |
| I | Weld length |  |
H | Excess height |  |
| n | Number of weld segments |  |
β | Groove face angle |  |
2.2 Marking principles for symbol and weld size data are illustrated in Figure 7.
The. The cross-sectional dimensions of the weld are indicated on the left side of the basic symbol;
B. The dimension in the weld length direction is indicated on the right side of the basic symbol;
w. The groove angle, groove face angle, and root gap dimension are indicated at the top or bottom of the basic symbol;
d. The numerical symbol of the same weld is indicated at the end;
It is. When there are many dimension data to be marked and it is difficult to distinguish, corresponding dimension symbols can be added in front of the data for clarity.
2.3 See Table 7 for an example of weld size marking.
Table 7 Example of Weld Dimension
| Serial number | Weld name | Cartographic sketch | Welding Dimension Symbol | Example |
| 1 | Butt weld |  |
S: Effective weld thickness | |
 |
||||
 |
||||
| two | Crimp solder |  |
S: Effective weld thickness | |
 |
||||
| 3 | Continuous fillet weld |  |
K: Fillet size | |
| 4 | Intermittent fillet weld |  |
L: Length of the weld, excluding crater; e: weld gap; n: number of weld segments | |
| 5 | Stepped intermittent fillet weld | 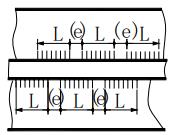 |
L: Weld length, excluding crater;e: weld gap;n: number of weld segments; K: weld fillet size |  |
| 6 | Socket welding or slot welding |  |
L: Length of the weld, excluding crater; e: weld gap; n: number of weld segments; c: slot width. | |
 |
e: Weld gap; n: number of weld segments; d: hole diameter. | |||
| 7 | seam welding |  |
L: Length of the weld, excluding crater; e: weld gap; n: number of weld segments; c: weld width. |  |
| 8 | Welding point |  |
n: Number of weld segments; e: spacing; d: diameter of the welding point. |  |
3. Description of dimension symbols
3.1 The size to determine the position of the weld must be indicated on the drawing and not on the weld symbol.
3.2 If no marking is present on the right side of the basic symbol and no additional information is provided, it is assumed that the weld is continuous along the entire length of the part.
3.3 If there is no marking on the left side of the basic symbol and no other information is provided, it is assumed that the butt weld must be completely welded.
3.4 When the plug weld and groove weld have beveled edges, the size of the bottom of the hole must be marked.
SAW. Symbol application example
Appendix A
(Informative appendix)
Symbol application example
A. 1 Application of basic symbols
See Table A.1 for examples of basic symbols.
A. 2 Basic combination of symbols
See Table A.2 for basic symbol combination application examples.
A. 3 Combination of basic symbols and auxiliary symbols
See Table A.3 for examples of combining basic symbols and auxiliary symbols.
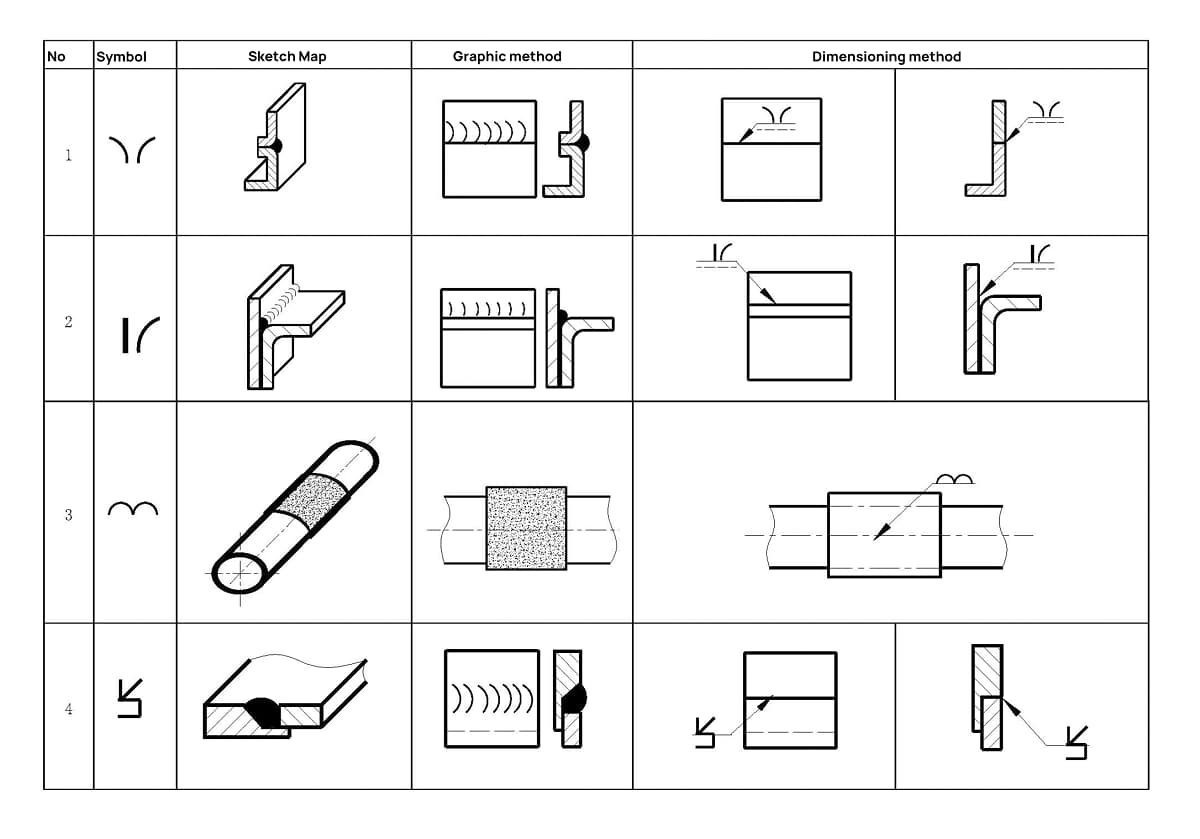
A. 4 Special cases
See Table A.4 for the markings of flared weld, one-sided flared weld, stacked weld, and locked edge weld.
Table A.1 Examples of application of basic symbols
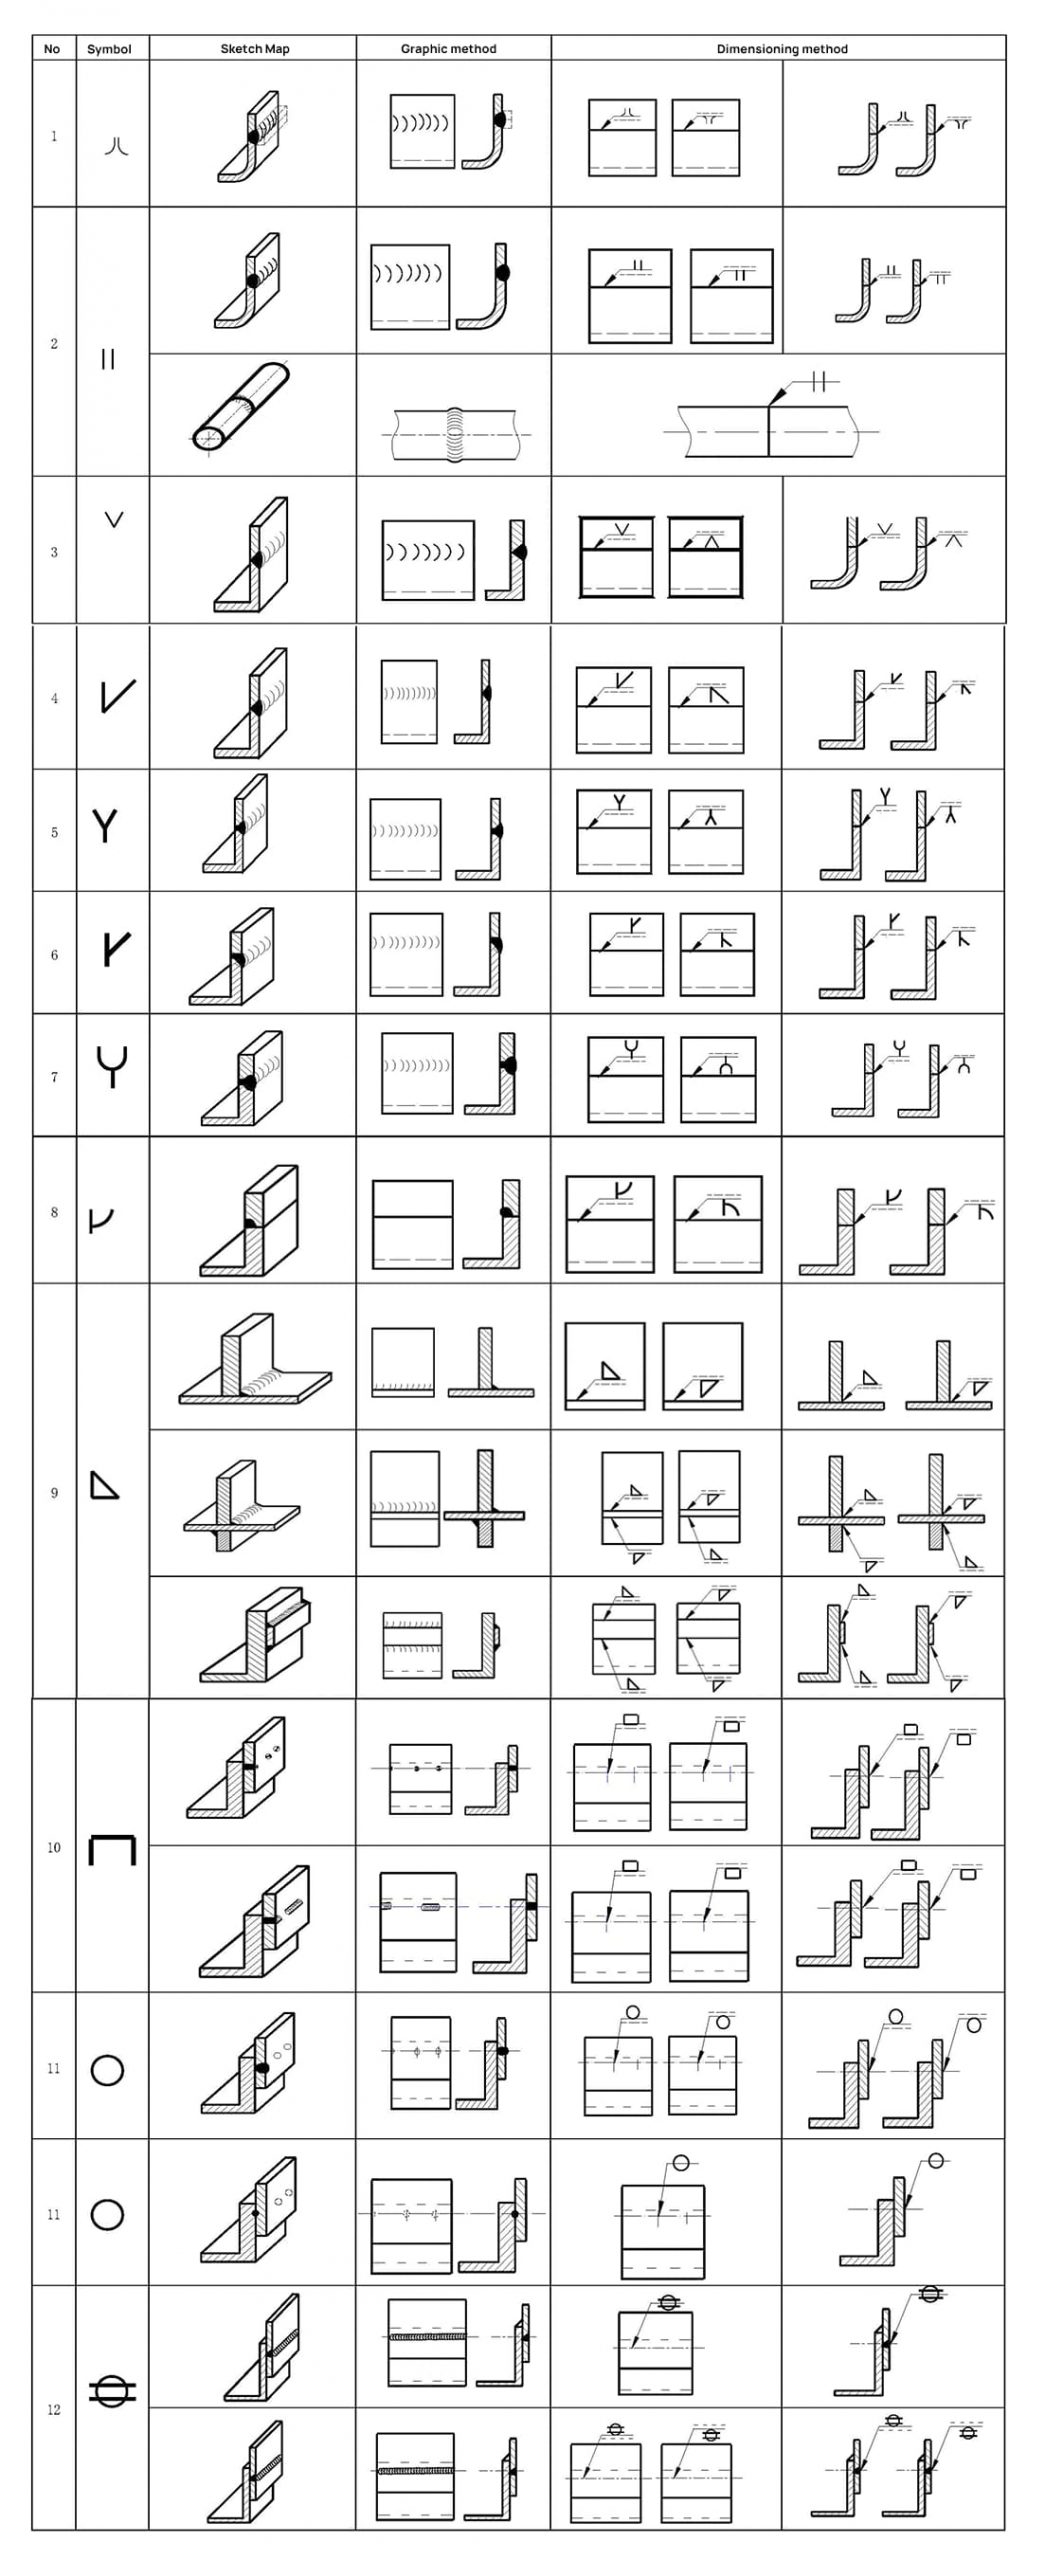
Table A.2 Example of basic symbol combination
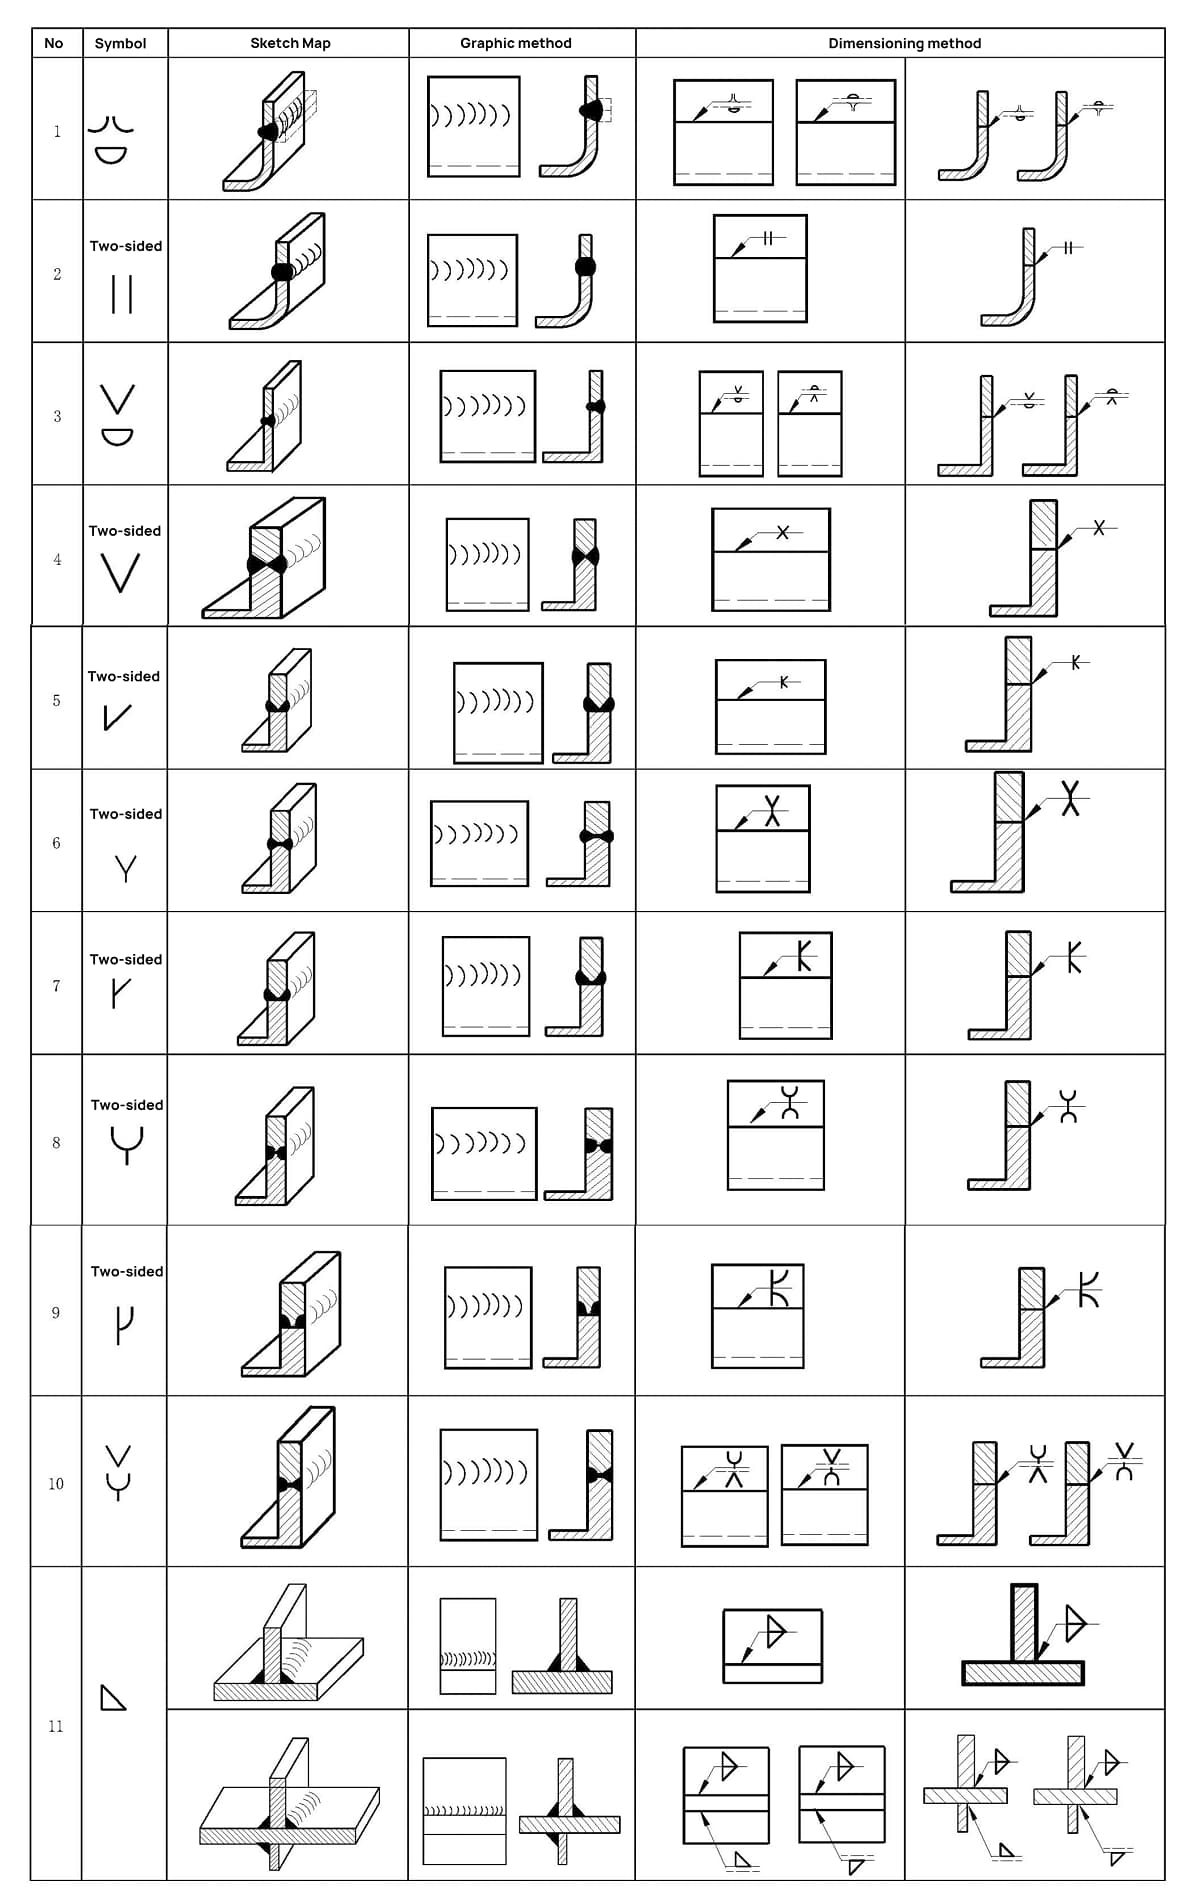
Table A.3 Examples of combinations of basic symbols and auxiliary symbols
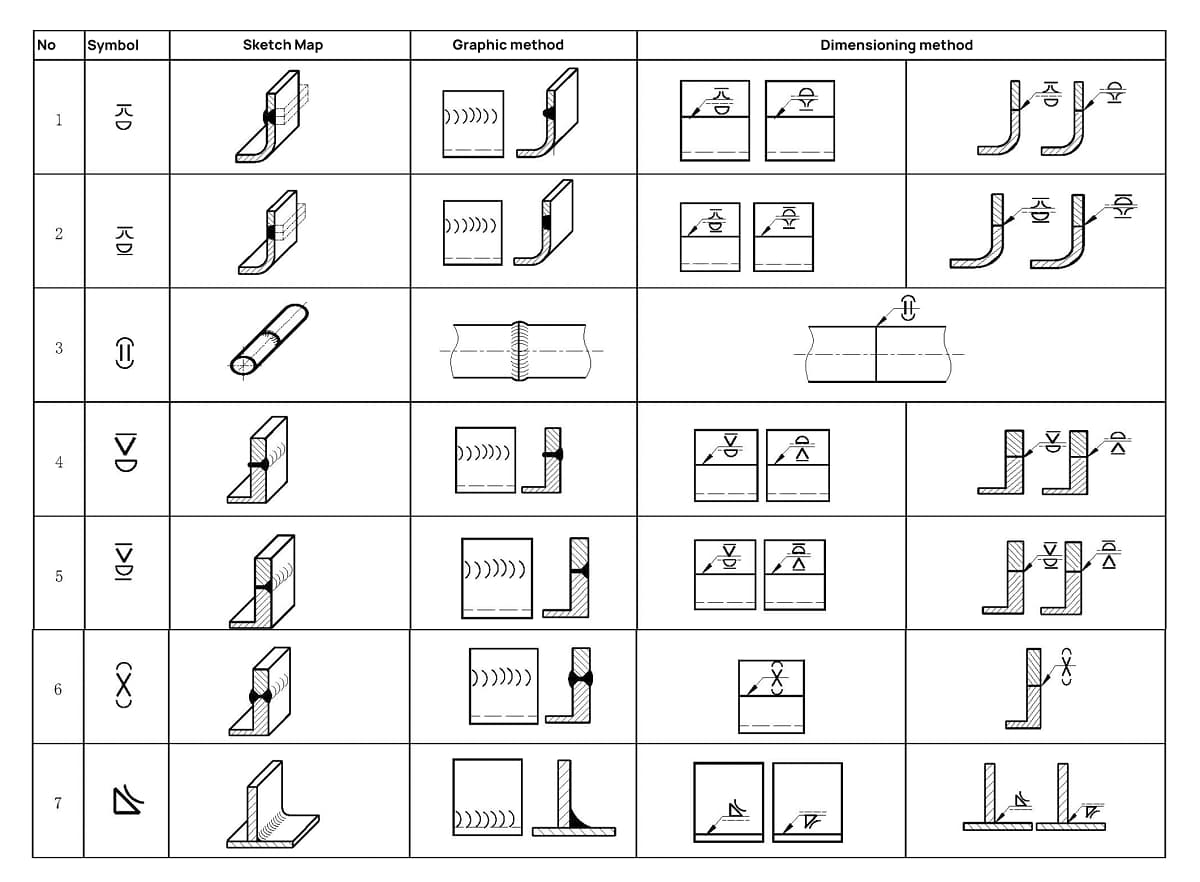
Table A.4 Marking of Special Welds
Appendix B
(Normative appendix)
Welding method and its name
B. 1 Marking of welding method on drawings
When multiple welding methods are marked on drawings, Chinese characters should be used instead of the codes specified in GB/T 5185.
B. 2 Common welding methods and their names
Common welding methods and their names are as follows:
a) Manual arc welding (MIG welding with coated electrode);
b) Submerged arc welding;
c) MIG welding: Protective welding with molten inert gas;
d) MAG welding: Non-inert molten gas shield welding;
e) TIG: Welding with inert tungsten gas.
f) Spot welding;
g) Acetylene oxygen welding;
h) Energy storage welding;
i) Flame brazing;
j) Induction brazing;
k) Solder (tin).
Appendix C
(Normative appendix)
Graphical method
C. 1 General
When a simple representation of the weld is required on the drawing, it can be shown through views, cross-sectional views, or cross-sectional drawings. This appendix provides a simple method commonly used by companies as described in GB/T 12212 for ease of use. For more information, see GB/T 12212.
C. 2 views
C. 2.1 The weld drawing method is shown in Fig. C.1 and Fig. C.2 (a series of thin solid line segments representing welds can be drawn by hand).
It is also permitted to use thick lines (2b ~ 3b) to represent welds, as shown in Figure C.3.
However, on the same drawing, only one painting method is allowed.
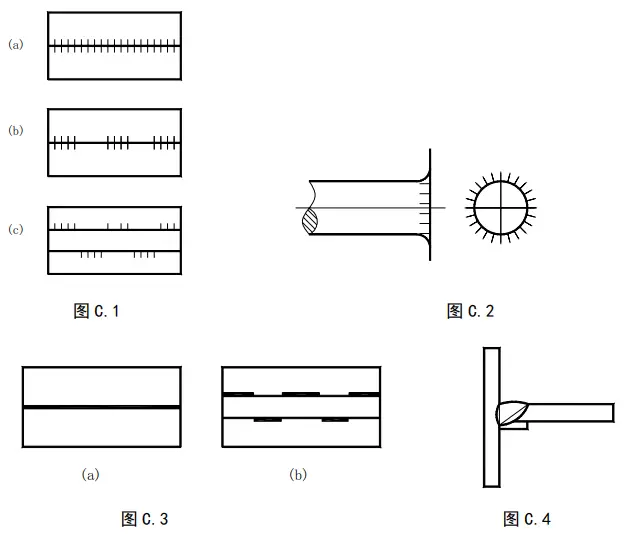
C. 2.2 In representing the weld end face, a thick solid line is normally used to delineate the weld contour.
If necessary, a thin solid line can be used to represent the shape of the groove before welding, as illustrated in Figure C.4.
C. 3 Sectional view or cross-sectional view
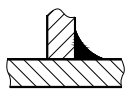
In sectional or profile views, the metal fusion welding area of the weld is typically marked in black, as illustrated in Figure C.5. If the groove shape also needs to be indicated, the fusion welding area may also be represented as described in Clause C.2.2, as shown in Figure C.6.

VII. Examples of Welding Symbols
