1. What is surface roughness ?
In technical communication, the term “surface finish” is commonly used. However, it should be noted that “surface finish” is based on human perception, while “surface roughness” is based on the actual microgeometry of the surface.
To align with international standards (ISO), the use of “surface finish” is no longer acceptable in national standards. The preferred and more accurate term is “surface roughness”.
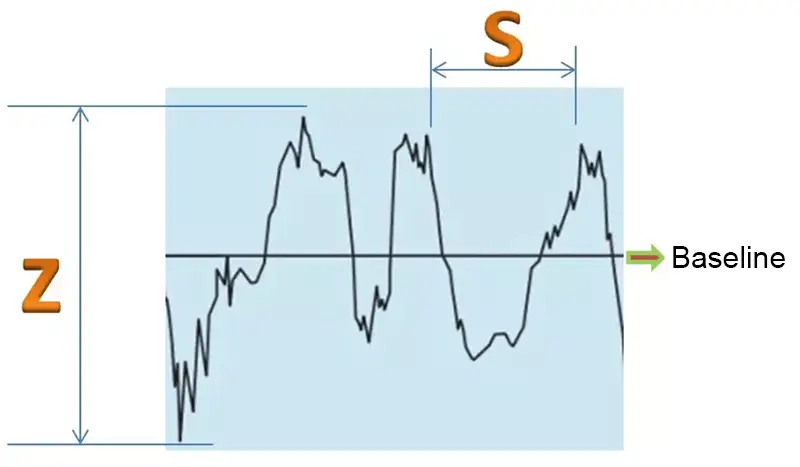
Surface roughness refers to the irregularity of a machined surface, characterized by small, closely spaced peaks and valleys. The distance between these peaks and valleys, known as the wave distance, is typically less than 1 mm, which falls into the category of microgeometry errors.
It is specifically defined by the level of high and low (Z) micropeaks and valleys and the spacing(s) between them.
Generally according to S:
- S < 1 mm – surface roughness
- 1 ≤ s ≤ 10mm- ripple
- S > 10 mm-form f
2. Comparison table of VDI3400, Ra and Rmax
In national standards, three indicators are commonly used to evaluate surface roughness (the unit is μm).

- Mean arithmetic deviation of contours: Ra
- The average height of the slope: Rz
- Maximum height: Ry
The Ra index is widely used in real production. The maximum microscopic height deviation of a contour, Ry, is commonly referred to as Rmax in Japan and other countries, while the VDI index is commonly used in Europe and America. The following table compares VDI3400, Ra and Rmax.
The VDI3400 surface has a corresponding relationship with the widely used Ra standard. Many people find it necessary to consult reference data to determine the corresponding value. The following table is comprehensive and is recommended to be kept for reference.
VDI3400 and Ra standard comparison table
| VDI | Frog | VDI | Frog |
|---|---|---|---|
| 3400 | μm | 3400 | μm |
| 0 | 01 | 23 | 1.4 |
| 1 | 0.112 | 24 | 1.6 |
| two | 0.126 | 25 | 1.8 |
| 3 | 0.14 | 26 | two |
| 4 | 0.16 | 27 | 2.2 |
| 5 | 0.18 | 28 | 2.5 |
| 6 | 0.2 | 29 | 2.8 |
| 7 | 0.22 | 30 | 3.2 |
| 8 | 0.25 | 31 | 3.5 |
| 9 | 0.28 | 32 | 4 |
| 10 | 0.32 | 33 | 5 |
| 11 | 0.35 | 34 | 5 |
| 12 | 0.4 | 35 | 5.6 |
| 13 | 0.45 | 36 | 6.3 |
| 14 | 0.5 | 37 | 7 |
| 15 | 0.56 | 38 | 8 |
| 16 | 0.63 | 39 | 9 |
| 17 | 0.7 | 40 | 10 |
| 18 | 0.8 | 41 | 11.2 |
| 19 | 0.9 | 42 | 12.6 |
| 20 | 1 | 43 | 14 |
| 21 | 1.12 | 44 | 16 |
| 22 | 1.26 | 45 | 18 |
RA and Rmax Comparison Table
| Ra (μm) | Rmax (μm) |
|---|---|
| 0.1 | 0.4 |
| 0.2 | 0.8 |
| 0.4 | 1.5 |
| 0.56 | 2.4 |
| 0.8 | 3.3 |
| 1.12 | 4.7 |
| 1.6 | 6.5 |
| 2.2 | 10.5 |
| 3.2 | 12.5 |
| 4.5 | 17.5 |
| 6.3 | 24 |
3. Surface roughness formation factors
Surface roughness is typically formed by several factors, including the processing method used.
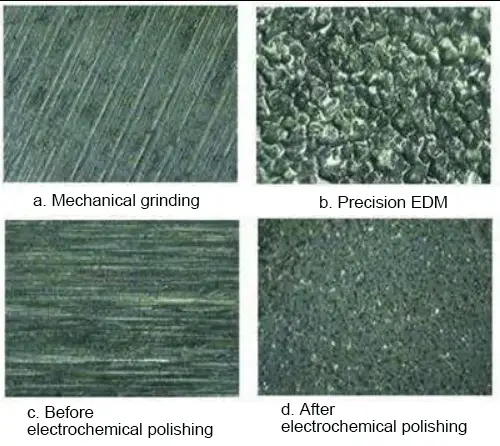
For example, factors contributing to surface roughness include friction between the tool and the workpiece surface during machining, plastic deformation of the surface layer metal during chip separation, high-frequency vibrations in the processing system, and pitting. discharge in electrical machining.
The depth, density, shape and texture of marks left on the processed surface may vary due to differences in processing methods and part materials.
4. Main effects of surface roughness on parts
The impact on wear resistance:
The rougher the surface, the smaller the effective contact area between mating surfaces, the greater the pressure, and the greater the frictional resistance, resulting in faster wear.
The impact on stability of gap adjustment:
For clearance adjustment, a rougher surface leads to greater wear and a gradual increase in clearance during operation. In the case of interference fit, the actual effective interference is reduced due to the flattening of the microscopic convex peaks during assembly, leading to a decrease in connection resistance.
The impact on fatigue resistance:
The rough surface of a part has large depressions that are susceptible to stress concentration, similar to notches and cracks with sharp edges, affecting the fatigue strength of the part.
The impact on corrosion resistance:
The rough surfaces of parts can easily allow corrosive gases or liquids to penetrate microscopic surface valleys and reach the inner layer of the metal, causing surface corrosion.
The impact on sealability:
Rough surfaces do not fit tightly together, allowing gases or liquids to leak through the spaces between the mating surfaces.
The impact on contact stiffness:
Contact stiffness refers to the ability of a part's bonding surfaces to resist deformation under external forces. The rigidity of a machine largely depends on the contact rigidity between its parts.
The impact on measurement accuracy:
Parts are measured by their surface, and the surface roughness of the measuring tool will directly affect the measurement accuracy, especially in precision measurement.
Additionally, surface roughness has a variable effect on a part's coating, thermal and contact resistance, reflectance and radiation properties, resistance to the flow of liquids and gases, and the flow of current through the surface of a conductor. .
5. Surface roughness evaluation basis
- Sampling length
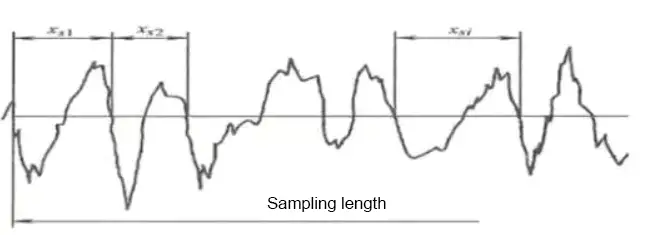
The sampling length is the length of a designated reference line used to evaluate surface roughness.
To accurately reflect the surface roughness characteristics of a part, the sampling length must be selected based on the actual surface formation and texture. The sampling length should be measured according to the general profile of the actual surface.
The purpose of specifying and selecting the sample length is to minimize the impact of surface waviness and shape errors on surface roughness measurement results.
The unit length and sampling length for each surface roughness parameter are determined by a specified reference line for evaluation.
According to ISO1997 standards, common reference lengths are 0.08mm, 0.25mm, 0.8mm, 2.5mm and 8mm.
Sampling length Ln and evaluation length L of RA, RZ and Ry
| Ra(μm) | Rz.Ry(μm) | L(mm) | Ln=5L(mm) |
|---|---|---|---|
| ≥ 0.008-0.02 | ≥ 0.025-0.10 | 0.08 | 0.4 |
| >0.02-0.1 | >0.10-0.50 | 0.25 | 1.25 |
| >01-2.0 | >0.50-10.0 | 0.8 | 4 |
| >2.0-10.0 | >10.0-50.0 | 2.5 | 12.5 |
| >10.0-80.0 | >50.0-320 | 8 | 40 |
- Assessment duration
The evaluation length is a required length used to evaluate the contour and may include one or multiple sampling lengths.
Because the surface roughness of a part is not always uniform, it may not be possible to accurately reflect a specific surface roughness characteristic with just one sampling length. Consequently, multiple sampling lengths on the surface are required to evaluate surface roughness.
Typically, the evaluation length consists of five sampling lengths.
- Baseline
The baseline is the centerline of the profile used to evaluate surface roughness parameters. There are two types of baselines:
- Contour Least Squares Centerline: This baseline is the line within the sampling length for which the sum of the squares of the contour displacement of each point on the contour line is the smallest and has a contour geometric shape.
- Contour Centerline Arithmetic Mean: This baseline is the line within the sampling length for which the area of the upper and lower contours on the centerline is equal.
Although the least squares center line is an ideal baseline in theory, it is difficult to obtain in practical applications. As a result, the centerline of the arithmetic mean of the contour is commonly used and can be measured using a straight line with an approximate position.
6. Surface roughness evaluation parameters
1. Altitude characteristics
Deviation from the Contour Arithmetic Mean (Ra):
Ra is the arithmetic mean of the absolute value of the contour deviation within the specified sampling length (lr).
In real measurements, a greater number of measurement points results in a more accurate Ra value.
Maximum Contour Height (Rz):
Rz is the distance between the top and bottom lines of the contour.
In parameters of common magnitude range, Ra is preferred.
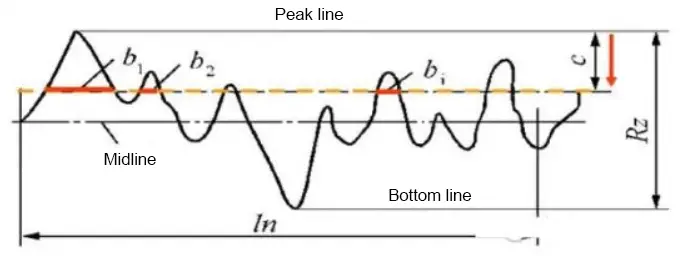
Before 2006, the national standard included an evaluation parameter known as “height of ten micro-inequality points”, which was expressed as Rz and the maximum profile height was expressed as Ry.
However, after 2006, the national standard abolished the “height of ten points of microcosmic flatness” and instead expressed the maximum profile height as Rz.
2. Tone characteristic is
Rm:
Rsm is the average width of the contour unit, representing the average of the microscopic spacing of the irregularity along the sampled length.
The microscopic irregularity distance refers to the length between a profile peak and the adjacent profile valley at the midline.
Even with the same Ra value, the Rsm value may not be the same, resulting in a different reflected texture.

Surfaces that prioritize texture often consider Ra and Rmr metrics.
The shape feature parameter Rmr is expressed as the contour support length ratio, which is the ratio of the contour support length to the sampling length.
The profile support length is calculated as the sum of the length of each section of the profile obtained by drawing a straight line parallel to the center line and at a distance “c” from the top line of the profile within the sampling length.
7. Surface roughness measurement methods
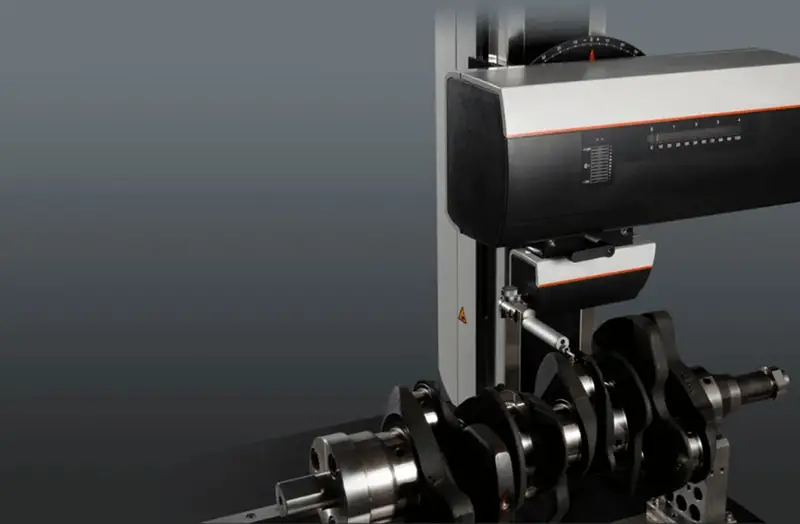
1. Comparative method
It is used for on-site measurement in workshops and is often employed to measure medium to rough surfaces.
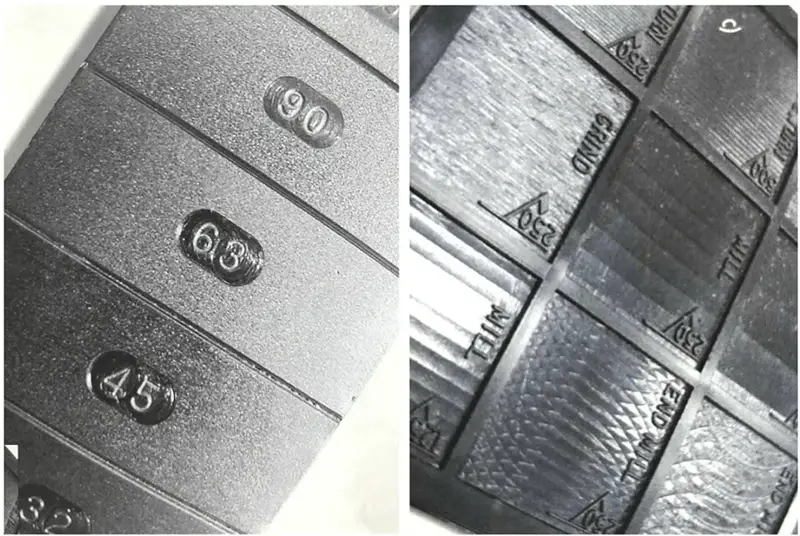
The method involves comparing the measured surface with a roughness model labeled with a specific value to determine the roughness value of the measured surface.
Roughness comparators, which are electroformed nickel-based samples, are ideal for metal machining and serve as an effective aid. The operator simply scrapes a fingernail across each surface in a group to find the closest match to the part being compared.
Although some people use these model groups as reference tables, it is important to note that they are not official material standards.
There are several roughness measuring machines available, each with different functions, evaluation methods and costs. Before choosing a model, it is recommended that you consult a professional manufacturer to select the option that best suits your needs.
2. Pen method
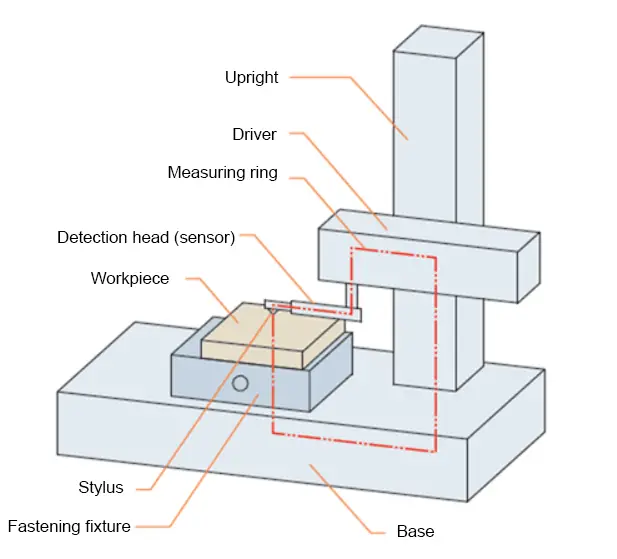
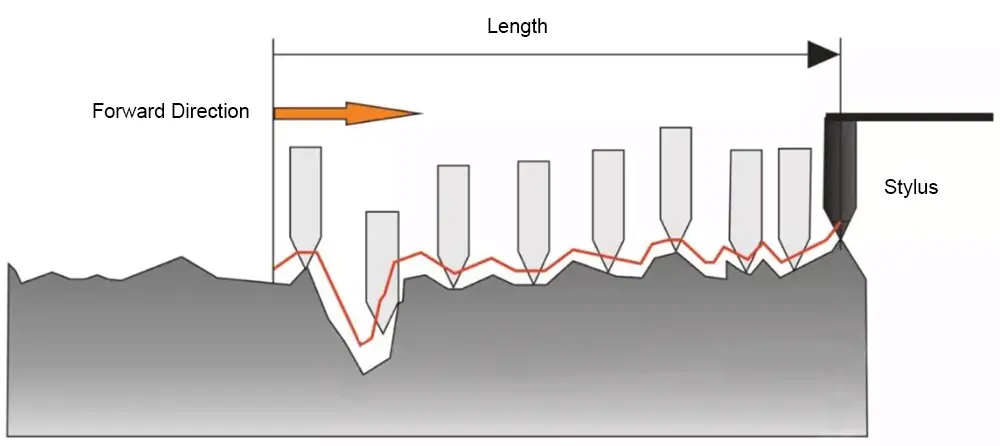
Measuring surface roughness involves using a diamond tip with a tip curvature radius of approximately 2 μm to move along the measured surface.
The up and down displacement of the diamond tip is converted into an electrical signal by an electrical length sensor. After amplification, filtering and calculation, the surface roughness value is displayed on an instrument and the measured profile curve can also be recorded by a recorder.
Instruments that display only surface roughness values are called surface roughness meters, while those that record surface profile curves are called surface roughness profilers.
Both types of tools have electronic calculation circuits or computers that automatically calculate the deviation from the arithmetic mean of the contour (Ra), the height of ten points of the microscopic irregularity (Rz), the maximum height of the contour (Ry) and other parameters of assessment.
These tools have high measurement efficiency and are suitable for measuring surface roughness with Ra values ranging from 0.025 to 6.3 μm.
8. Surface roughness: Ra and Rz
- Basic Concepts of Ra and Rz
In the old national standard GB/T3505-1983, it is stipulated that the surface roughness evaluation parameters must be selected from three aspects: the arithmetic mean deviation of the contour (Ra), the height of ten points of the micro-irregularity (Rz ) and the maximum contour height (Ry).
Ra is known as the arithmetic mean deviation from the contour or mean value from the center line. It is the arithmetic mean of the heights of the contour points within the measuring length.
Rz is known as the ten-point height of the microirregularity. It is the sum of the mean values of the five highest contour peaks and the five deepest contour valleys within sampling length l.
- The range of use varies between the two
Ra is the primary evaluation parameter, while Rz is generally only used to represent shorter surfaces. In actual processing, Ra is more commonly used to express roughness than Rz.
- Calculation methods are different
The arithmetic mean deviation Ra refers to the arithmetic mean of the absolute values of the vertical coordinate Z within a sampling length, denoted as Ra. Rz is the sum of the mean values of the five highest contour peaks and the five deepest contour valleys within the sampling length.
- Accuracy varies between the two
Since Rz has fewer measurement points, it does not reflect the height characteristics of the microgeometric shape as completely as the Ra parameter. It doesn't have the precision of Ra, but it is easier to measure than Ra.
9. Surface roughness table
China-US Surface Roughness Comparison Table
| Ancient Chinese pattern (smoothness) | Chinese New Standard (Roughness) Ra | US Standard (microns) Ra | US Standard (Microinches) Ra |
| ▽4 | 6.3 | 8 | 320 |
| 6.3 | 250 | ||
| ▽5 | 3.2 | 5 | 200 |
| 4 | 160 | ||
| 3.2 | 125 | ||
| ▽6 | 1.6 | 2.5 | 100 |
| two | 80 | ||
| 1.6 | 63 | ||
| ▽7 | 0.8 | 1.25 | 50 |
| 1 | 40 | ||
| 0.8 | 32 | ||
| ▽8 | 0.4 | 0.63 | 25 |
| 0.5 | 20 | ||
| 0.4 | 16 |
Domestic surface finish and surface roughness Ra, Rz conversion table (unit: μm)
| Surface Finish | ▽1 | ▽2 | ▽3 | ▽4 | ▽5 | ▽6 | ▽7 | |
| Surface stiffness | Ra | 50 | 25 | 12.5 | 6.3 | 3.2 | 1.60 | 0.80 |
| Rz | 200 | 100 | 50 | 25 | 12.5 | 6.3 | 6.3 | |
| Surface Finish | ▽8 | ▽9 | ▽10 | ▽11 | ▽12 | ▽13 | ▽14 | |
| Surface stiffness | Ra | 0.40 | 0.20 | 0.100 | 0.050 | 0.025 | 0.012 | – |
| Rz | 3.2 | 1.60 | 0.80 | 0.40 | 0.20 | 0.100 | 0.050 | |
International standard processing method for surface roughness
| Default note code | Surface stiffness | Processing Tool (Method) | Processing material and hardness requirements | Description of luminosity | |||
| Coarse Grinding Sand Grain Size | Fine Grinding Sand Grain Size | Polishing with diamond paste | |||||
| IP(A1) | Ra0.005 | S136 | 54HRC | Very high gloss, mirror effect | |||
| 8407 | 52HRC | ||||||
| IP(A2) | Ra0.01 | DF-2 | 58HRC | Lower shine, no sandpaper texture | |||
| XW-10 | 60HRC | ||||||
| IPD(A3) | Ra0.02 | S136 | 300HB | Even lower shine, but without sandpaper texture | |||
| 718SUPREME | 300HB | ||||||
| IPD(B1) | Ra0.05 | No shine, light 3000# sandpaper texture | |||||
| IPD(B2) | Ra0.1 | No shine, light 2000# sandpaper texture | |||||
| IPD(B3) | Ra0.2 | No shine, light 1000# sandpaper texture, indistinguishable stroke processing direction | |||||
| Ra0.4 | Precision processing: Precision turning\Precision planning\Precision milling\Grinding\Reaming\Scraping | Slightly discernible direction of processing traces | |||||
| Ra0.8 | Precision processing: Precision turning\Precision planning\Precision milling\Grinding\Reaming\Scraping | Discernible direction of trace processing | |||||
| Ra1.6 | |||||||
| Ra3.2 | |||||||
| Ra6.3 | |||||||
| Ra12.5 | |||||||
| Ra25 | |||||||
| Ra50 | |||||||
Reference table for the relationship between surface roughness and gloss (Unit: μm)
| Surface stiffness | GB1031-1983 | Surface gloss | GB1031-1968 | Surface condition |
| Frog | Frog | Note | ||
| 0.012 | 0.01 | ▽14 | Frosted mirror surface | |
| 0.025 | 0.02 | ▽13 | Shiny mirror-like surface | |
| 0.05 | 0.04 | ▽12 | Bright and shiny surface | |
| 0.1 | 0.08 | ▽11 | Glossy Dark Surface | |
| 0.2 | 0.16 | ▽10 | Unidentifiable machining tracking direction | |
| 0.4 | 0.32 | ▽9 | Slightly identifiable machining trace direction | |
| 0.8 | 0.63 | ▽8 | Identifiable machining trace direction | |
| 1.6 | 1.25 | ▽7 | Unrecognizable machining marks | |
| 3.2 | 2.5 | ▽6 | Slightly visible machining marks | |
| 6.3 | 5 | ▽5 | Visible machining marks | |
| 12.5 | 10 | ▽4 | Slightly visible tool marks | |
| 25 | 20 | ▽3 | Visible tool marks | |
| 50 | 40 | ▽2 | Clearly visible tool marks | |
| 100 | 80 | ▽1 | ||


