1. Preface
Two 4.6t steel ingots made of 1Cr17Ni2 developed serious transverse cracks during the forging process and one of them also developed serious longitudinal cracks, which had a significant impact on the batch products. To avoid similar problems in future production, an analysis was carried out to determine the causes of ingot breakage.
The ingot heating process involved holding the ingot at 500°C for 2 hours, then increasing the temperature to 850°C at a rate of 100°C per hour and maintaining that temperature for 2 hours. The temperature was then raised to 1180°C and held for 6 hours before the ingot was removed from the furnace for forging.
However, serious cracking occurred during the first compaction by fire.
2. On-site observation
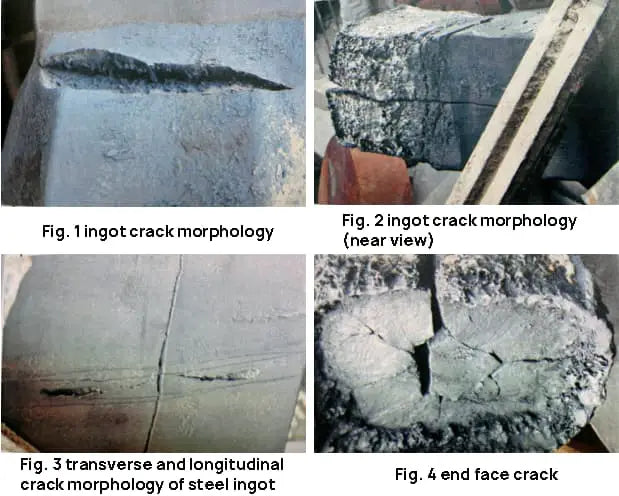
The surface of the ingot has numerous transverse cracks with wide openings. The longitudinal crack runs along the length of the ingot and is located in the center of the billet. The crack opening is narrow and both ends of the ingot, the head and tail, are broken, as illustrated in Figures 1 to 4.

The original fracture has oxidized and is grayish-black in color, a morphology caused by the high temperature typical of fractures.
3. Test analysis
3.1 Low magnification test analysis
The transverse test piece in the ingot crack was subjected to a hot acid leaching test. The results are displayed in Table 1.
Table 1 Hot acid leaching test of cross-section test piece
| Porosity/general grade | Central porosity/class | Ingot segregation/class | Defect morphology |
| 1.5 | 2.5 | 3.5 | There are many cracks, the longest is about 6 cm |
The cross-section of the steel ingot specimen is essentially square in shape, with an open fissure located in the center of one side. The crack is approximately 6mm deep, which corresponds to the vertical depth of the macro longitudinal crack in the steel ingot.
The edge of the specimen presents a columnar crystalline pattern and several small cracks, with a maximum length of around 10mm, as illustrated in Figures 5 to 7.
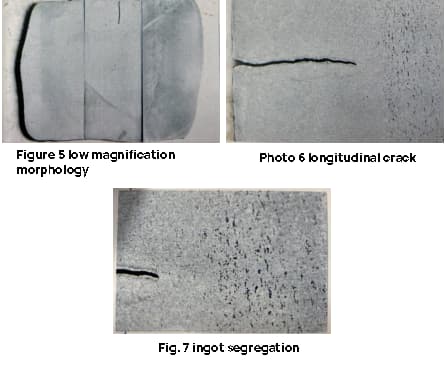
Test results indicate that the ingot exhibits severe shape segregation after forging (square pressing only), making it unqualified. The small cracks observed are related to the height of the columnar crystals in the cast ingot.
3.2 fracture test analysis
The artificial fracture is a typical cupped fracture, as shown in Fig.
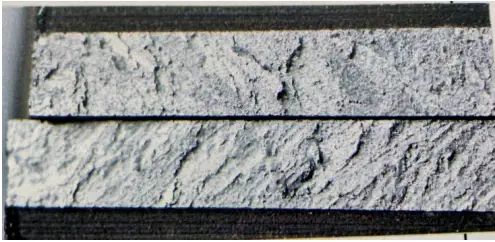
The test results reveal that the shell fracture is an abnormal fracture and its formation requires further analysis.
3.3 Analysis of chemical composition
Samples were taken from the surface of the steel ingot and from an R/2 site for chemical composition analysis. The results are presented in Table 2. The chemical composition met the technical requirements for 1Cr17Ni2 steel.
Table 2 Chemical composition of 1Cr17Ni2 steel (mass fraction) (%)
| Element | W | Mn | s | P | Yes | Cr | No | Al |
| Surface | 0.15 | 0.52 | 0.012 | 0.013 | 0.48 | 16.7 | 1.74 | 0.018 |
| R/2 | 0.15 | 0.53 | 0.012 | 0.013 | 0.49 | 16.8 | 1.77 | 0.018 |
3.4 Detection of non-metallic inclusion
A high magnification sample was taken from the test piece for detection of non-metallic inclusions and evaluated according to the microscopic inspection method for determining the non-metallic inclusion content in steel as specified by the standard classification table GB/T10561-2005 . . The results can be seen in Table 3.
Table 3 test results of non-metallic inclusions (grade)
| Position | Class A | Class B | Class C | Type D | Class D |
| edge | 0.5 | 1.0 | 0.5 | 0.5 | 0.5 |
| R/2 | 1.0 | 1.5 | 0.5 | 0.5 | 0.5 |
| essential | 1.0 | 1.0 | 0.5 | 0.5 | 0.5 |
The ingot was found to be of qualified purity, but contained many class B alumina inclusions.
3.5 Metallographic analysis
The metallographic structure and grain size of samples taken from different positions were tested and the results are presented in Table 4.
Table 4 Metallographic structure and grain size test
| Position | Grain size/grade | Metallographic structure |
| Edge | 5.0 | Low carbon ferrite + ferrite + intergranular carbide + lamellar structure |
| R/2 | 3.5 | Low carbon ferrite + ferrite + intergranular carbide + lamellar structure |
| Essential | 3.5 | Low carbon ferrite + ferrite + intergranular carbide + lamellar structure |
| Columnar crystal region | 3.5 | Low-carbon ferrite + ferrite + intergranular carbide + lamellar structure (structure distribution maintains columnar crystal morphology) |
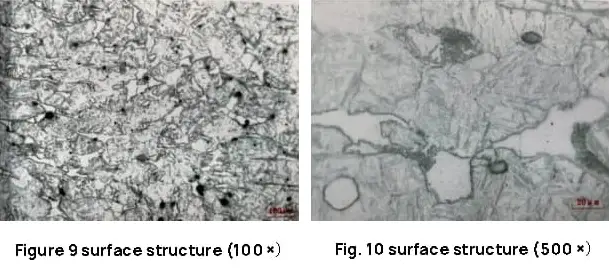
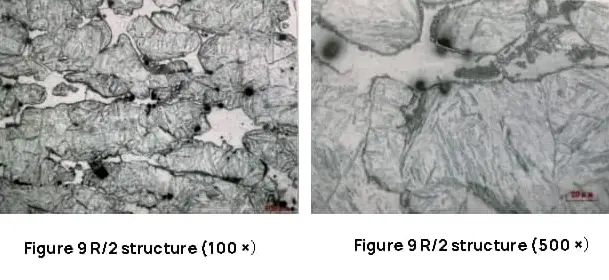
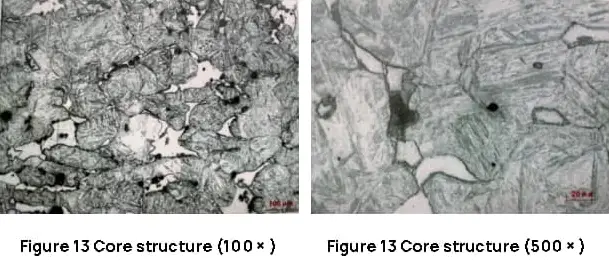
Test results indicate that the microstructure consists of low-carbon martensite, ferrite, intergranular carbides and a lamellar structure. Carbides are evenly distributed along grain boundaries and precipitated along the original columnar crystals, resulting in increased brittleness and decreased mechanical properties of the steel. The metallographic structure of each piece is represented in Figures 9 to 14.
3.6 Crack analysis
The micromorphology of small, low-magnification cracks is characterized by varying widths, intermittent appearance, diffuse boundaries, and discontinuous tips. In addition, there are very fine cracks located close to the small cracks that are arranged in an intermittent linear or island fashion.
After being treated with an aqueous solution of hydrochloric acid with a high content of iron chloride, the microstructure of small cracks and microcracks is mainly found along the ferrite with columnar crystalline distribution. There is no significant change in the microstructure close to the cracks, as shown in Figures 15 to 18.
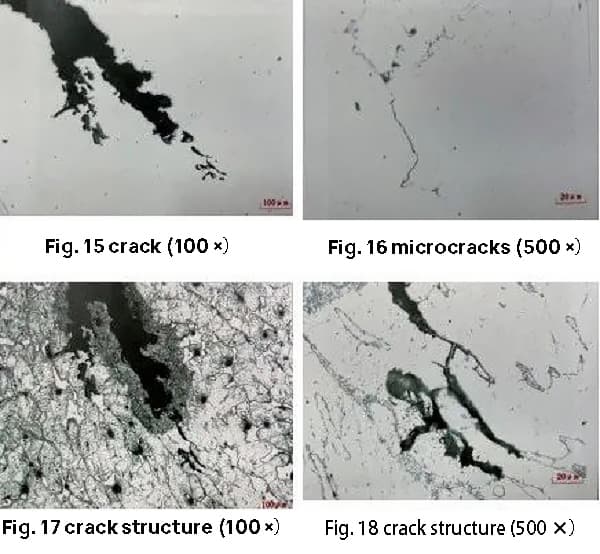
The results indicate that the small cracks and microcracks in the forgings are closely related to the carbides distributed throughout the columnar crystals in the molten state.
3.7 Microfracture analysis
The macroscopic cupped fracture is characterized by cleavage feathers and tear ridge lines that form between parallel cleavages when viewed under a scanning electron microscope. The mold-free crystal surface and locally visible second phase particles and inclusions can be seen, as depicted in Figures 19 to 22.
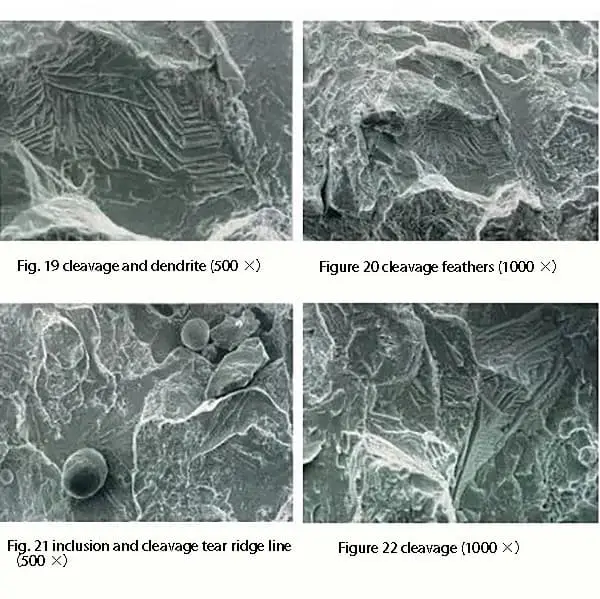
The source of the cleavage microcracks is located on the surface of the free crystal at the grain boundary. Energy spectrum analysis revealed that it mainly contains elements such as C, Al, Si, Cr, Ni, among which Al, Si, Cr and other elements have a composition higher than the average level, while the element Ni has a lower composition. The composition of the cleavage microregion is similar to the macrochemical composition.
The results indicate that the shell fracture is caused by the microsegregation of aluminum in the steel.
4. Discussion
The chemical composition test results indicate that the ingot material meets the technical specifications of 1Cr17Ni2 steel. However, the uniformity of the ingot structure is poor, and the ingot segregation was classified as grade 3.5, which is considered unqualified.
Ingot segregation is due to the accumulation of impurities and segregation of components at the junction between the columnar crystalline region and the central equiaxed crystalline region. Furthermore, there are numerous small cracks in the low-magnification columnar crystal region, with a microcrack morphology that resembles the carbide morphology of cast columnar crystals.
The post-forging structure of the ingot is composed of low-carbon martensite, ferrite, carbide and a lamellar structure, with a grain size of 3.5-5.0. The structure in the columnar crystalline region still maintains its columnar shape, with a large number of carbides distributed continuously in the grain boundary, which contributes to the fragility of the structure.
The shell-shaped fracture in the columnar crystalline region of the ingot is an abnormal fracture, with a microfracture that presents cleavage and tear ridges, indicating the fragility of the ingot. The source of the microcleavage crack is located on the free crystalline surface of the grain boundary and is caused by the presence of Cr-containing carbides and an Al-containing second phase.
When the aluminum content exceeds 0.09%, shell-shaped fracture is more likely to occur in the columnar crystal region. During the aluminum deoxidation process, if the aluminum content is not strictly controlled, a significant amount of aluminum waste may result. Although the original aluminum content in the molten steel meets the standards, due to the low melting point of aluminum, the aluminum concentration in the residual molten steel increases significantly, leading to the precipitation of a second phase containing aluminum in the dendritic form, which is a species of micro segregation.
When the crystallization process is slow, the second aluminum-containing dendritic phase precipitates from the residual molten steel and is pushed to the grain boundary of primary crystallization. If the matrix crystallization rate exceeds a critical rate, the second phase becomes trapped in the growing crystal and eventually increases sensitivity to intergranular fracture.
The steel ingot heating process involves heating to 500°C for 2 hours, then heating to 850°C at a rate of 100°C per hour for 2 hours, heating to 1180°C for 6 hours, and then finally, the removal of the steel ingot. the furnace for forging.
1Cr17Ni2 is a martensitic-ferritic duplex stainless steel that is brittle at 475°C. It is advisable to avoid prolonged heating in the temperature range of 400-525°C. When 1Cr17Ni2 steel is heated above 900°C, its grain growth tendency increases, causing an increase in brittleness and worsening forging conditions.
5. Conclusion
The results of the chemical composition analysis show that the ingot material complies with the technical specifications of 1Cr17Ni2 steel. However, the uniformity of its microstructure is inadequate and ingot segregation is significant.
The post-forging structure of the steel ingot is poor, the main cause being an inadequate heating process design that increases the risk of brittleness at 475°C. Furthermore, slow cooling of the ingot during casting leads to precipitation of an aluminum-containing phase in the columnar crystalline region, which increases sensitivity to intergranular fractures.
These two factors combine to cause cracking during forging.

