During a tightness test on the head of a gasoline engine, water leaked and, after disassembling and inspecting the engine, cracks were found in the spark plug bushing. The bushing material was determined to be cast brass ZCuZn38 (H62), which is a common non-ferrous metal alloy used in various industries.
The process flow is: copper bar casting → hot pressing → machining → assembly and testing.
1. Test method
The chemical composition of the cracked bushing was analyzed using an OBLF direct reading spectrometer. The bushing was also examined metallographically with a Zeiss Axio metallographic microscope, and the sample was cut with a wire. Microscopic observation and analysis of the composition of microareas of the cracks were carried out using a Zeiss EVO18 scanning electron microscope equipped with an X-ray energy spectrometer.
2. Test results
2.1 Chemical composition test
Use direct reading spectrum to detect the chemical composition of the bushing.
See Table 1 for results.
Comply with cast copper and copper alloy requirements GB/T 1176-2013.
Table 1 Chemical composition (mass fraction) of the bushing (%)
| element | Ass | Zn | Al | P | Sn | Sb | Faith | Conclusion |
| Prototype | 61.5 | 38.15 | 0.078 | <0.001 | 0.036 | <0.001 | 0.124 | qualified |
| GB/T1176-2013 | 60.0~63.0 | rest | – | – | – | – | <0.15 | – |
2.2 Macro observation
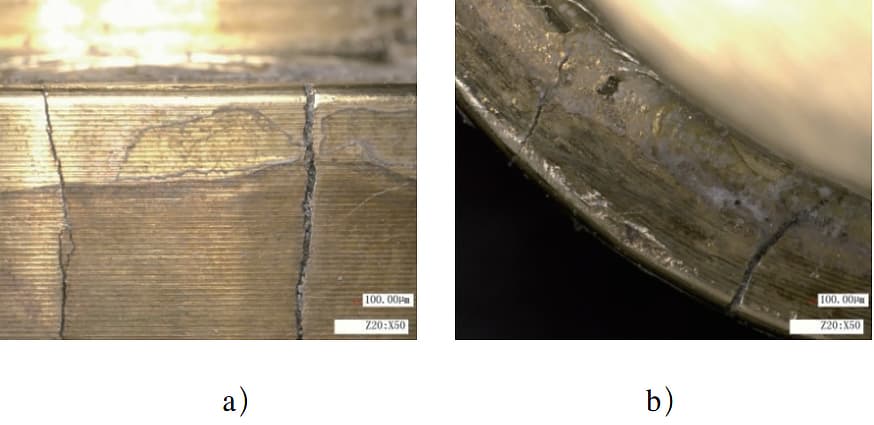
There are two cracks present in the bushing, which run down from the shoulder in the axial direction. The cracks are straight and run almost parallel to each other. Additionally, there is evidence of green sealant in the shoulder chamfer. As depicted in Fig. 1, the crack extends into the ledge and gradually becomes narrower, indicating that it began on the outer wall of the ledge before extending downward and inward.

Fig. 1 Macro appearance of cracks in the bushing
2.3 Microobservation
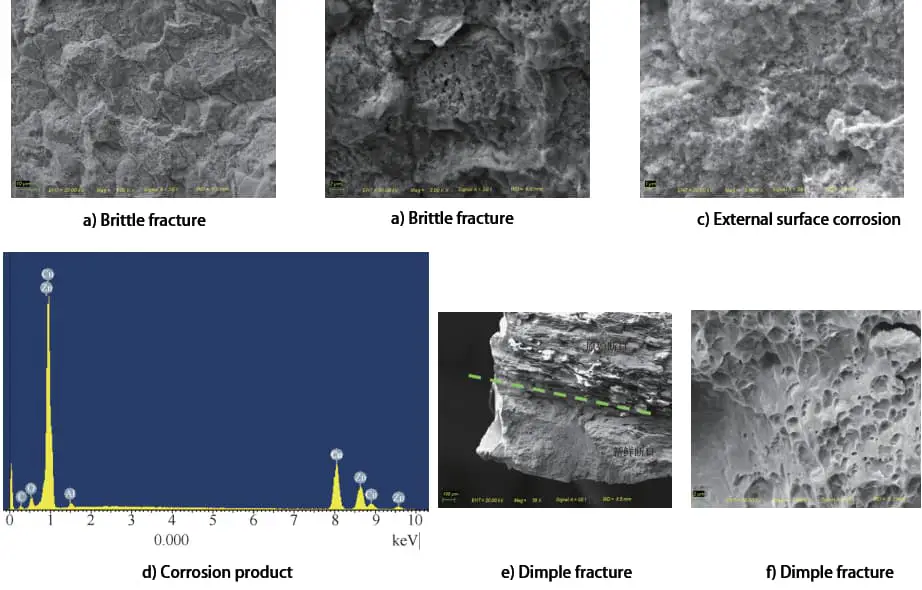
An electron microscope scan reveals the presence of a layer of flakes close to the outer surface of the bushing, as depicted in Fig. 2a and Fig. 2b. The entire fracture surface exhibits brittle fracture, including intergranular fractures that resemble crystal sugar, some transgranular fractures and corrosion products, and small corrosion pits at the grain boundary. The corrosion products mainly consist of O, Cu, Zn and Al, as shown in Fig. 2c and Fig. 2d.
The recent artificial rupture fracture exhibits a clear and clean parabolic dimple with a normal fracture morphology, as shown in Fig. Furthermore, laminated strips along the axial direction are visible on the original fracture surface.

Fig. 2 SEM of bushing fracture
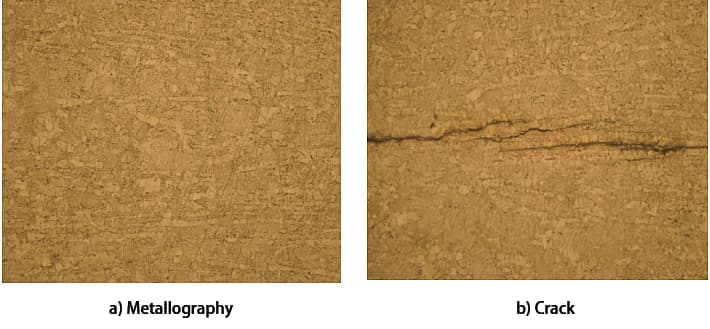
The grinding, polishing and corrosion process was carried out in the axial direction, and the crack and metallographic structure were observed, as shown in Fig. 3. The crack is irregular and continuous, with branches and sharp tips resembling a tree, which is consistent with the typical characteristics of a stress corrosion cracking.
Based on these observations, we have made a preliminary determination that the crack is in fact a stress corrosion cracking. The metallographic structure is composed of the α phase and a small amount of the pointed β phase. There are also prominent slip lines present on the structure, and the banded structure of the cracked bushing is clearly visible.

Fig. 3 Metallographic Structure of Cracks
2.4 Finite element analysis
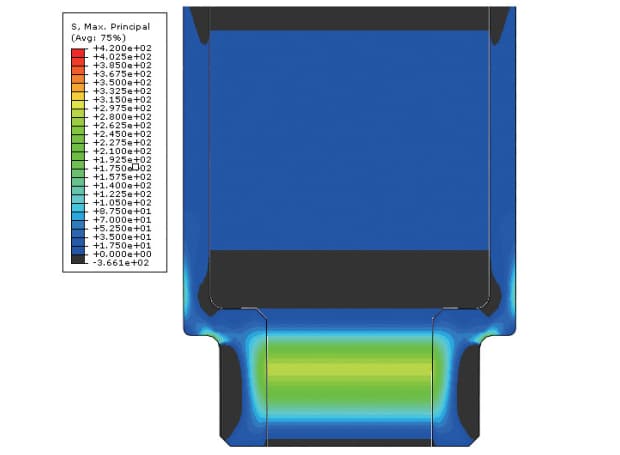
The bushing is designed with interference fit, with the amount of interference ranging from 0.069mm to 0.100mm. The bushing assembly tension (without spark plug) was analyzed using the finite element method.
Figure 4 shows the first main stress cloud diagram of the bushing configuration. The light areas represent regions of tensile stress. It can be seen that the tensile stress is high on the outer wall and the outer wall of the chamfer above the bushing shoulder, as well as the inner surface of the thin neck, which is consistent with the actual position of the crack origin.
Despite the high tensile stress present on the inner surface of the bushing's thin neck, there is no sealant or conditions for stress corrosion cracking.

Fig. 4 Cloud Plot of First Principal Voltage in Cladding Configuration
3. Conclusion and Analysis
The raw bushing is formed by hot pressing at a process temperature of 650-800°C. After pressing, the blank is allowed to cool to room temperature.
According to the data, all brass materials have a brittle zone between 200-700°C, and the hot pressing temperature should not be lower than 700°C. A lower temperature limit increases the risk of cracking, increases the difficulty of forming the blank and leads to higher residual stress.
During the machining process, the bushing is subjected to repeated tool contact and forces, leading to size changes and the creation of residual stresses. Furthermore, the finishing process carried out on the CNC machine uses cutting fluid that contains additives such as S and halogens, exposing the bushing to a humid and corrosive environment for a certain period of time.
The bushing and cylinder head have an interference fit. After assembly, the pressure creates a large tensile stress on the outer wall above the bushing shoulder and the outer wall of the chamfer.
The sealant material applied to the bushing shoulder during assembly is made of methacrylate and contains an amino catalyst, providing a weak corrosion environment for the bushing. When the cylinder head is subjected to a hydrostatic seal test, the outer wall of the bushing shoulder is subjected to stress, leading to the rapid development and expansion of cracks.
Despite the high tensile stress on the inner surface of the bushing's thin neck, it does not come into contact with the sealant and therefore the conditions for stress corrosion cracking are not favorable.
4. Conclusion
1) The cause of coating cracking is brittle intergranular cracking due to stress corrosion cracking.
2)Bushing cracks occurred in large numbers within a specific period of time, and there were no previous incidents of batch crack failure.
Based on analysis, it was determined that there was a quality issue with the bushing in this batch. The residual stress from bushing processing was very high, which combined with the additional tensile stress during assembly and the weak corrosion environment provided by the sealant (or cutting fluid during processing), led to corrosion cracking of the bushing under voltage.


