Basic concepts
Alloying elements are chemical elements specifically added to steel to ensure the desired structural, physical, chemical and mechanical properties.
Impurities refer to chemical elements that are introduced during the casting process through raw materials or casting methods.
Carbon steel is an iron-carbon alloy with carbon content ranging from 0.0218% to 2.11%.
Alloy steel is steel to which a certain amount of carbon steel-based alloying elements has been added.
Low alloy steel generally refers to steel with a total alloying element content of less than or equal to 5%.
Medium alloy steel generally refers to steel with a total alloying element content between 5% and 10%.
High-alloy steel generally refers to steel with a total alloying element content of more than 10%.
Microalloyed steel is steel that has alloying elements (such as V, Nb, Ti, Zr, B) with a content of less than or equal to 0.1%, which can significantly affect the structure and properties.
Steel line
Common Impurities in Carbon Steel
1. Manganese (MN) and silicon (SI)
Manganese (Mn) enters steel during steelmaking through deoxidizers or residual pig iron. In carbon steel, the Mn content is normally less than 0.8%. It can dissolve in steel and also form high melting point (1600°C) MNS inclusions.
MnS inclusions have a certain plasticity at high temperatures and do not cause hot embrittlement of the steel. After processing, manganese sulfide is distributed in strip form along the rolling direction.
The silicon (Si) content in steel is generally less than 0.5%. It can also dissolve in steel and form SiO inclusions.
Although Mn and Si are beneficial impurities, the presence of MnS and SiO inclusions can reduce the fatigue strength, plasticity and toughness of steel.
2. Sulfur (S) and phosphorus (P)
S: The solubility of S in solid iron is very small. When S and Fe combine, they can form FeS, which facilitates the formation of a low-melting eutectic. This can lead to thermal embrittlement and cracking.
Q: Although it is soluble in α-Iron, the presence of phosphorus significantly reduces the toughness of the steel, especially at low temperatures, which is known as cold embrittlement. However, phosphorus can improve the corrosion resistance of steel in the atmosphere.
S and P are considered harmful impurities in steel. However, they can improve the machinability of steel.
3. Nitrogen (N), hydrogen (H), oxygen (O)
N: Steel containing supersaturated n precipitates nitrides after cold deformation, through a process known as mechanical aging or creep aging.
Additionally, N can form stable nitrides with elements such as vanadium, titanium and chromium, which can lead to grain refinement and precipitation strengthening.
H: The combined effect of residual stress and hydrogen can cause embrittlement in the steel, which can lead to material failure.
Ó: Steel can form silicate compounds such as 2MnO · SiO2, MnO · SiO, or oxide compounds such as MgO · Al2O3, MnO · Al2O3.
N, H and O are considered harmful impurities in steel.
Classification of Carbon Steel
1. According to the carbon content in steel
1) Classification according to Fe Fe 3 C phase diagram
- Hypoeutectoid steel: 0.0218% ≤ W C ≤ 0.77%
- Eutectoid steel: W c =0.77%
- Hypereutectoid steel: 0.77% < W C ≤ 2.11%
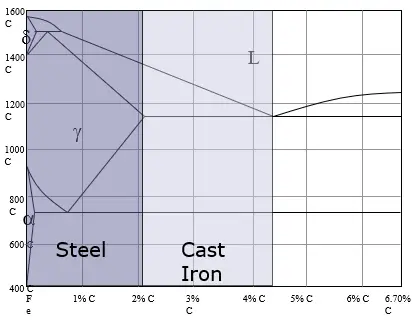
2) Classification by carbon content in steel
- Low carbon steel: W C ≤ 0.25%
- Medium carbon steel: 0.25% < W C ≤ 0.6%
- High carbon steel: W C > 0.6%
2. According to the quality of steel (quality)
(1) Ordinary carbon steel:
C S ≤ 0.05%, W P ≤ 0.045%.
(2) High quality carbon steel:
c S ≤0.035%,w P ≤0.035%
(3) High quality carbon steel:
c S ≤0.02%,w P ≤0.03%
(4) Super quality carbon steel:
c S ≤0.015%,w P ≤0.025%
3. Classification according to the use of steel
(1) Carbon Structural Steel:
Carbon structural steel is mainly used in various engineering components, including bridges, ships, building components, etc. Furthermore, it can also be used on less critical parts.
(2) High Quality Carbon Structural Steel:
High-quality carbon structural steel is mainly used in manufacturing various machine parts, such as shafts, gears, springs, connecting rods, etc.
(3) Carbon tool steel:
Tool carbon steel is mainly used in the manufacture of various tools such as cutting tools, molds, measuring tools, etc.
(4) Cast Carbon Steel for General Engineering:
General engineering cast carbon steel is mainly used in the manufacture of parts with a complex shape that requires certain strength, plasticity and toughness.
4. Classification according to the degree of deoxidation during steel casting
(1) Rimmed steel refers to steel with incomplete deoxidation, code F.
(2) Dead steel refers to steel with complete deoxidation, with code called Z.
(3) Semi-finished steel refers to steel with a degree of deoxidation between edge steel and dead steel, with code B.
(4) Special dead steel refers to steel with special deoxidation, with code called TZ.
Use of Carbon Steel
1. Common carbon structural steel
The. It is mainly used for general engineering structures and common parts.
It is generally rolled into steel plates, steel strips, steel tubes, wire rod, steel profiles, steel bars or various profiles (round steel, square steel, I-beam, reinforcement, etc.), which can be used for welding, riveting, screws and other structural parts.
It is widely used (more than 70% of total steel production).
B. Air cooling after hot rolling is the usual supply state for this type of steel.
Users generally do not need to perform heat treatment, but use it directly.
c C =0.06%~0.38%.
When the quality grade is “A” and “B”, the chemical composition can be adjusted appropriately according to the demander's needs with guaranteed mechanical properties.
w. Common Carbon Structural Steel Designation
It is composed of letters (Q) representing the yield limit, yield limit value, quality grade symbols (A, B, C, D) and deoxidation method symbols (F, b, Z, TZ) in sequence .
The yield limit value is divided into five resistance grades: 195, 215, 235, 255 and 275;
The grade symbol refers to the quality grade symbol used exclusively for this type of steel, which is also divided according to the number of impurities S and P. Four symbols A, B, C and D represent four grades, among which:
- Class A wS ≤ 0.05%, W P ≤ 0.045%,
- Class B wS ≤ 0.045%, W P ≤ 0.045%,
- Class C wS ≤ 0.04%, W P ≤ 0.04%,
- Level D wS ≤ 0.035%, W P ≤ 0.035%
Among them, the highest quality grade is D grade, which reaches the high quality grade of carbon structural steel. Classes A, B and C all belong to the range of normal classes.
The deoxidation method symbol may be omitted in the dead steel and special dead steel grades.
d. Typical brand, performance and application
Q195, Q215:
The carbon content is very low and the strength is not high, but it has good plasticity, toughness and welding performance.
It is often used as workpieces with low strength requirements, such as nails, iron wires, steel windows and various thin plates.
Q235A, Q255A:
It is used for tie rods, small shafts, chains, etc. in agricultural machinery and tools.
It is also used for building reinforcement, steel sheets, steel profiles, etc.;
Q235B, Q255B:
It is used as welded structural parts with high quality requirements in construction projects, and general rotating axles, hooks, bicycle frames, etc.
Q235C, Q235D:
The quality is good and can be used as some important welding structural parts and machine parts.
Q255, Q275:
The strength is high, among which Q275 is the medium carbon steel, which can be used to manufacture friction clutch, brake steel belt, etc.
2. High quality carbon structural steel
(1) For important mechanical parts, the mechanical properties of the parts can be adjusted through various heat treatments.
(2) The supply state can be air cooling after hot rolling, annealing, normalizing and other states, which generally depends on the needs of users.
(3) The brand is generally represented by two digits.
These two numbers represent ten thousand times the average mass fraction of carbon in steel, such as steel 20 and steel 45.
The. Three types of high-quality carbon structural steel are rimmed steels, which are 08F, 10F and 15F.
Semi-dead steel is marked with “b” and dead steel is generally not marked with symbols.
B. High-quality carbon structural steel is marked with “A” after the brand, and high-quality carbon structural steel is marked with “E”.
w. For high-quality special carbon structural steels, a symbol representing the purpose of the product should also be added at the beginning (or end) of the mark, such as boiler steel with an average carbon content of 0.2%, whose mark is “20g” , etc.
d. High-quality carbon structural steel is divided into two groups: common manganese content and higher manganese content according to different manganese content.
For the high manganese group, add “Mn” at the end of your number, such as 15Mn, 45Mn, etc.
It is. There are 31 types of high-quality carbon structural steel
08F steel: low carbon mass fraction, good plasticity and low resistance.
It can be used for all types of cold deformation forming parts.
Steel 10~25: It has good welding and cold stamping properties and can be used to manufacture standard parts, shaft sleeves, containers, etc.
It can also be used to manufacture wear-resistant and impact-resistant parts with high surface hardness and high strength and toughness at the heart.
Such as gears, cams, pins, friction plates, cement nails, etc.
45 medium carbon steel: good comprehensive mechanical properties can be obtained by suitable heat treatment.
It can be used for mechanical parts such as transmission shaft, engine connecting rod, machine tool gear, etc.
High carbon structural steel: after appropriate heat treatment, it can obtain high elastic limit, yield index, sufficient toughness and wear resistance.
It can manufacture springs, heavy rails, rollers, paddles, steel cables, etc. with small wire diameters.
High Quality Carbon Structural Steel Grades, Performance Characteristics and Applications
| Note | Performance characteristics | Usage examples |
| 08F, 08, 10 | Good plasticity, toughness and low strength | Cold-rolled sheets, steel strips, steel wires, steel sheets, stamping products such as shells, containers, covers, bullet cartridges, instrument panels, gaskets, washers, etc. |
| 15, 20, 25, 15 minutes, 20 minutes | Good plasticity and toughness, with a certain degree of strength | Load-bearing parts that do not require heat treatment, such as screws, nuts, tie rods, flanges, carburized parts that can be formed into gears, shafts, cams, etc. |
| 30, 35, 40, 45, 50, 55, 30Mn, 40Mn, 50Mn | Good strength, plasticity and toughness | It mainly produces parts such as gears, connecting rods and shafts, among which 40 steel and 45 steel are widely used. |
| 60, 65, 70, 60Mn, 65Mn | High elasticity and resistance to flow | They often produce elastic and easily worn parts, such as springs, spring washers, rollers, plows, etc. |
3. Tool carbon steel
(1) It is mainly used to make various small tools.
It can be quenched and tempered at low temperature to obtain high hardness and high wear resistance.
It can be divided into high-quality carbon tool steel and high-quality carbon tool steel.
(2) The trademark is generally expressed by the symbolic symbol “T” (the Chinese phonetic prefix for carbon) plus a thousand times the mass fraction of carbon. Such as T10, T12, etc.
Generally, high-quality carbon tool steel does not add the quality grade symbol, while high-quality carbon tool steel adds the word “a” after its number, such as T8A, T12, etc.
(3) The mass fraction of manganese in tool steel containing manganese can be expanded to 0.6%.
At this time, Mn is marked at the end of the mark, such as T8Mn, T8MnA.
(4) Typical carbon tool steel
T7, T8: suitable for manufacturing cutting tools that withstand certain impact and require high toughness, such as woodworking axes, bench chisels, etc. the hardness after low temperature quenching and tempering is 48~54HRC (working part);
T9, T10, T11 steel: It is used to manufacture cutting tools that require high hardness and wear resistance due to small impacts, such as small drills, taps, hand saw blades, etc. 62HRC.
T10A steel can also be used to manufacture some cold working molds and measuring tools with simple shape and small workload;
T12 and T13 steel: hardness and wear resistance are the highest, but toughness is the worst.
It is used in the manufacture of cutting tools that do not suffer impact, such as files, shovels and scrapers. The hardness after low temperature quenching and tempering is 62 ~ 65 HRC.
The T12A can also be used to manufacture measuring tools.
T7~t12 and T7A~T12A can also be used for plastic molds with simple shapes.
Class, performance characteristics and application of tool carbon steel
| Note | Performance characteristics | Usage examples |
| T7, T7A, T8, T8A, T8Mn | Good toughness with a certain hardness | Woodworking tools, assembly tools such as hammers, chisels, molds, scissors, etc. T8Mn can be used to manufacture tools with larger cross sections |
| T9, T9A, T10, T10A, T11, T11A | Greater hardness and certain tenacity | Low-speed tools such as planers, taps, dies, saw blades, gauges, dies, and drawing dies |
| T12, T12A, T13, T13A | High hardness and low toughness | Low-speed tools that are not subject to vibration, such as files, scrapers, surgical tools, and drills |
4. General engineering cast carbon steel
(1) It is mainly used for rough cast iron parts that cannot guarantee their plasticity and their shape is complex, which is not convenient for forging.
Its carbon content is generally less than 0.65%.
(2) The brand is represented by the symbol “ZG” (the Chinese phonetic prefix for cast steel) plus the minimum value of the yield strength – the minimum value of tensile strength.
For example, ZG340-640 refers to cast steel with yield strength of not less than 340MPa and tensile strength of not less than 640MPa.
(3) Typical carbon cast steel
(4) Other types of steel castings include:
Carbon steel castings for welded structures
(GB/T7659-1987), such as ZG230-450H;
Low Alloy Steel Castings
(GB/T14408-1993), such as ZGD535-720;
Heat Resistant Steel Castings
(GB/T8492-1987), such as ZG40Cr30Ni20;
Stainless steel and acid-resistant castings
(GB2100-1980), such as ZG1Cr18Ni9Ti;
Medium and high strength stainless steel castings (GB6967-1986), such as ZG10Cr13Ni1Mo, etc.
Properties of Carbon Steel
Materials are the material basis of machines. The properties of metallic materials are the main basis for material selection.
The properties of metallic materials are generally divided into process performance and service performance.
Process performance refers to the properties of metallic materials exhibited under various processing conditions, from casting to finished products; Service performance refers to the properties of metallic materials exhibited by metallic parts under conditions of use.
The service performance of metallic materials determines their scope of use. Service performance includes physical, chemical and mechanical properties.
1. Physical properties.
(1) Density
The density of a metal is the mass of a unit volume of the metal, expressed in kg/m 3 .
Based on their density, metallic materials can be classified into light metals and heavy metals. Metals with a density of less than 4.5 g/cm 3 are called light metals, such as aluminum, titanium, etc.
(2) Melting point
The temperature at which a metal passes from a solid to a liquid state is called its melting point, usually expressed in degrees Celsius (℃). Each metal has a fixed melting point. For example, the melting point of lead is 323℃ and the melting point of steel is 1538℃. Melting point is important for refining, smelting, welding and alloying.
Metals with a melting point below 1000℃ are called low melting point metals, those with a melting point between 1000 and 2000℃ are called medium melting point metals, and those with a melting point greater than 2000℃ are called of high melting point metals. metals with melting point.
(3) Thermal conductivity
The ability of a metallic material to conduct heat is called thermal conductivity. The thermal conductivity quality of metallic materials is generally expressed in terms of thermal conductivity (thermal conductivity coefficient) λ.
Metals with high thermal conductivity have good thermal conductivity. In general, metallic materials have better thermal conductivity than non-metallic materials. Silver has the best thermal conductivity of all metals, followed by copper and aluminum.
Metals with good thermal conductivity also have good heat dissipation and can be used in the manufacture of heat dissipation parts such as radiator fins for refrigerators and air conditioners.
(4) Thermal expansion
When a metallic material is heated, its volume will increase and shrink when cooled. This phenomenon is called thermal expansion. Different metals have different thermal expansion properties.
In practical work, the effect of thermal expansion must sometimes be considered. For example, some precision measuring tools must be made of metals with small coefficients of expansion; laying tracks, erecting bridges, measuring dimensions in machining processes, etc. all need to consider the thermal expansion factor.
(5) Electrical conductivity
The ability of a metallic material to conduct electricity is called electrical conductivity. However, the electrical conductivity of each metal is different. Silver has the best electrical conductivity of all metals, followed by copper and aluminum.
In industry, copper and aluminum are used as conductive materials. High strength and low electrical conductivity metal materials such as iron-chromium alloys, nickel-chromium-aluminum alloys, Constantan, manganese-copper, etc. are used to manufacture instrument parts or electrical heating elements such as furnace wires.
(6) Magnetism
The ability of a metal to conduct magnetic flux is called magnetism. Metallic materials with magnetic conductivity can be attracted to magnets.
Iron, cobalt, etc., are ferromagnetic materials, and manganese, chromium, copper and zinc are diamagnetic or paramagnetic materials.
However, for some metals, magnetism is not fixed and unchanging, such as iron which does not show magnetism or paramagnetism above 768 ℃.
Ferromagnetic materials can be used to make transformer cores, motor cores, measuring instrument parts, etc.; Diamagnetic or paramagnetic materials can be used for parts that do not require magnetic field interference.
2. Chemical properties.
The chemical properties of metallic materials refer to the properties exhibited by metals under chemical reactions.
(1) Corrosion resistance
The ability of a metallic material to resist corrosion from oxygen, water vapor and other chemical media at normal temperature is called corrosion resistance. Steel rust is a common example of corrosion.
(2) Oxidation resistance
The ability of a metallic material to resist oxidation is called oxidation resistance. When a metallic material is heated, the oxidation reaction accelerates.
For example, during heating operations such as forging, heat treatment and welding of steel, oxidation and decarburization can occur, causing material loss and various defects.
Therefore, when heating billets or materials, a reducing gas or shielding gas is often formed around them to prevent oxidation of metal materials.
(3) Chemical stability
Chemical stability refers to the sum of the corrosion and oxidation resistance of metallic materials. The chemical stability of metallic materials at high temperatures is called thermal stability.
Metallic materials used in the manufacture of parts that operate at high temperatures must have good thermal stability.
3. Mechanical properties.
Mechanical properties, also known as strength properties, refer to the properties exhibited by materials under the action of forces.
The main mechanical properties include strength, plasticity, hardness, toughness and fatigue resistance.
(1) Strength
Strength refers to the ability of a metal to resist permanent deformation (plastic deformation) and fracture. Commonly used strength criteria are yield point (formerly known as yield point or yield point) and tensile strength.
The method for determining resistance criteria is through a tensile test.


Tensile curve: the relationship between tensile force (F) and elongation (l-lo).

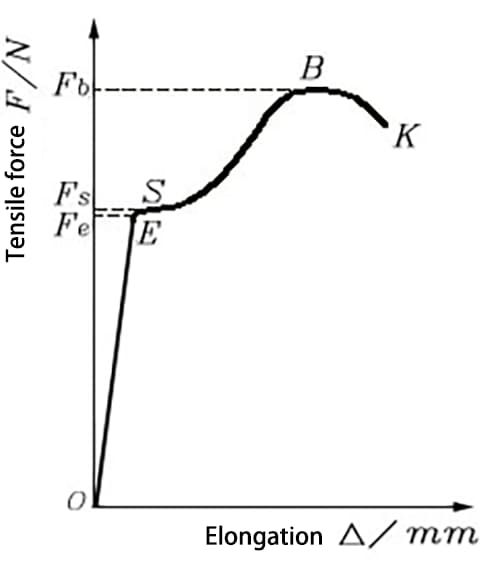
When a material is subjected to external forces, the internal interaction force between the elements of the material is called internal force, which is equal in magnitude and opposite in direction to the external force. The internal force per unit area is called stress and is denoted by the symbol σ.
elastic limit
The maximum stress that a sample can withstand when it undergoes complete elastic deformation.
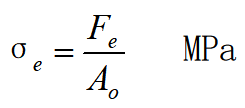
where σ e is the elastic limit in units of stress (such as MPa or psi), Fe is the maximum tensile force that the sample can withstand when it undergoes complete elastic deformation, measured in units of force (such as N or lbf), and A ó is the original cross-sectional area of the sample, measured in area units (such as mm 2 or em 2 ).
Yield point
Definition: The stress at which a sample stops behaving elastically and becomes permanently deformed during the testing process, while the force remains constant or decreases.
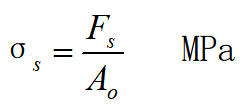
Where:
F is – Tensile force when the specimen undergoes yielding, in N.
A ó – Original cross-sectional area of the sample, in mm 2 .
Conditional yield strength:

Tensile strength
Definition: The maximum stress a specimen can withstand before breaking during the tensile testing process.

Where:
F b – The maximum tensile force that the sample can withstand before breaking, in N.
A ó – Original cross-sectional area of the sample, in mm 2 .
Ratio between yield strength and tensile strength (σ é /σ b )
Engineering materials require not only high tensile strength, but also a certain ratio of yield strength to tensile strength (σ is /σ b ). The lower the ratio of yield strength to tensile strength, the greater the reliability of the component and it will not immediately break under overload during use. However, if the ratio of yield strength to tensile strength is too small, the effective utilization rate of material strength will decrease.
(2) Plasticity
It refers to the ability of a material to undergo irreversible and permanent deformation before breaking. The ductility criterion is determined by the elongation after fracture and the reduction in cross-sectional area.
(1) Stretching after fracture
Elongation after fracture refers to the percentage increase in the length of the specimen after it breaks during the tensile testing process compared to its original reference length.

It refers to the ability of a material to undergo irreversible and permanent deformation before breaking. The ductility criterion is determined by the elongation after fracture and the reduction in cross-sectional area.
(2) Reduction of cross-sectional area after fracture
Reduction in cross-sectional area after fracture refers to the percentage decrease in the maximum reduction in cross-sectional area at the pinch point of the sample after it has broken during the tensile testing process compared to its original cross-sectional area .

(3) Hardness
Hardness is a measure of a material's ability to resist local deformation, particularly plastic deformation, indentation or scratching. It determines whether a material is soft or hard.
Currently, the most commonly used hardness testing methods are Brinell hardness test, Rockwell hardness test and Vickers hardness test.
(1) Brinell hardness

Where:
- Ap – Spherical surface of the indentation, in mm 2 .
- D – Diameter of the indenter, in mm.
- d – Average diameter of the indentation, in mm.

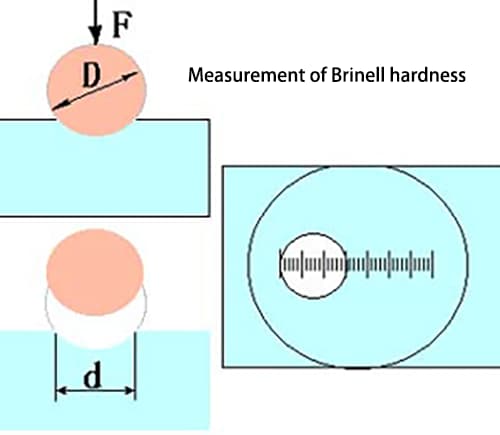
(The test force F is measured in kgf)
The method of representing Brinell hardness is as follows:
- 140HBS10/10000/30
- 500HBW5/7500
Typically, when specifying the Brinell hardness value for a material requirement in a part drawing or process document, the test conditions are not specified. Only the required hardness range and hardness symbol are marked, such as 200~230HBS.
HBS is used to test materials with hardness value less than 450; HBW is used to measure materials with hardness value in the range of 450-650.
Brinell hardness is mainly used to determine the hardness of cast iron, non-ferrous metals and annealed, normalized and quenched and tempered steel materials such as semi-finished products and raw materials.
(2) Rockwell hardness

In the formula, C is a constant. When the indenter is a diamond cone, C = 100; when the indenter is a hardened steel ball, C = 130.
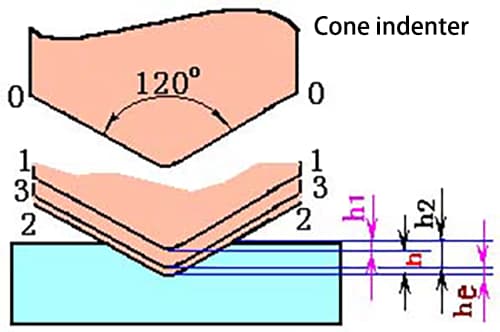
1- The position of the plunger after adding the initial load.
2- The position of the plunger after adding the initial load and the main load.
3- The position of the plunger after removing the main load.
ele: Elastic recovery after removal of the main load.
| Rockwell Scale Common Specification | ||||
| Hardness symbol | Head type | Total test force (kgf) | Effective hardness value range | Application examples |
| HR | 120° diamond cone | 60 | 60~88 | Hard alloy, surface quenching, carburizing steel, etc. |
| HRB | φ 1,588mm steel ball | 100 | 20~100 | Non-ferrous metals, annealed, standardized steel, etc. |
| CDH | 120° diamond cone | 150 | 20~70 | Hardened steel, quenched and tempered steel, etc. |
Note: Total test force=initial test force+main test force; The initial test force is 10kgf (98.07N)
Taking GCr15 steel quenched and tempered at low temperature as an example, measure the HRC value.
Rockwell hardness does not have a unit of measurement, therefore the hardness scale symbol must be indicated. The hardness value is written before the symbol, such as 60HRC, 80HRA and 90HRB. There is no correspondence between the different Rockwell hardness scales, so hardness values cannot be directly compared.
The Rockwell hardness test is simple, quick and leaves a small mark. It is mainly used to test finished parts with high hardness after heat treatment and thin parts. For materials with irregular structure and hardness, the hardness value fluctuates greatly and its accuracy is not as good as that of Brinell hardness values.
(3) Vickers hardness

In the formula,
- F is the test force in Newtons (N),
- Ao is the surface area of the indentation in square millimeters (mm²),
- d is the arithmetic mean of the diagonal lengths of the indentation in millimeters (mm).
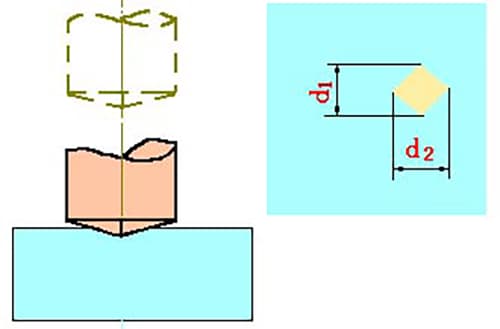
Taking T8A steel quenched and tempered at low temperature as an example, measure the HV value.
Vickers hardness values are usually not marked with units and the hardness value is written before the symbol HV.
The Vickers hardness test has a small testing force (commonly used 49.03N), shallow indentation, clear profile, accurate results, and a wide testing force selection range (49.03 ~ 980.7N). Therefore, it can measure the hardness of materials from soft to hard, and the Vickers hardness values can be directly compared.
Vickers hardness is commonly used to test the hardness of thin sheet materials, metal coatings, and layers of surface-hardened parts. However, the test is complicated and not suitable for routine inspections in mass production.
Special Note: Hardness values obtained by various hardness testing methods cannot be directly compared. They must be converted to a given hardness value using a hardness conversion table before comparing relative hardness.
(4) Toughness and fatigue resistance
(1) Resilience
Toughness refers to the ability of a metal to absorb strain energy before fracture, which can be used to measure the resistance of a metallic material to impact loads.
The toughness criterion is determined through impact tests.
40Cr Steel Impact Absorption Energy Measurement Test:
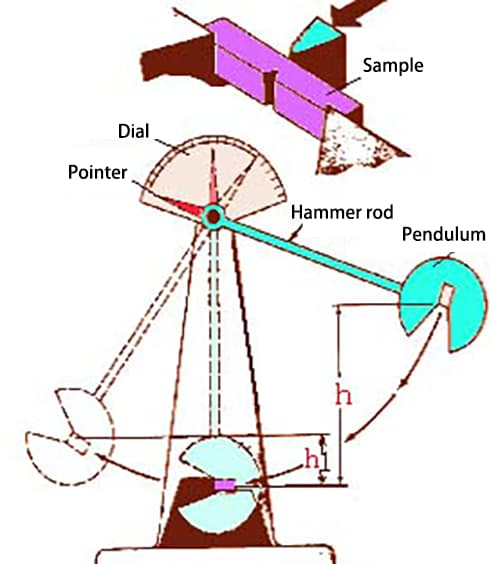
(5) Fatigue resistance
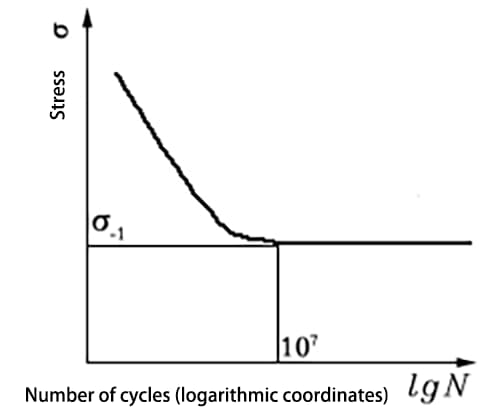
Cyclic stress: The magnitude and direction of stress undergo periodic changes over time.
The phenomenon of fracture of a component under cyclic stress, often at a stress level much lower than the σ of the material b or even lower than its σ is strength, is called metal fatigue. The criterion for metal fatigue is fatigue strength.

It has been proven that when the stress level σ is below a certain value, the material can undergo an infinite number of cyclic stresses without fracturing, and this stress level is called fatigue strength.
In engineering, fatigue strength refers to the maximum stress that does not cause fracture under a certain number of cycles.
Generally, the stress cycle number is set as 10 8 for steel materials and 10 7 for non-ferrous metals.
The reasonable design of component structure, avoid stress concentration, reduce surface roughness values, surface lamination, shot peening treatment, surface heat treatment, etc.
