Abstract:
The residual stress of the butt joint of the X80 steel pipeline was simulated through finite element analysis, and the residual stress distribution was obtained.
The prediction results were verified by X-ray diffraction and blind hole method.
The results show that the general changing trend of circumferential residual stress increases first, and then the voltage reaches the peak position stably after the arc is stabilized, and the residual stress value decreases near the arc stopping position ;
The general variation trend of axial residual stress first increases and then decreases continuously after reaching the peak position.
The residual stress simulation and prediction results are consistent with those of the two measurement methods.
The results of the X-ray diffraction method are superior to those of the blind hole method.
The large stress position is predicted by finite element simulation technology, which has certain importance in engineering applications to effectively prevent stress corrosion cracking.
Preface
During pipeline construction, the anti-corrosion design of pipeline steel is an important factor for reliability design.
Stress corrosion cracking (SCC) is a low-stress brittle cracking phenomenon under tensile stress and corrosive environment.
Generally, the surface of the pipeline is coated to ensure its anti-corrosion performance.
Under the influence of surface contact with the ground, temperature, cathodic protection current and other factors, the chemical composition, changes in microstructure, mechanical factors and stress of materials will have a direct impact on stress corrosion cracking.
Stress in mechanical factors will lead to deformation and cracking of the material, and its size, stress fluctuation, strain rate, etc. will affect the rate of corrosion cracking of the material, thus affecting the fatigue life of the structural members.
Stress research has received increasing attention in the design of reliability and life maximization.
Means of analysis include destructive testing and non-destructive testing, but non-destructive testing is not suitable for industrial production due to its inaccuracy and high cost.
All types of simulation software for stress prediction can only perform qualitative analysis but not quantitative analysis when conducting nonlinear analysis.
To ensure quantitative analysis in addition to continuous improvement of simulation software, users need to have rich production experience, which cannot be completely separated from the accumulation of production experience.
In order to accurately predict the distribution trend and size of residual stress after welding and ensure the high accuracy and short periodicity of production requirements, researchers have conducted a large number of welding stress simulation studies.
Bai Fang established a multi-layer and multi-pass welding finite element model of X80 steel, obtained the thermal cycle curve within the relative error range through testing, used to simulate the equivalent load of the heat source, obtained the relationship between the peak temperature and cooling time and distance to the center of the weld, and obtained the law of variation of longitudinal and transverse residual stresses.
Gu Guolin established the finite element model of the butt joint of the X80 steel pipeline and used the X-ray diffraction method to verify whether the prediction accuracy of the residual stress caused by the root node decoupling is higher, and the prediction result voltage can be controlled at 10.35%.
Duan Weijun established the finite element model of S355 steel based on thermal elastoplastic theory.
By introducing the transformation model, transformation plasticity and transformation volume model, he concluded that the equivalent stress and stress value would be greatly reduced, and the residual stress was in accordance with the measured results.
Xiong Qingren et al. analyzed the residual stress of SSAW steel pipes through ring cutting test and blind hole test, compared the residual stress of steel pipes produced by different manufacturers, and proposed the residual stress control index, which effectively promoted production .
Zhang Dingquan and He Jiawen, etc. gave a comprehensive and detailed exposition of the principle, method and application of the non-destructive X-ray diffraction residual stress method, which is of guiding importance for the research of this method.
However, the above research focuses more on the distribution trend and accuracy of residual stress, and there is little research on the relationship between residual stress and corrosion resistance.
In this paper, through finite element analysis, the finite element model of X80 pipeline steel butt joint is established to predict and analyze the residual stress distribution, and then the simulation results are verified by two methods test methods, namely X-ray diffraction method and blind hole method, and their impact on corrosion resistance is analyzed in combination with macroengineering.
1. Establish a finite element model
1.1 Welding parameters
The wall thickness of butt joint piping steel is 22mm and the material is X80 piping steel.
The chemical composition of X80 pipeline steel is shown in Table 1.
The welding method is electrode arc welding.
Low hydrogen sodium basic electrode E7016 with a diameter of 3.2mm is used as welding material.
The chemical composition is shown in Table 2. Preheat 100 ℃ before welding.
E8010-P1 filler covering material is used.
The chemical composition is shown in Table 3.
Welding parameters are: arc voltage 27~28V, welding current 120~130A, welding speed 42cm/min, groove shape is U type on one side and 5 layers and 10 welding passes are adopted.
Table 1 Chemical composition of X80 pipeline steel (% by weight)
| Mn | Yes | P | It is | Mo |
| 1.8294 | 0.2795 | 0.01102 | 0.0006 | 0.217 |
| You | V | No. | No | Cr |
| 0.0161 | 0.0586 | 0.0608 | 0.0308 | 0.0337 |
Table 2 E7016 Welding rod chemical composition (% by weight)
| W | Mn | Yes | s | P |
| 0.06 | 1.05 | 0.65 | ≤0.02 | ≤0.02 |
Table 3 Chemical composition of E8010-P1 (wt%)
| Mn | Yes | P | s | Mo | V | Cr | No |
| 0.5 | 0.14 | 0.015 | 0.02 | 0.4 | 0.01 | 0.035 | 0.4 |
1.2 Establishment of material parameters
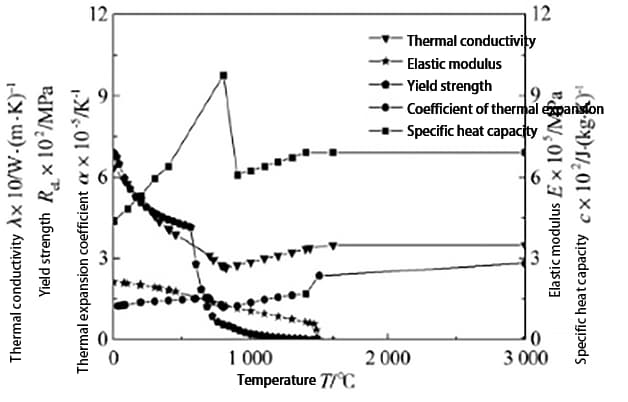
The X80 material parameters for simulation are obtained through JMATPRO software analysis.
Some physical and mechanical parameters that vary with temperature are shown in Figure 1.

1.3 Establishment of the network model
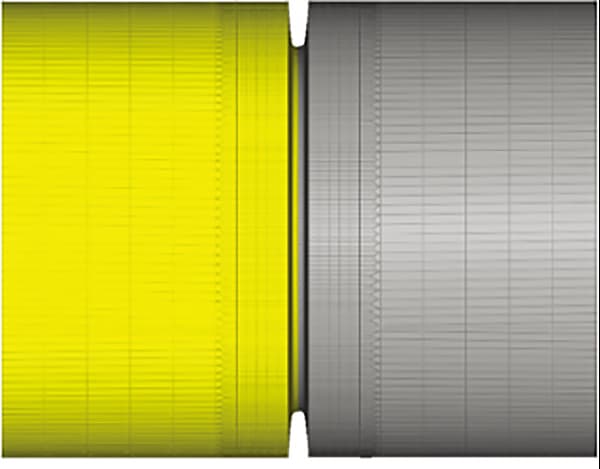
In order to ensure the accuracy of the voltage field solution, a relatively mature double ellipsoidal heat source model is established that can reflect the heat source of shielded metal arc welding.
Due to the relatively large values of residual stress near the weld and near the weld tip, and considering the temperature gradient, the grid in the weld is densified, the transition grid is used for the heat-affected zone and the position away from the weld , and the grid away from the weld is sparse.
The unit size of the weld position is 2 mm, the total number of units is 108,648, and the number of nodes is 121,598, as shown in Fig.

1.4 Mechanical boundary conditions
At the weld tip position on the outer surface of the butt joint steel pipe, along the weld cross-section direction, select the element node in the circumferential position for the displacement constraint in the X direction, so as to ensure that the lateral shrinkage of the X80 steel wire tube finite element model is not affected;
Select the outer surface element node of the pipeline steel tube with the free limit of the butt joint along the longitudinal direction of the weld and the normal plane direction of the center of the circumference to constrain the Y and Z displacement, so as to ensure that the longitudinal shrinkage of the model is not affected.
2. Testing and measurement methods
2.1 Non-destructive X-ray diffraction method
X-ray strain measurement is a non-destructive test.
Its basic principle is based on Bragg's law, and the basic basis is that the lattice deformation of the material caused by a certain stress state is consistent with macrodeformation.
Metallic materials are generally polycrystalline, containing a large number of grains with different orientations per unit volume, and any selected crystalline plane can be observed from any direction in space.
According to the elastic mechanics equation, calculate the corresponding crystal plane deformation value through changing the crystal plane spacing, i.e.

Where
- ε is the deformation value of the crystalline plane;
- d0 is the spacing between the crystalline planes in the stress-free state.
2.2 Blind hole method
Blind hole method residual stress test is a non-destructive testing method.
It consists of gluing a tension rosette to the surface of the part to be tested.
By piercing the part in the center of the deformation rosette, the stress balance is destroyed and a certain amount of deformation is generated.
After measuring the elastic deformation increment near the hole, the residual stress in the small hole can be calculated using the principle of elastic mechanics.
The principal stress and direction in the small hole can be calculated according to the following formula.

Where εA is the strain gauge strain a; A. B is the strain release coefficient.
2.3 Test method design
To minimize the error, two methods are used to measure the same test piece, first the X-ray measurement method and then the blind hole method.
In order to verify the accuracy of the calculation results, zero-voltage and high-voltage calibration equipment for X-ray diffraction measurement should be used;
When measuring with blind hole method, the spacing between measuring points should be 30mm to effectively release drilling stress.
After the butt joint of the X80 steel pipeline is welded, the weld tip position and the weld center position should be selected along the circumferential direction for stress measurement.
3. Analysis and verification of simulation results
3.1 Analysis of circumferential residual stress measurement results
Through simulation calculation, the simulation results of the circumferential stress field of the butt joint of the X80 steel wire pipe are obtained.
The residual stress from the position of the weld tip on one side of the butt joint to the relatively smooth outer surface is extracted, and the X-ray method and blind hole stress tests are carried out.
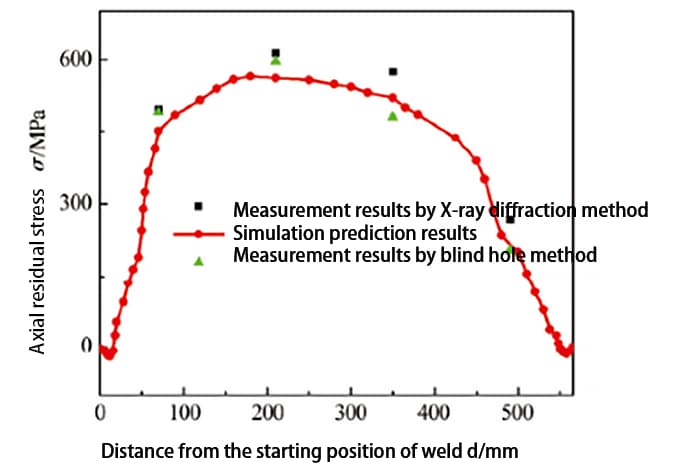
The results are shown in Figure 3.

It can be seen from Fig. 3 that from the arc starting position to the arc stopping position, the general changing tendency of the residual voltage increases first, and after the arc is stabilized, the voltage stably reaches the peak position and then remains.
When approaching the arc stop position, the residual stress value decreases, which is consistent with the classical butt joint rule.
When welding the starting and ending positions, the welding bonding effect is relatively small.
At the same time, there is a certain intersection at the initial and final positions, resulting in little change in the voltage value.
The start and stop positions have a certain preheating effect on the stop positions.
Therefore, the welding stress is relatively small, mainly manifested as compressive stress;
In the middle part, due to the large bonding force in the welding position after welding, the stress is also large, which increases first and then decreases, showing mainly tensile stress.
The trends of the two measurement methods are in good agreement with the simulation results.
The maximum error between the simulation results and the X-ray diffraction measurement results is 490 mm away from the initial position of the weld, with an error of 15.9%;
The maximum error between the simulation results and the results measured by the blind hole method is 490 mm, with an error of 12.4%.
The residual stress results measured by the X-ray method fluctuate relatively large.
Due to the measurement method and the characteristics of the measurement sample, the X-ray diffraction method requires a high flatness of the measuring surface during measurement.
However, the butt joint plane of the X80 steel wire pipe has a certain radian, and the net size at the measurement location changes abnormally, resulting in a large stress value.
The changing trends of the two measurement methods are approximately consistent, and most of the measured values are greater than the simulation values.
During the simulation calculation process, factors such as fluidity of the filling unit, material hardening and phase transformation are not considered, resulting in lower residual stress results predicted by the simulation.
3.2 Analysis of axial residual stress measurement results
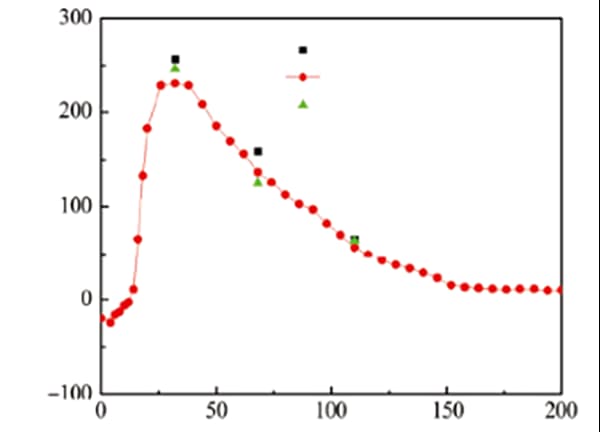
The test and simulation results of axial residual stress are shown in Figure 4.

It can be seen from Fig. 4 that the general changing trend of residual voltage from the arc starting position to the arc stopping position is to increase first, and the residual voltage decreases continuously after reaching the peak position, which is consistent with the classic top joint rule.
Near the center of the weld, the welding is relatively restricted, resulting in large changes in stress values and relatively large welding stresses, which are mainly tensile and compressive stresses;
Near the free end, the residual stress value is relatively small because it is not restricted by the cold and hot shrinkage stress of welding heat input.
The trends of the two measurement methods are in good agreement with the simulation results.
The maximum error between the simulation results and the X-ray diffraction measurement results is 68 mm, and the error is 13.9%;
The maximum error between the simulation result and the measurement result of the blind hole method is 110 mm, with an error of 11.4%.
The voltage measurement result by the X-ray method fluctuates relatively large.
3.3 Effect of residual stress on corrosivity in engineering applications
The residual stress results obtained by different measurement methods verify the accuracy of the residual stress prediction simulation results for X80 steel pipelines.
In the case of after-sales application powered by real engineering application, Pakistan's after-sales support personnel once discovered that the paint on the weld tip of X80 pipe steel is very easy to fall off under corrosion and ground illumination in the long term, releasing harmful stresses under the effects of environmental factors and residual stresses, causing local corrosion and damage to the steel of the X80 pipeline, which ultimately leads to stress corrosion cracking.
In the absence of major accidents, on-site application problems were resolved through troubleshooting analysis.
4. Conclusion
(1) The finite element model was used to simulate the residual stress of the steel butt joint of the X80 pipeline, and the accuracy of the simulation results was verified by X-ray diffraction and blind hole method.
The simulation results are in agreement with the two measurement methods, and the X-ray diffraction results are superior to those of the blind hole method.
(2) From the arc starting position to the arc stopping position, the general changing tendency of the circumferential residual stress increases first, and after the arc is stabilized, the voltage stably reaches the peak position and then maintains, and When it is close to the arc stopping position, the residual voltage value decreases.
From the arc starting position to the arc stopping position, the general changing trend of the axial residual stress increases first, and the residual stress decreases continuously after reaching the peak position.
(3) The steel of the X80 pipeline shows local stress corrosion cracking.
Through finite element simulation technology, predict the location of high stress, which has certain importance in engineering application to effectively prevent stress corrosion cracking.


