Os telefones celulares possuem módulo GSM integrado que permite a conexão com qualquer rede celular em todo o mundo. O GSM significa Sistema Global para Comunicações Móveis. Em certas aplicações, os sistemas baseados em microcontroladores têm de estar ligados à rede GSM, o que permitirá ao utilizador controlar o sistema enviando mensagens ou fazendo uma chamada. Os sistemas também podem enviar mensagens ao usuário para alertar ou informar sobre o status do sistema em execução. Em todos estes casos é utilizado um módulo GSM separado em vez de utilizar os telemóveis.
Existem módulos GSM disponíveis que podem fazer comunicação serial com sistemas baseados em microcontroladores. A comunicação é feita enviando ou recebendo Comandos AT com o módulo GSM. Este projeto específico demonstra como fazer interface com um módulo GSM e fazer uma chamada usando o teclado PS2 padrão com a ajuda de uma placa Arduino.
O teclado PS2 pode enviar o valor ASCII equivalente da tecla que foi pressionada para um dispositivo host ao qual está conectado. O teclado PS2 também usa um protocolo serial síncrono simples chamado PS2, usando apenas dois fios para comunicação. Devido à sua simplicidade na interface, os teclados PS2 e módulos GSM são amplamente utilizados com sistemas simples baseados em microcontroladores.ARDS.
Qualquer placa baseada em microcontrolador AVR que siga o esquema padrão do Arduino e seja atualizada com o Arduino carregador de inicialização pode ser chamada de placa Arduino. O gerenciador de inicialização do Arduino permite que diferentes placas Arduino sejam conectadas e programadas com o Arduino IDE. A placa Arduino usada neste projeto é a placa Arduino pro-mini e a versão IDE do arduino é 1.0.3 para Windows.
A imagem da placa Arduino pro-mini e do Arduino IDE é mostrada abaixo:
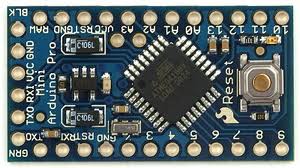
Fig. 2: Placa Arduino Pro-Mini típica
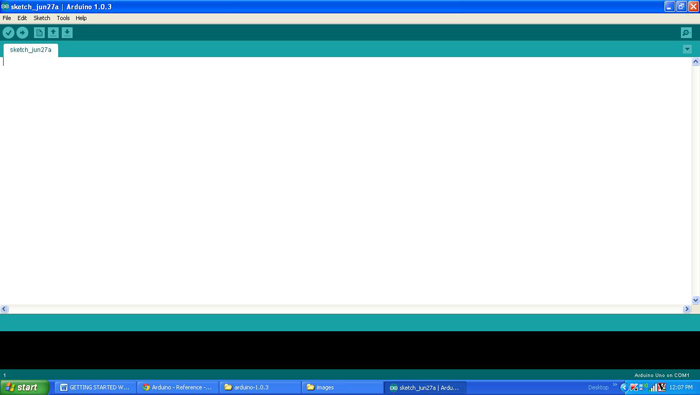
Fig. 3: Janela do software Arduino IDE
Como a placa Arduino pro-mini não possui circuito para interface com a porta serial ou porta USB do PC, uma placa conversora USB para TTL externa é necessária para conectá-la ao PC. Este hardware auxilia na programação da placa Arduino e também auxilia na comunicação serial com a porta USB do PC.
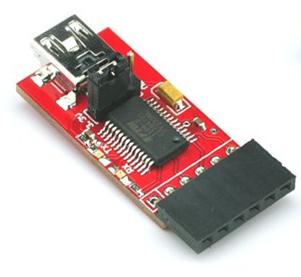 4: Placa conversora USB para TTL externa para programação Arduino e comunicação serial
Presume-se que o leitor tenha passado pelo projeto de como começar a usar o Arduino e experimentado todas as coisas discutidas lá.
O módulo GSM utilizado neste projeto é um módulo baseado em SIM900 que pode se comunicar com outros dispositivos usando a porta de comunicação serial RS232. Funciona com fonte de alimentação de 9V e a imagem do mesmo é mostrada abaixo:
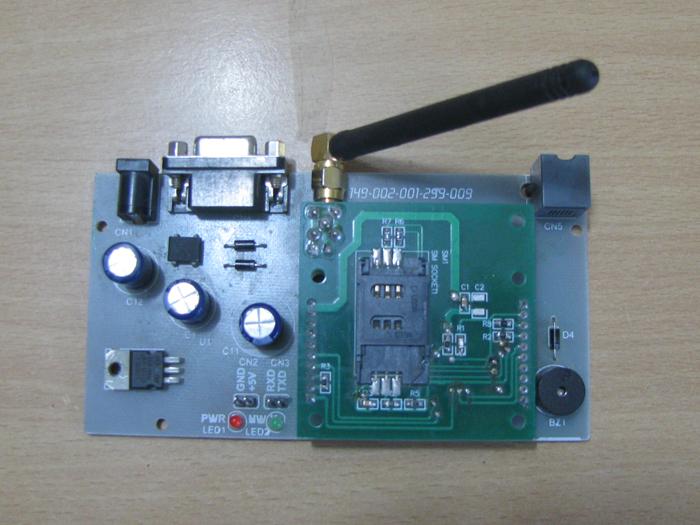
Fig. 5: Módulo GSM SIM900 conectado ao pino Tx do módulo da placa Arduino através de max232
O teclado sempre possui um conector mini-DIN macho de 6 pinos para interface PS2 e o dispositivo host sempre possui o pino fêmea correspondente. As imagens e as pinagens dos conectores macho e fêmea do PS2 são mostradas na imagem a seguir, a única diferença entre os conectores de teclado e mouse do PS2 está na cor.
A imagem do pino masculino do PS2
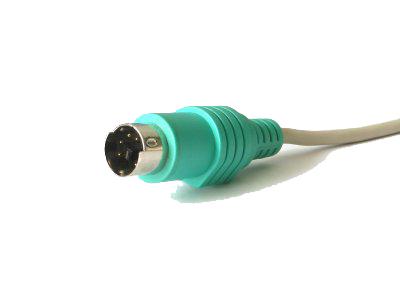
6: Conector macho mini-DIN de 6 pinos para interface PS2
A imagem do pin feminino do PS2
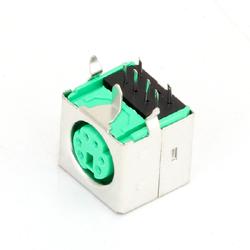
Fig. 7: Plugue conector fêmea Mini DIN de 6 pinos para interface PS2
A pinagem dos conectores macho e fêmea PS2

Fig. 8: Pinagem dos conectores PS2 macho e fêmea
Quando se trata de conectar o conector fêmea à placa de circuito, deve-se conseguir identificar os pinos na parte inferior do conector PS2 e a imagem a seguir será útil.
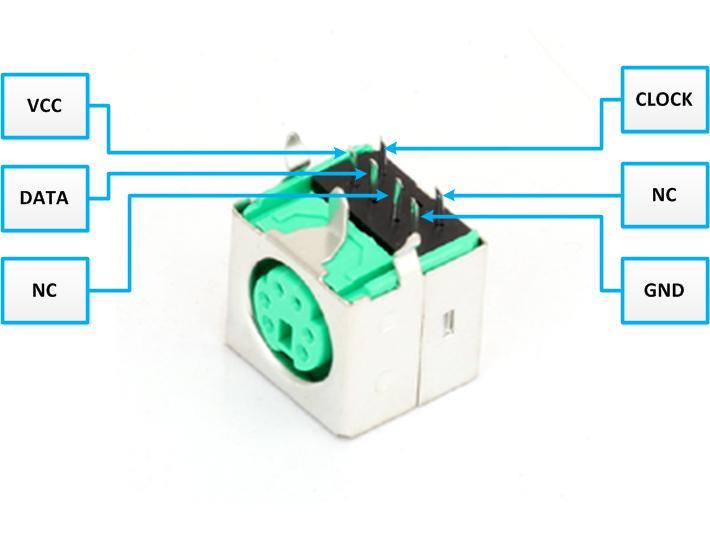
Fig. 9: Parte inferior do conector de pino PS2
A implementação do projeto que pode receber os dados do teclado PS2 e utilizá-los para fazer uma chamada através do módulo GSM é representada pelo seguinte diagrama de blocos:

Fig. 10: Diagrama de blocos do circuito de chamada com teclado, módulo GSM e Arduino
O código escrito para este projeto lê os dados do teclado PS2 usando o arquivo de biblioteca PS2 personalizado chamado “PS2Keyboard.h” que possui todas as rotinas necessárias para acessar um teclado PS2. Existem basicamente três funções que o usuário pode utilizar diretamente em seu código: “keyboard.begin ”,keyboard.available e “teclado.ler ”. Os detalhes de como usar essas funções para fazer a interface de um teclado PS2 já foram discutidos em um projeto anterior sobre como fazer a interface do teclado PS2 com o Arduino.
O Arduino é capaz de se comunicar com o módulo GSM usando Comandos AT. O Comandos AT são enviados ou recebidos do módulo usando as funções de comunicação serial fornecidas pela biblioteca Arduino. As funções como Serial.begin que ajuda a inicializar a porta serial com uma determinada taxa de transmissão, Serial.write para enviar dados para a porta serial, funções Serial.available e Serial.read para ler dados da porta serial são usados neste projeto e já foram discutidos em projetos anteriores sobre como fazer comunicação serial com o Arduino, como enviar e receber dados seriais usando o Arduino e como fazer depuração serial com o Arduino.
Os módulos GSM respondem “OK” quando recebem o comando “AT” e é a melhor forma de verificar a comunicação entre o módulo e o microcontrolador. O comando para fazer uma chamada para um número é “ATD”;
SINTAXE: ATD
Por exemplo,
ATD123456789;
O código é escrito de forma que primeiro envia a string “ATD” e depois espera até que o usuário insira o número de telefone desejado e pressione Enter. À medida que o usuário pressiona cada tecla, o mesmo número é lido do teclado e enviado para o módulo GSM serialmente até que o usuário pressione a tecla ENTER. Assim que o usuário pressionar a tecla Enter, o restante do comando para fazer uma chamada, ou seja. “;” o ponto e vírgula e o retorno de carro “;'r” são enviados para fazer uma chamada.
Tente enviar o comando pelo PC com o auxílio de algum software de monitoramento serial e certifique-se de que o módulo está fazendo uma chamada para o número especificado. Em seguida, pode-se verificar e fazer upload do código que pode enviar os mesmos comandos para a placa Arduino conforme explicado no projeto como começar a usar o Arduino. Certifique-se de que o módulo GSM foi ligado pelo menos 2 minutos antes da placa Arduino começar a enviar os comandos para que o GSM possa estabelecer comunicação com a rede celular correspondente ao cartão SIM nele inserido.
Código fonte do projeto
### /*============================ EG LABS ===================================// Demonstration of how to use a ps2keyboard to dial a call using the GSM The circuit: LCD: * LCD RS pin to digital pin 12 * LCD Enable pin to digital pin 11 * LCD D4 pin to digital pin 7 * LCD D5 pin to digital pin 6 * LCD D6 pin to digital pin 5 * LCD D7 pin to digital pin 4 * LCD R/W pin to ground * 10K resistor: * ends to +5V and ground * wiper to LCD pin 3 * LED anode attached to digital output 9 * LED cathode attached to ground through a 1K resistor KEYBOARD: DATA PIN TO PIN NUMBER 8 CLOCK PIN TO PIN NUMBER 3 GSM: RX PIN OF GSM TO TX0 PIN OF ARDUINO SHORT THE GROUND PINS OF ARDUINO AND GSM ============================== EG LABS ===================================*/ #include "PS2Keyboard.h" #include// initialize the library with the numbers of the interface pins LiquidCrystal lcd(12, 11, 7, 6, 5, 4); #define DATA_PIN 8 PS2Keyboard keyboard; // give the pin a name: int led = 9; char dat = 0; void setup { pinMode(9, OUTPUT); lcd.begin(16, 2); lcd.print("ENGINEERS GARAGE"); lcd.setCursor(0, 1); lcd.print(" GSM CALLING "); delay(3000); lcd.clear ; keyboard.begin(DATA_PIN); // initialize the PS2 keyboard // initialize the led pin as an output. pinMode(led, OUTPUT); // start serial port at 9600 bps Serial.begin(9600); // wait for a while till the serial port is ready delay(100); // Serial.print("ATD09895941988;nr"); Serial.print("ATD"); while(1) { if(keyboard.available ) // check if there is any data coming from the keyboard { dat = keyboard.read ; // read the data from the keyboard if(dat == 'n') break; else; Serial.write(dat); lcd.write(dat); }else; } Serial.print(";nr"); lcd.setCursor(0, 1); lcd.print(" CALLING ... "); } void loop { digitalWrite(led, HIGH); delay(1000); digitalWrite(led, LOW); delay(1000); } ###
Código fonte do projeto
### /* PS2Keyboard.cpp - PS2Keyboard library Copyright (c) 2007 Free Software Foundation. All right reserved. Written by Christian Weichel** Modified for use beginning with Arduino 13 by L. Abraham Smith, * ** Modified to include: shift, alt, caps_lock, caps_lock light, and hot-plugging a kbd * ** by Bill Oldfield 22/7/09 * This library is free software; you can redistribute it and/or modify it under the terms of the GNU Lesser General Public License as published by the Free Software Foundation; either version 2.1 of the License, or (at your option) any later version. This library is distributed in the hope that it will be useful, but WITHOUT ANY WARRANTY; without even the implied warranty of MERCHANTABILITY or FITNESS FOR A PARTICULAR PURPOSE. See the GNU Lesser General Public License for more details. You should have received a copy of the GNU Lesser General Public License along with this library; if not, write to the Free Software Foundation, Inc., 51 Franklin St, Fifth Floor, Boston, MA 02110-1301 USA */ #include #include #include #include "Arduino.h" #include "PS2Keyboard.h" #include "binary.h" typedef uint8_t boolean; typedef uint8_t byte; /* * I do know this is so uncool, but I just don't see a way arround it * REALLY BAD STUFF AHEAD * * The variables are used for internal status management of the ISR. The're * not kept in the object instance because the ISR has to be as fast as anyhow * possible. So the overhead of a CPP method call is to be avoided. * * PLEASE DO NOT REFER TO THESE VARIABLES IN YOUR CODE AS THEY MIGHT VANISH SOME * HAPPY DAY. */ int ps2Keyboard_DataPin; byte ps2Keyboard_CurrentBuffer; volatile byte ps2Keyboard_CharBuffer; volatile byte ps2Keyboard_BufferPos; // variables used to remember information about key presses volatile bool ps2Keyboard_shift; // indicates shift key is pressed volatile bool ps2Keyboard_ctrl; // indicates the ctrl key is pressed volatile bool ps2Keyboard_alt; // indicates the alt key is pressed volatile bool ps2Keyboard_extend; // remembers a keyboard extended char received volatile bool ps2Keyboard_release; // distinguishes key presses from releases volatile bool ps2Keyboard_caps_lock; // remembers shift lock has been pressed // vairables used in sending command bytes to the keyboard, eg caps_lock light volatile boolean cmd_in_progress; volatile int cmd_count; byte cmd_value; volatile byte cmd_ack_value; byte cmd_parity; volatile boolean cmd_ack_byte_ok; // sending command bytes to the keybaord needs proper parity (otherwise the keyboard // just asks you to repeat the byte) byte odd_parity(byte val) { int i, count = 1; // start with 0 for even parity for (i=0; i<8; i++) { if (val&1) count++; val = val>>1; } return count & 1; // bottom bit of count is parity bit } void kbd_send_command(byte val) { // stop interrupt routine from receiving characters so that we can use it // to send a byte cmd_in_progress = true; cmd_count = 0; // set up the byte to shift out and initialise the ack bit cmd_value = val; cmd_ack_value = 1; // the kbd will clear this bit on receiving the byte cmd_parity = odd_parity(val); // set the data pin as an output, ready for driving digitalWrite(ps2Keyboard_DataPin, HIGH); pinMode(ps2Keyboard_DataPin, OUTPUT); // drive clock pin low - this is going to generate the first // interrupt of the shifting out process pinMode(PS2_INT_PIN, OUTPUT); digitalWrite(PS2_INT_PIN, LOW); // wait at least one clock cycle (in case the kbd is mid transmission) delayMicroseconds(60); // set up the 0 start bit digitalWrite(ps2Keyboard_DataPin, LOW); // let go of clock - the kbd takes over driving the clock from here digitalWrite(PS2_INT_PIN, HIGH); pinMode(PS2_INT_PIN, INPUT); // wait for interrupt routine to shift out byte, parity and receive ack bit while (cmd_ack_value!=0) ; // switch back to the interrupt routine receiving characters from the kbd cmd_in_progress = false; } void PS2Keyboard::reset { kbd_send_command(0xFF); // send the kbd reset code to the kbd: 3 lights // should flash briefly on the kbd // reset all the global variables ps2Keyboard_CurrentBuffer = 0; ps2Keyboard_CharBuffer = 0; ps2Keyboard_BufferPos = 0; ps2Keyboard_shift = false; ps2Keyboard_ctrl = false; ps2Keyboard_alt = false; ps2Keyboard_extend = false; ps2Keyboard_release = false; ps2Keyboard_caps_lock = false; cmd_in_progress = false; cmd_count = 0; cmd_value = 0; cmd_ack_value = 1; } // val : bit_2=caps_lock, bit_1=num_lock, bit_0=scroll_lock void kbd_set_lights(byte val) { // When setting the lights with the 0xED command the keyboard responds // with an "ack byte", 0xFA. This is NOT the same as the "ack bit" that // follows the succesful shifting of each command byte. See this web // page for a good description of all this: // cmd_ack_byte_ok = false; // initialise the ack byte flag kbd_send_command(0xED); // send the command byte while (!cmd_ack_byte_ok) ; // ack byte from keyboard sets this flag kbd_send_command(val); // now send the data } // The ISR for the external interrupt // This may look like a lot of code for an Interrupt routine, but the switch // statements are fast and the path through the routine is only ever a few // simple lines of code. void ps2interrupt (void) { int value = digitalRead(ps2Keyboard_DataPin); // This is the code to send a byte to the keyboard. Actually its 12 bits: // a start bit, 8 data bits, 1 parity, 1 stop bit, 1 ack bit (from the kbd) if (cmd_in_progress) { cmd_count++; // cmd_count keeps track of the shifting switch (cmd_count) { case 1: // start bit digitalWrite(ps2Keyboard_DataPin,LOW); break; case 2: case 3: case 4: case 5: case 6: case 7: case 8: case 9: // data bits to shift digitalWrite(ps2Keyboard_DataPin,cmd_value&1); cmd_value = cmd_value>>1; break; case 10: // parity bit digitalWrite(ps2Keyboard_DataPin,cmd_parity); break; case 11: // stop bit // release the data pin, so stop bit actually relies on pull-up // but this ensures the data pin is ready to be driven by the kbd for // for the next bit. digitalWrite(ps2Keyboard_DataPin, HIGH); pinMode(ps2Keyboard_DataPin, INPUT); break; case 12: // ack bit - driven by the kbd, so we read its value cmd_ack_value = digitalRead(ps2Keyboard_DataPin); cmd_in_progress = false; // done shifting out } return; // don't fall through to the receive section of the ISR } // receive section of the ISR // shift the bits in if(ps2Keyboard_BufferPos > 0 && ps2Keyboard_BufferPos < 11) { ps2Keyboard_CurrentBuffer = (value << (ps2Keyboard_BufferPos - 1)); } ps2Keyboard_BufferPos++; // keep track of shift-in position if(ps2Keyboard_BufferPos == 11) { // a complete character received switch (ps2Keyboard_CurrentBuffer) { case 0xF0: { // key release char ps2Keyboard_release = true; ps2Keyboard_extend = false; break; } case 0xFA: { // command acknowlegde byte cmd_ack_byte_ok = true; break; } case 0xE0: { // extended char set ps2Keyboard_extend = true; break; } case 0x12: // left shift case 0x59: { // right shift ps2Keyboard_shift = ps2Keyboard_release? false : true; ps2Keyboard_release = false; break; } case 0x11: { // alt key (right alt is extended 0x11) ps2Keyboard_alt = ps2Keyboard_release? false : true; ps2Keyboard_release = false; break; } case 0x14: { // ctrl key (right ctrl is extended 0x14) ps2Keyboard_ctrl = ps2Keyboard_release? false : true; ps2Keyboard_release = false; break; } case 0x58: { // caps lock key if (!ps2Keyboard_release) { ps2Keyboard_caps_lock = ps2Keyboard_caps_lock? false : true; // allow caps lock code through to enable light on and off ps2Keyboard_CharBuffer = ps2Keyboard_CurrentBuffer; } else { ps2Keyboard_release = false; } break; } default: { // a real key if (ps2Keyboard_release) { // although ignore if its just released ps2Keyboard_release = false; } else { // real keys go into CharBuffer ps2Keyboard_CharBuffer = ps2Keyboard_CurrentBuffer; } } } ps2Keyboard_CurrentBuffer = 0; ps2Keyboard_BufferPos = 0; } } PS2Keyboard::PS2Keyboard { // nothing to do here } void PS2Keyboard::begin(int dataPin) { // Prepare the global variables ps2Keyboard_DataPin = dataPin; ps2Keyboard_CurrentBuffer = 0; ps2Keyboard_CharBuffer = 0; ps2Keyboard_BufferPos = 0; ps2Keyboard_shift = false; ps2Keyboard_ctrl = false; ps2Keyboard_alt = false; ps2Keyboard_extend = false; ps2Keyboard_release = false; ps2Keyboard_caps_lock = false; cmd_in_progress = false; cmd_count = 0; cmd_value = 0; cmd_ack_value = 1; // initialize the pins pinMode(PS2_INT_PIN, INPUT); digitalWrite(PS2_INT_PIN, HIGH); pinMode(dataPin, INPUT); digitalWrite(dataPin, HIGH); attachInterrupt(1, ps2interrupt, FALLING); #if 0 // Global Enable INT1 interrupt EIMSK = ( 1 << INT1); // Falling edge triggers interrupt EICRA = (0 << ISC10) (1 << ISC11); #endif } bool PS2Keyboard::available { return ps2Keyboard_CharBuffer != 0; } // This routine allows a calling program to see if other other keys are held // down when a character is received: ie , , or // Note that this routine must be called after available has returned true, // but BEFORE read . The read routine clears the buffer and allows another // character to be received so these bits can change anytime after the read . byte PS2Keyboard::read_extra { return (ps2Keyboard_caps_lock<<3) (ps2Keyboard_shift<<2) (ps2Keyboard_alt<<1) ps2Keyboard_ctrl; } byte PS2Keyboard::read { byte result; // read the raw data from the keyboard result = ps2Keyboard_CharBuffer; // Use a switch for the code to character conversion. // This is fast and actually only uses 4 bytes per simple line switch (result) { case 0x1C: result="a"; break; case 0x32: result="b"; break; case 0x21: result="c"; break; case 0x23: result="d"; break; case 0x24: result="e"; break; case 0x2B: result="f"; break; case 0x34: result="g"; break; case 0x33: result="h"; break; case 0x43: result="i"; break; case 0x3B: result="j"; break; case 0x42: result="k"; break; case 0x4B: result="l"; break; case 0x3A: result="m"; break; case 0x31: result="n"; break; case 0x44: result="o"; break; case 0x4D: result="p"; break; case 0x15: result="q"; break; case 0x2D: result="r"; break; case 0x1B: result="s"; break; case 0x2C: result="t"; break; case 0x3C: result="u"; break; case 0x2A: result="v"; break; case 0x1D: result="w"; break; case 0x22: result="x"; break; case 0x35: result="y"; break; case 0x1A: result="z"; break; // note that caps lock only used on a-z case 0x41: result = ps2Keyboard_shift? '<' : ','; break; case 0x49: result = ps2Keyboard_shift? '>' : '.'; break; case 0x4A: result = ps2Keyboard_shift? '?' : '/'; break; case 0x54: result = ps2Keyboard_shift? '{' : '('; break; case 0x5B: result = ps2Keyboard_shift? '}' : ')'; break; case 0x4E: result = ps2Keyboard_shift? '_' : '-'; break; case 0x55: result = ps2Keyboard_shift? '+' : '='; break; case 0x29: result=" "; break; case 0x45: result = ps2Keyboard_shift? ')' : '0'; break; case 0x16: result = ps2Keyboard_shift? '!' : '1'; break; case 0x1E: result = ps2Keyboard_shift? '@' : '2'; break; case 0x26: result = ps2Keyboard_shift? '£' : '3'; break; case 0x25: result = ps2Keyboard_shift? '$' : '4'; break; case 0x2E: result = ps2Keyboard_shift? '%' : '5'; break; case 0x36: result = ps2Keyboard_shift? '^' : '6'; break; case 0x3D: result = ps2Keyboard_shift? '&' : '7'; break; case 0x3E: result = ps2Keyboard_shift? '*' : '8'; break; case 0x46: result = ps2Keyboard_shift? '(' : '9'; break; case 0x0D: result="t"; break; case 0x5A: result="n"; break; case 0x66: result = PS2_KC_BKSP; break; case 0x69: result = ps2Keyboard_extend? PS2_KC_END : '1'; break; case 0x6B: result = ps2Keyboard_extend? PS2_KC_LEFT : '4'; break; case 0x6C: result = ps2Keyboard_extend? PS2_KC_HOME : '7'; break; case 0x70: result = ps2Keyboard_extend? PS2_KC_INS : '0'; break; case 0x71: result = ps2Keyboard_extend? PS2_KC_DEL : '.'; break; case 0x72: result = ps2Keyboard_extend? PS2_KC_DOWN : '2'; break; case 0x73: result="5"; break; case 0x74: result = ps2Keyboard_extend? PS2_KC_RIGHT : '6'; break; case 0x75: result = ps2Keyboard_extend? PS2_KC_UP : '8'; break; case 0x76: result = PS2_KC_ESC; break; case 0x79: result="+"; break; case 0x7A: result = ps2Keyboard_extend? PS2_KC_PGDN : '3'; break; case 0x7B: result="-"; break; case 0x7C: result="*"; break; case 0x7D: result = ps2Keyboard_extend? PS2_KC_PGUP : '9'; break; case 0x58: // setting the keyboard lights is done here. Ideally it would be done // in the interrupt routine itself and the key codes associated wth // caps lock key presses would never be passed on as characters. // However it would make the interrupt routine very messy with lots // of extra state associated with the control of a caps_lock // key code causing a cmd byte to transmit, causing an ack_byte to // be received, then a data byte to transmit. Much easier done here. // The downside, however, is that the light going on or off at the // right time relies on the calling program to be checking for // characters on a regular basis. If the calling program stops // polling for characters at any point pressing the caps lock key // will not change the state of the caps lock light while polling // is not happening. result = ps2Keyboard_caps_lock? PS2_KC_CLON : PS2_KC_CLOFF; if (ps2Keyboard_caps_lock) kbd_set_lights(4); else kbd_set_lights(0); break; // Reset the shift counter for unexpected values, to get back into sink // This allows for hot plugging a keyboard in and out default: delay(500); // but wait a bit in case part way through a shift ps2Keyboard_BufferPos = 0; ps2Keyboard_shift = false; ps2Keyboard_ctrl = false; ps2Keyboard_alt = false; ps2Keyboard_extend = false; ps2Keyboard_release = false; ps2Keyboard_caps_lock = false; } // end switch(result) // shift a-z chars here (less code than in the switch statement) if (((result>='a') && (result<='z')) && ((ps2Keyboard_shift && !ps2Keyboard_caps_lock) (!ps2Keyboard_shift && ps2Keyboard_caps_lock))) { result = result + ('A'-'a'); } // done with the character ps2Keyboard_CharBuffer = 0; return(result); } *****************PS2 Keyboard Header File*********************** PS2Keyboard.h - Biblioteca PS2Keyboard Copyright (c) 2007 Free Software Foundation.
Todos os direitos reservados. Escrito por Christian Weichel <(e-mail protegido)>
** Modificado para uso com Arduino 13 por L. Abraham Smith,
* ** Modificado para incluir: shift, alt, caps_lock e caps_lock light por Bill Oldfield *
Esta biblioteca é um software livre; você pode redistribuí-lo e/ou modificá-lo sob os termos de
a Licença Pública Geral Menor GNU conforme publicada pela Free Software Foundation;
a versão 2.1 da Licença ou (a seu critério) qualquer versão posterior.
Esta biblioteca é distribuída na esperança de ser útil, mas SEM QUALQUER GARANTIA;
mesmo sem a garantia implícita de COMERCIALIZAÇÃO ou ADEQUAÇÃO A UM DETERMINADO FIM.
Consulte a Licença Pública Geral Menor GNU para obter mais detalhes.
Você deve ter recebido uma cópia da Licença Pública Geral Menor GNU junto com esta biblioteca;
caso contrário, escreva para Free Software Foundation, Inc., 51 Franklin St, Fifth Floor, Boston, MA 02110-1301 EUA
*/ #ifndef PS2Keyboard_h
#define PS2Keyboard_h
#incluir
#incluir
#incluir
/* * O teclado PS2 "cria" códigos para verificar determinadas teclas. */
// Fornece esses códigos que não são usados por mais nada
// Criar todos os códigos das teclas de controle acima de 0x80 simplifica a verificação
// caracteres imprimíveis no nível de chamada.
#define PS2_KC_BKSP 0x80
#define PS2_KC_UP 0x81
#define PS2_KC_DOWN 0x82
#define PS2_KC_LEFT 0x83
#define PS2_KC_RIGHT 0x84
#define PS2_KC_PGDN0x85
#define PS2_KC_PGUP 0x86
#define PS2_KC_END 0x87
#define PS2_KC_HOME 0x88
#define PS2_KC_INS 0x89
#define PS2_KC_DEL 0x8A
#define PS2_KC_ESC 0x8B
#define PS2_KC_CLON 0x8C
//caps_lock ativado
#define PS2_KC_CLOFF 0x8D
//caps_lock desativado
#include "binary.h" typedef uint8_t boolean; typedef uint8_t byte;
/* * Este PIN é codificado posteriormente na rotina de inicialização.
Se você alterar isso * certifique-se de alterar também a inicialização da interrupção.
*/ #define PS2_INT_PIN 3 /** * Objetivo: Fornece acesso fácil aos teclados PS2
*Autor: Christian Weichel */class PS2Keyboard
{ privado: int m_dataPin; byte m_charBuffer; público: /**
* Este construtor basicamente não faz nada. Por favor, chame o início (int)
* antes de usar qualquer outro método desta classe. */Teclado PS2 ;
/** * Inicia o "serviço" do teclado registrando a interrupção externa.
* definir os modos de pin corretamente e aumentar os níveis necessários.
* O melhor lugar para chamar esse método é na rotina de configuração.
*/ void start(int dataPin);
/** * Retorna verdadeiro se houver um caractere a ser lido, falso se não houver.
*/ bool disponível ; /** * Envia um comando de reset para o teclado e reinicializa todos os controles
* variáveis dentro do código PS2Keybaord. */ void reset ;
/** * Retorna o último caractere lido no teclado.
Se o usuário pressionou duas teclas * entre as chamadas para este método, somente a última estará disponível.
Assim que * o caracter for lido, o buffer será limpo.
* Se não houver char disponível, 0 será retornado. */byte lido ;
/** * Retorna o status do
chave, o chave, o key e o estado * caps_lock. Observe que shift e caps_lock são tratados dentro do
* Código Ps2Keyboard (e o valor de retorno de read já está modificado),
mas * poder lê-los aqui pode ser útil.
*Esta rotina é opcional, MAS SÓ DEVE ser lida após o retorno de available
* true e BEFORE read são chamados para recuperar o caractere. Lendo depois
* a chamada para read retornará valores imprevisíveis. */byte read_extra ; }; #fim se
###
Diagramas de circuito
| Circuito-Diagrama-Fazendo-Chamadas-Usando-Teclado-Módulo-GSM-Arduino | 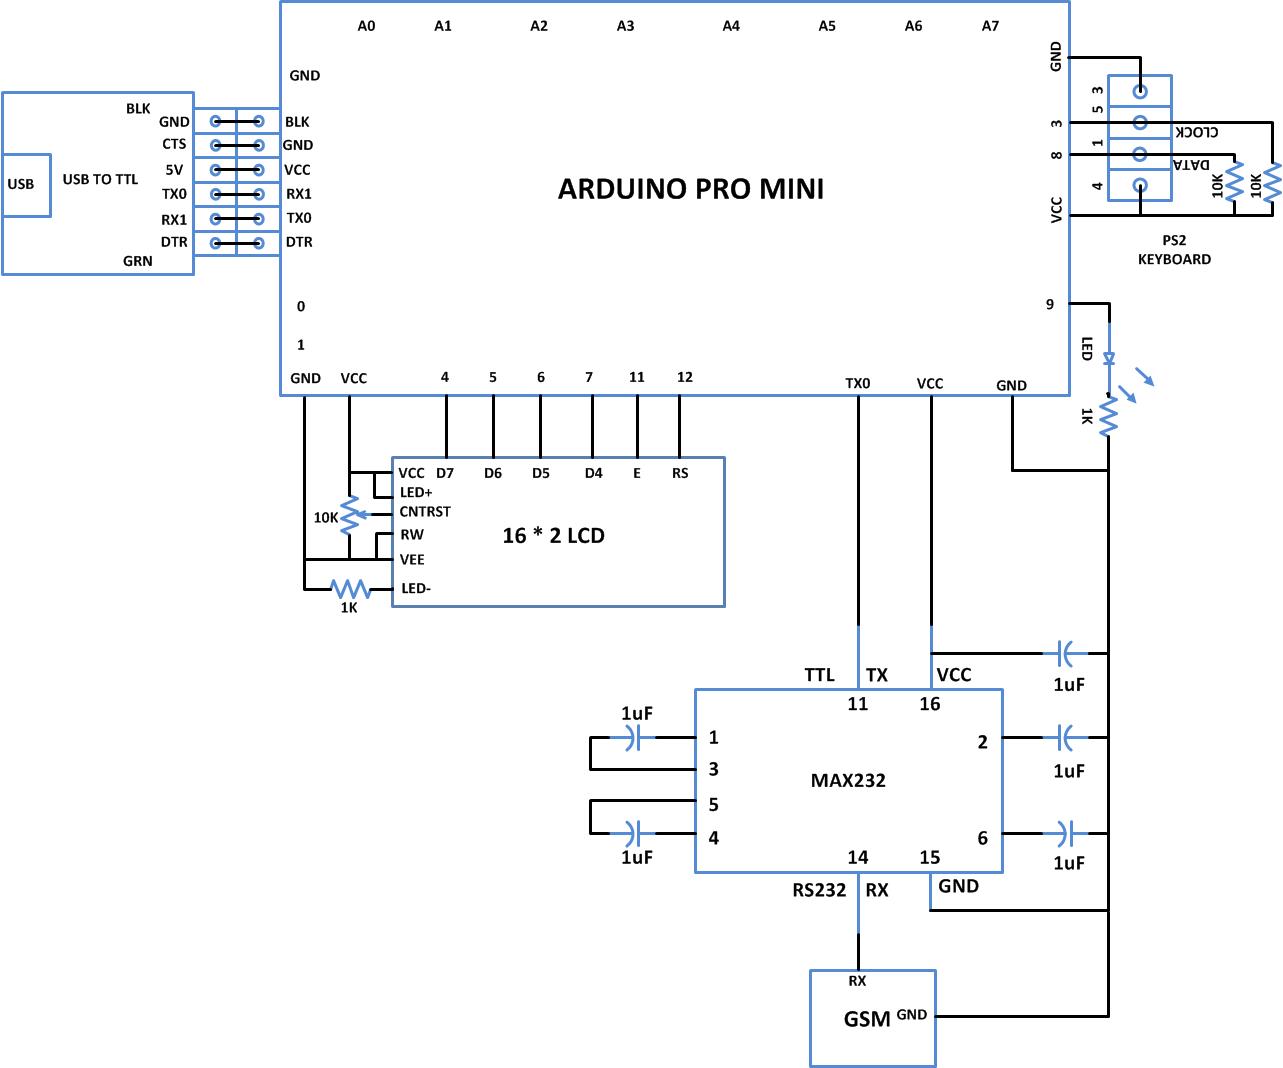 |
Componentes do Projeto
- Arduino ProMini
- Capacitor
- LCD
- LIDERADO
- MÁX232
Vídeo do projeto